Click the image to get a zoomed in view.
One of the cool things about LEGO® Trains is that the track is LEGO® and therefore clips onto other LEGO®, so it's very easy to make support pillars of any height you want. In the instruction manual LEGO® actually recommend against making inclines for some reason, but with a bit of care and attention it works fine, I've been building them for years.
At first glance it seems that the obvious way to make an incline is to raise the track by one LEGO® brick for every straight or curve piece. This sort of works and indeed the #4563 Euro Freight Line has no trouble climbing this slope but if you try the #4558 Euro Express or add more wagons to your train you will find that the driving wheels start to spin, especially if there are any curves involved in the incline. You will also find that trains go down this sort of slope at an outrageous speed!
Ideally, you should raise the track by only one plate (a third of a brick) per piece of track for a nice gentle incline. The trouble is, you need a frightening amount of track, supports and floorspace to achieve this.
A better solution is to only raise the track by two plates for each piece of track (i.e. 2/3 brick), all my trains can climb this slope. Another tip is to make the change in angle only gradually at each end of the slope by only changing the height by one plate for each piece of track. To put this slightly more mathematically, I have two rules
To start an incline immediately with 2 plates violates rule 2 because it goes straight from an angle of zero plates per piece of track to an angle of 2 plates per piece of track. So you need to go from level to 1 plate to 1 brick. This will become clearer in the diagram further on.
How high does the track need to be to make a bridge over another track? For the simplest case the answer is 12 bricks. Two sets don't clear this unfortunately, if you have the #4551 Austrian Federal Railways Locomotive the answer is 13, and if you have #4552 Track Repair Team the answer is 14. These numbers only cover the case where the bridge is simply a piece of track between two pillars. If you make an actual bridge structure where the track rests on something, a Technic beam for example, you will need to allow for correspondingly more bricks in the pillars.
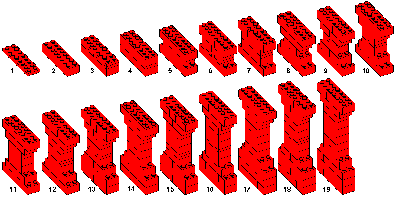
Here is a diagram of a complete set of pillars to make a single span bridge over another track. This shows the smooth profile that you get if you follow my rules.

The exact brick count is as follows, where x.y means x bricks and y plates.
| Column | Height |
| 1 | 0.1 |
| 2 | 1.0 |
| 3 | 1.2 |
| 4 | 2.1 |
| 5 | 3.0 |
| 6 | 3.2 |
| 7 | 4.1 |
| 8 | 5.0 |
| 9 | 5.2 |
| 10 | 6.1 |
| 11 | 7.0 |
| 12 | 7.2 |
| 13 | 8.1 |
| 14 | 9.0 |
| 15 | 9.2 |
| 16 | 10.1 |
| 17 | 11.0 |
| 18 | 11.2 |
| 19 | 12.0 |
I always place the pillars exactly under the joint between two pieces of track since this is the weakest point in terms of ability to carry weight and also because it makes the whole track much more rigid, i.e. it stops the track pulling itself apart.
Here is a drawing of some completed pillars, obviously you can build them however you like.

Click the image to get a zoomed in view.
An example plan using these pillars is shown in Figure of Eight with Bridge.
Points (switches) and inclines don't mix terribly well! They are an accident waiting to happen. There are two more rules to follow here. If you ignore them, many LEGO® people could die.
These rules should prevent your trains from derailing, but they don't mean you can't have fun, you can still have raised points for elevated junctions! I have even had junctions half way up an incline, you just have to flatten out the incline for a while where the junction is.