Section 05-02G: Axle, Integral Carrier, 8.8-Inch Ring Gear
1996 F-150 and Bronco Workshop Manual
REMOVAL AND INSTALLATION

Flange Yoke Seal and/or Universal Joint Flange, Rear Axle

 
SPECIAL SERVICE TOOL(S) REQUIRED
DescriptionTool Number
Companion Flange Holding ToolT78P-4851-A
Puller — Differential Side BearingT77F-4220-B1
Pinion Seal ReplacerT83T-4676-A
 

Removal

  1.  CAUTION: This operation disturbs the pinion bearing preload, and this preload must be carefully reset when assembling.

    NOTE: If rear axle drive pinion seal (4676) is leaking, check the rear axle housing vent (4022). If the axle housing vent is plugged with dirt or debris it will cause pressure buildup in the rear axle housing (4010) that can lead to rear axle drive pinion seal problems.

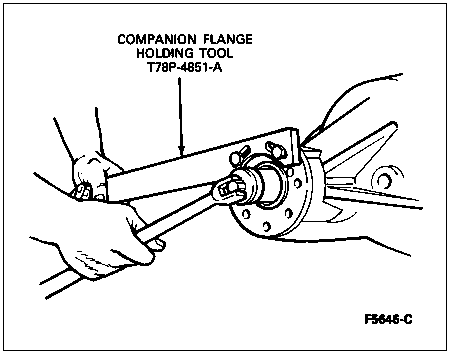
    Raise the vehicle and install safety stands. Remove the rear wheels and brake drums (1126) to prevent brake drag during drive pinion bearing preload adjustment.

  1. Mark the driveshaft axle end flange and the rear axle universal joint flange (4851) to make sure the driveshaft (4602) will be installed in its original position at time of assembly. Disconnect the driveshaft from the rear axle universal joint flange. Remove the driveshaft from the extension housing (7A039). Install an oil seal replacer tool in the extension housing to prevent oil leakage.

  1. Install an inch-pound torque wrench on the pinion nut. Record the torque required to maintain rotation of the pinion through several revolutions.

  1. While holding the rear axle universal joint flange with Companion Flange Holding Tool T78P-4851-A, remove the pinion nut.

  1. Clean the area around the rear axle drive pinion seal. Place a drain pan under the rear axle drive pinion seal, or raise the front of the vehicle higher than the rear.

  1. Mark the rear axle universal joint flange in relation to drive pinion shaft so rear axle universal joint flange can be reinstalled in the same position.

  1. Using Puller — Differential Side Bearing T77F-4220-B1, remove the rear axle universal joint flange. Place drain pan under axle pinion nose.

  1. Pry up on metal flange of rear axle drive pinion seal. Install gripping pliers and strike with hammer until rear axle drive pinion seal is removed.

  1.  CAUTION: Installation without the proper tool may result in seal failure. If rear axle drive pinion seal becomes misaligned during installation, remove it and install new one.

    Clean the seat surface of rear axle drive pinion seal. Install the rear axle drive pinion seal in the housing bore using Pinion Seal Replacer T83T-4676-A. Coat the lips of the rear axle drive pinion seal with Premium Long-Life Grease XG-1-C or -K or equivalent meeting Ford specification ESA-M1C75-B.


Installation

  1. Apply a small amount of lubricant to the rear axle companion flange splines.

  1.  CAUTION: The rear axle universal joint flange must never be hammered on or installed with power tools.

    NOTE: If a new rear axle universal joint flange is being installed, disregard the scribe mark on the pinion shaft.

    Align the mark on the rear axle universal joint flange with the mark on the pinion shaft.

  1. Install the rear axle universal joint flange using Companion Flange Replacer TOOL-4858-E or equivalent. Install a new pinion nut on the pinion stem.

  1. Hold the rear axle universal joint flange with Companion Flange Holding Tool T78P-4851-A while tightening the pinion nut.

  1. Tighten the pinion nut, rotating the pinion occasionally to make sure pinion bearing cone and roller assemblies seat properly. Take frequent torque preload readings until the original recorded preload reading is obtained.

  1. If the original recorded preload is lower than specification (used bearings: 0.9-1.5 Nm [8-14 lb-in], new bearings: 1.8-3.3 Nm [16-29 lb-in]) tighten to specification. If the preload is higher than specification, tighten to original reading as recorded in Step 3 of the removal procedure.

  1. Under no circumstances should the pinion nut be backed off to reduce preload. If reduced preload is required, a new collapsible spacer and pinion nut must be installed.

  1. Remove the oil seal replacer tool from the extension housing of the transmission. Install the driveshaft into the extension housing. Align the scribe marks on the rear axle companion flange and driveshaft end flange. Install the attaching bolts and tighten to 83-118 Nm (61-87 lb-ft).

  1. Check and add rear axle fluid. Refer to Lubricant Capacities in the Specifications portion of this section.

  1. Install rear brake drums. Refer to Section 06-02.

  1. Install rear wheels and tires. Refer to Section 04-04.

  1. Remove safety stands and lower vehicle. Road test.