Section 13-01: Instrument Cluster, Conventional | 1997 F-250 Heavy Duty, F-350 and F-Super Duty Motorhome Chassis Workshop Manual |
DIAGNOSIS AND TESTING
Instrument Cluster
Inspection and Verification
Visually inspect the components. Check for damaged components, blown fuses, loose or corroded connections. Check the wiring harness for obvious signs of shorts, opens, bad connections or damage.
Verify circuit operation. Verify speedometer and odometer operation by road testing the vehicle.
Possible malfunctions of the PSOM are:
- Inoperative speedometer or odometer. Refer to Pinpoint Test G.
- Improper operation, such as an erratic, jumpy or hesitating speedometer or scrambled digits on the odometer. Refer to Pinpoint Test H.
- Inaccuracy concerns, such as the odometer not indicating the proper mileage after traveling a known distance or the speedometer higher or lower than expected to travel a known distance in the proper amount of time. Refer to Pinpoint Test F.
- Loss of speed output signal to the powertrain control module, transmission or speed control. Refer to Pinpoint Test J.
Symptom ChartŚConventional Instrument Cluster
Refer to the Electrical and Vacuum Troubleshooting Manual for the connector numbers in the pinpoint tests.
NOTE: Use Rotunda 88 Digital Multimeter 105-00053 or equivalent to perform Pinpoint Tests.
Pinpoint Tests
PINPOINT TEST A: FUEL LEVEL READS INACCURATELY
A1 VERIFY POWER AT LOAD SIDE OF FUSE PANEL
- Key to RUN.
- Using Rotunda 88 Digital Multimeter 105-00053 or equivalent, verify system voltage at the load side of fuse.
Is the voltage greater than 10 volts?
A2 VERIFY POWER AT FEED SIDE OF FUSE PANEL
- Key to RUN.
- Using Rotunda 88 Digital Multimeter 105-00053 or equivalent, verify system voltage at the feed side of the fuse.
Is the voltage greater than 10 volts?
| Yes | No |
|---|
| REPLACE the fuse. | SERVICE the wiring to the fuse panel. |
A3 VERIFY POWER AT INSTRUMENT CLUSTER
- Have cluster connector(s) remain intact.
- Partially remove the instrument cluster from the instrument panel.
- Key to RUN.
- Using Rotunda 88 Digital Multimeter 105-00053 or equivalent, measure the voltage on the ignition wire at the instrument cluster connector C250 to ground.
Is the voltage greater than 10 volts?
| Yes | No |
|---|
| GO to A4. | SERVICE the ignition wire. |
A4 VERIFY GROUND CIRCUITRY AT CLUSTER
 CAUTION: Before checking the continuity of any circuit, make sure there is no voltage present in the circuit prior to switching the test equipment to the resistance function, to avoid damage to equipment. Refer to the test equipment user's manual for additional information.
- Using Rotunda 88 Digital Multimeter 105-00053 or equivalent, check the continuity of the ground wire at the instrument cluster connector C250 to ground.
Is the resistance less than 1 ohm?
| Yes | No |
|---|
| GO to A5. | SERVICE the wire to ground. |
A5 CHECK FUEL GAUGE (EMPTY)
- Key off.
- Disconnect the fuel gauge sending unit connector C440 (front) or C441 (rear).
- Connect one lead of the Rotunda Instrument Gauge System Tester 014-R1063 or equivalent to the fuel level sensor input wire at the fuel tank sending unit connector and the other lead to ground.
- Set the tester to 22 ohms.
- Key to RUN.
- Read the fuel gauge.
Does the fuel gauge read E (empty)?
A6 RECHECK FUEL GAUGE (EMPTY)
- Key off.
- Key to RUN.
- Tap on the instrument panel.
- Read the fuel gauge.
Does the fuel gauge read E (empty)?
| Yes | No |
|---|
| Except F-Super Duty Motorhome: REPLACE instrument cluster . F-Super Duty Motorhome: GO to A7. | GO to A9. |
A7 CHECK PRINTED CIRCUIT BOARD
- Key off.
- Disconnect instrument cluster connectors C250 and C251.
- Measure the resistance of the circuit between the SIG terminal of the fuel gauge and instrument cluster connector C250, Pin 5 and instrument cluster connector C251, Pin 6.
Is the resistance less than 1 ohm?
| Yes | No |
|---|
| GO to A8. | REPLACE instrument cluster. |
A8 CHECK FUEL GAUGE SENDING UNIT WIRE
- Key off.
- Disconnect the instrument cluster connectors C250 and C251 and the fuel tank sending unit connector C440 (front) or C441 (rear).
- Measure the resistance of the DB/Y wire (front) or Y/LB wire (rear) between the instrument cluster and the fuel level sensor.
Is the resistance less than 5 ohms?
| Yes | No |
|---|
| GO to A9. | SERVICE the DB/Y wire (front) or Y/LB (rear) wire between the instrument cluster and the fuel level sensor. |
A9 CHECK CHASSIS GROUND
- Key off.
- Leave instrument cluster and fuel level sensor disconnected.
- Measure the resistance of wire to chassis ground.
Is the resistance less than 5 ohms?
| Yes | No |
|---|
| SERVICE short to chassis ground. | GO to A10. |
A10 CHECK FUEL TANK SENDING UNIT GROUND
- Key off.
- Measure the resistance of the BK wire at the fuel level sensor connector C440 (front) or C441 (rear) to ground at battery.
Is the resistance less than 1 ohm?
| Yes | No |
|---|
| GO to A11. | SERVICE the BK wire from the fuel level sensor to ground. |
A11 FUEL TANK INSPECTION
- Inspect fuel tank for distortion or damage.
Is the fuel tank damaged?
| Yes | No |
|---|
| REPLACE fuel tank. REFER to Section 10-01A in the Powertrain, Drivetrain Manual. | GO to A12. |
A12 TEST BOX CHECK Ś EMPTY STOP
- Remove fuel tank sending unit from fuel tank.
- Connect one lead of Rotunda 88 Digital Multimeter 105-00053 or equivalent to the fuel sender signal lead and the other lead to fuel level sensor ground.
- Read multimeter when the float rod is against the empty stop (closest to fuel filter).
Does the multimeter read 14-18 ohms?
| Yes | No |
|---|
| GO to A13. | REPLACE fuel level sensor. REFER to Section 10-01A in the Powertrain, Drivetrain Manual. |
A13 TEST BOX CHECK Ś FULL STOP
- Connect one lead of Rotunda 88 Digital Multimeter 105-00053 or equivalent to the fuel sender signal lead and the other lead to fuel level sensor ground.
- Read multimeter when the float rod is against the full stop.
Does the multimeter read 154-162 ohms?
| Yes | No |
|---|
| GO to A14. | REPLACE fuel level sensor. REFER to Section 10-01A in the Powertrain, Drivetrain Manual. |
A14 TEST BOX CHECK Ś FLOAT ROD TRAVEL
- Connect one lead of a Rotunda 88 Digital Multimeter 105-00053 or equivalent to the fuel sending signal lead and the other lead to fuel level sensor ground.
- Move float rod slowly from FULL to EMPTY stop position.
Does multimeter reading decrease slowly?
| Yes | No |
|---|
| GO to A15. | REPLACE fuel level sensor. REFER to Section 10-01A in the Powertrain, Drivetrain Manual. |
A15 HARNESS CONNECTOR CHECK Ś EMPTY STOP
- Reattach all fuel indication connectors.
- Move float rod to empty stop position.
- Key to RUN.
- Read fuel gauge.
Does gauge read E (empty)?
| Yes | No |
|---|
| GO to A16. | GO to A7. |
A16 HARNESS CONNECTOR CHECK Ś FULL STOP
- Move float rod to full stop position.
- Key to RUN.
- Read fuel gauge.
Does gauge read F (full)?
| Yes | No |
|---|
| GO to A17. | GO to A7. |
A17 INSPECT FUEL SENDER
- Inspect float and float rod.
Is float rod distorted, hitting filter, filled with fuel or loose on float rod?
| Yes | No |
|---|
| REPLACE fuel level sensor. REFER to Section 10-01A in the Powertrain, Drivetrain Manual. | System OK. |
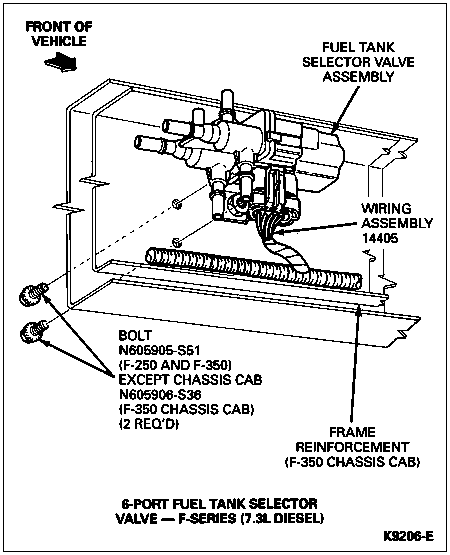
PINPOINT TEST B: NO FUEL LEVEL INDICATION, VEHICLES WITH DUAL TANKS (6 PORT FUEL SELECTOR VALVE 7.3L DIESEL)
B1 BYPASS TANK SELECTOR VALVE
- Disconnect fuel tank selector valve connector C423.
- Key to run.
- Jumper connector terminals No. 6 and No. 5 for rear fuel tank.
- Fuel gauge should indicate fuel level in rear fuel tank.
- Move selector switch to front tank.
- Jumper connector terminals No. 5 and No. 4 for front fuel tank.
- Fuel gauge should indicate fuel level in front fuel tank.
Does fuel gauge indicate fuel level in front and rear fuel tanks?
| Yes | No |
|---|
| REPLACE fuel tank selector valve. REFER to Section 10-01B in the Powertrain, Drivetrain Manual. | CHECK for damaged fuel gauge, fuel level sensor or wiring. SERVICE or REPLACE as necessary. |
PINPOINT TEST C: ENGINE COOLANT TEMPERATURE GAUGE INACCURATE/DOES NOT MOVE
C1 VERIFY POWER AT LOAD SIDE OF FUSE PANEL
- Key to run. Measure IP fuse No. 18 (15A) output, using Rotunda New Generation Star (NGS) Tester 007-00500 or equivalent.
Does voltage read between 10 and 15 volts?
| Yes | No |
|---|
| GO to C2. | REPLACE IP fuse No. 18 and RETEST. |
C2 VERIFY POWER AT INSTRUMENT PANEL
- Key to run.
- Measure voltage at engine coolant temperature sender input Circuit 640 (R/Y), using Rotunda NGS Tester 007-00500 or equivalent.
Does voltage read between 10 and 15 volts?
| Yes | No |
|---|
| GO to C3. | SERVICE Circuit 640 (R/Y) connection and RETEST. |
C3 MEASURE ENGINE COOLANT TEMPERATURE SENDER CIRCUIT 640 CONTINUITY
- Key off.
- Check continuity of Circuit 640 (R/Y) and a known good ground, using Rotunda NGS Tester 007-00500 or equivalent.
Does circuit have continuity?
| Yes | No |
|---|
| GO to C4. | SERVICE as required and RETEST. |
C4 CHECK GAUGE COLD CALIBRATION
- Key off.
- Disconnect engine coolant temperature sender connector C135 (gasoline) or C150 (diesel).
- Connect Rotunda Instrument Gauge System Tester 014-R1063 or equivalent to engine coolant temperature sender wiring connector.
- Set the tester at 74 ohms and turn key to run. Wait 60 seconds.
Does gauge read within COLD graduation?
C5 CHECK GAUGE HOT CALIBRATION
- Key off.
- Disconnect engine coolant temperature sender connector C135 (gasoline) or C150 (diesel).
- Connect Rotunda Instrument Gauge System Tester 014-R1063 or equivalent to engine coolant temperature sender wiring connector.
- Set the tester at 9.7 ohms and turn key to run. Wait 60 seconds.
Does gauge read within HOT graduation?
| Yes | No |
|---|
| GO to C6. | REPLACE engine coolant temperature sender. |
C6 CHECK GROUND CONNECTION
- Key off.
- Check resistance of engine coolant temperature sender hex Circuit 39 (R/W) and engine ground, using Rotunda NGS Tester 007-00500 or equivalent.
Does circuit resistance read less than 0.1 ohm?
| Yes | No |
|---|
| REPLACE engine coolant temperature sender. | CORRECT engine coolant temperature sender ground connection and RETEST. |
C7 CHECK FLEX CIRCUIT CONTINUITY
- Key off.
- Remove instrument cluster and check continuity between the cluster flex circuit and the engine coolant temperature gauge, using Rotunda NGS Tester 007-00500 or equivalent.
Does circuit resistance read less than 0.2 ohm?
| Yes | No |
|---|
| GO to C8. | CORRECT cluster flex circuit as required. RETEST. |
C8 CHECK FOR CORROSION/POOR CONNECTIONS
- Visually inspect the wiring harness connections for corrosion and poor connections.
Is there corrosion? Are there poor connections?
| Yes | No |
|---|
| SERVICE as required. | REPLACE engine coolant temperature gauge and RETEST. |
PINPOINT TEST D: OIL PRESSURE INDICATOR INACCURATE/DOES NOT MOVE
D1 VERIFY POWER AT LOAD SIDE OF FUSE PANEL
- Key to run.
- Measure IP fuse No. 18 (15A) output, using Rotunda NGS Tester 007-00500 or equivalent.
Does voltage read between 10 and 15 volts?
| Yes | No |
|---|
| GO to D2. | REPLACE IP fuse No. 18 and RETEST. |
D2 CHECK GAUGE FOR MID-SCALE GRADUATION
- Key off.
- Connect engine oil pressure switch connector C135 to engine block ground.
Does gauge read within mid-scale graduation or slightly above?
| Yes | No |
|---|
| GO to D3. | REPLACE oil pressure sender. |
D3 CHECK GROUND CONNECTION
- Key off.
- Check resistance of oil pressure switch connector C-135 to cluster connector C-257 using Rotunda NGS Tester 007-00500 or equivalent.
Does circuit resistance read less than 0.1 ohm?
| Yes | No |
|---|
| GO to D4. | REPAIR Circuit 31 (W/R) as required. |
D4 CHECK FLEX CIRCUIT CONTINUITY
- Key off.
- Remove instrument cluster and check continuity between the cluster flex circuit and the oil pressure gauge, using Rotunda NGS Tester 007-00500 or equivalent.
Does circuit resistance read less than 0.1 ohm?
| Yes | No |
|---|
| GO to D5. | CORRECT cluster flex circuit as required and RETEST. |
D5 CHECK FOR CORROSION/POOR CONNECTIONS
- Visually inspect the wiring harness connections for corrosion and poor connections.
Is there corrosion? Are there poor connections?
| Yes | No |
|---|
| REPAIR as required. | REPLACE oil pressure gauge and RETEST. |
PINPOINT TEST E: CHARGE INDICATION READS INACCURATELY
E1 VERIFY VOLTAGE GAUGE OPERATION
- Key to RUN, engine off.
- Headlamps on.
- Heater blower/fan on HIGH.
Does gauge pointer move toward the lower portion of the NORMAL BAND (white marked area)?
| Yes | No |
|---|
| GO to E2. | CHECK fuse and the battery-to-circuit breaker and circuit breaker-to-cluster wire connections. GO to E6. |
E2 VERIFY POWER AT LOAD SIDE OF FUSE PANEL
- Using Rotunda 88 Digital Multimeter 105-00053 or equivalent, verify system voltage at load side of warning indicator fuse.
Is system voltage present at load side of fuse?
E3 VERIFY POWER AT FEED SIDE OF FUSE PANEL
- Using Rotunda 88 Digital Multimeter 105-00053 or equivalent, verify system voltage at feed side of warning indicator fuse.
Is system voltage present at feed side of fuse?
| Yes | No |
|---|
| REPLACE fuse. | SERVICE wiring to fuse panel. |
E4 VERIFY POWER AT INSTRUMENT CLUSTER
- Partially remove instrument cluster from instrument panel. Using Rotunda 88 Digital Multimeter 105-00053 or equivalent, verify system voltage at instrument cluster connector C250, Pin 1.
Is voltage present at Pin 1?
| Yes | No |
|---|
| GO to E5. | SERVICE as required. |
E5 VERIFY GROUND CIRCUITRY AT INSTRUMENT CLUSTER
CAUTION: Before checking the continuity of any circuit, make sure there is no voltage present in the circuit prior to switching the test equipment to the resistance function to avoid damage to equipment.
- Refer to the test equipment user's manual for additional information.
- Using Rotunda 88 Digital Multimeter 105-00053 or equivalent, check continuity of instrument cluster and gauge ground circuitry.
Is ground circuitry good?
| Yes | No |
|---|
| GO to E6. | SERVICE as required. |
E6 CHECK INSTRUMENT CLUSTER PRINTED CIRCUIT CONTINUITY
CAUTION: Before checking the continuity of any circuit, make sure that there is no voltage present in the circuit prior to switching the test equipment to the resistance function to avoid damage to equipment. Refer to the test equipment user's manual for additional information.
- Check for instrument cluster printed circuit continuity and confirm flex circuit-to-clip and clip-to-gauge contact by physically flexing the wiring and observing continuity. Continuity reading should not fluctuate.
Are wiring and instrument cluster printed circuit OK?
| Yes | No |
|---|
| REPLACE instrument cluster. | SERVICE wiring or REPLACE the instrument cluster. |
PINPOINT TEST F: SPEEDOMETER/ODOMETER READS INACCURATELY
F1 CHECK SPEEDOMETER/ODOMETER CALIBRATION
- Refer to Speedometer Calibration Tolerance Specifications Table under Specifications in this section. Be sure to check the odometer calibration. If both the odometer and speedometer are incorrect in the same direction, it is usually a sign that the conversion constant, tire size, or speed sensor ring are different than programmed. A speedometer inaccurate with an accurate odometer is usually a problem with the speedometer module itself.
Are speedometer and odometer calibration within specified limits?
| Yes | No |
|---|
| Speedometer normal. | GO to F2. |
F2 CHECK FOR "NOT PROGRAMMED" MESSAGE
Does ERROR 3 message alternate with normal odometer display?
| Yes | No |
|---|
| GO to F5. RESET conversion constant. | GO to F3. |
F3 CHECK TIRE/AXLE CAPACITY
Are tires the same size on opposite ends of a common axle and properly inflated?
| Yes | No |
|---|
| DETERMINE conversion constant. GO to F4. | CORRECT condition or ADVISE customer. GO to F1. |
F4 VERIFY CONVERSION CONSTANT AND DISPLAY TYPE
- Check tire size and type or vehicle rear axle.
- Check whether the conversion constant in the speedometer is correct with the following procedure:
- Press and hold the RESET button on the front of the speedometer while turning the key to RUN.
- Release the RESET button. The pointer will prove out and some codes will appear on the odometer display. If an E is on the left side of the display, the module is programmed for English display mode and should have English graphics (mph). A lower case "o" signifies an overseas (metric) graphics (km/h). Verify the graphics and display modes agree. (The number appearing after the type is the microprocessor revision level and is not used in this test.)
- Press and release the RESET button again. The conversion constant and the word CAL will be shown on the odometer display.
- Verify the programmed conversion constant is the same as that displayed on the chart. Refer to Conversion Constants Charts under Specifications in this section.
- Key off.

Is the programmed conversion constant the same as that displayed on the chart and does the programmed display mode match the speedometer graphics?
| Yes | No |
|---|
| REPLACE instrument cluster as described in this section. VERIFY proper operation. | If conversion constant is wrong and programmed display mode OK, RESET conversion constant. REFER to Reset Conversion Constant in F5. If conversion constant is OK and programmed display mode wrong, REPLACE instrument cluster as described in this section. VERIFY proper operation. |
F5 RESET CONVERSION CONSTANT
NOTE: The module can only be reprogrammed six (6) times.
- Reprogram speed conversion constant using the following procedure:
- Locate the dealer mode programming enable connector C232. The connector is located at the bottom of the instrument panel below the center of the glove compartment. On all vehicles, the dealer mode enable wire is Circuit 567 (LB/Y).
- Insert metal clip in programming enable connector C232. Clip other end to vehicle ground while the key is in the OFF position.
- Key to RUN while holding down the trip odometer RESET button on speedometer. Release RESET button.
- Speedometer will prove out (sweep across dial and back). The English/Metric and revision levels will be displayed. The last number of the display is the dealer mode programming lockout count. This count shows the number of allowable conversion constant changes remaining. When the count is zero (0), no additional changes can be made to this instrument cluster. If a conversion constant change is required, a service instrument cluster must be ordered.
- Press and release RESET button again and PSOM conversion constant (without the decimal point) followed by the word CAL will be displayed.
- Press and release the odometer SELECT button as many times as necessary to change conversion constant to the correct value.
NOTE: Pressing and releasing the RESET button to lock in the new conversion constant reduces the number of times the PSOM can be reprogrammed by one count. The module can only be reprogrammed six times. If you change your mind and want to go back to the old conversion constant, turn the key off before you lock in the new constant.
- When the correct new value is displayed in odometer window, press and release the RESET button to lock in the new conversion constant.
- Key off. Remove the ground wire. Verify proper speedometer operation.
| Actual Speedometer or Odometer Value Indicated | 48 km/h (30 mph) Actual Speed | 97 km/h (60 mph) Actual Speed | Odometer Measure Over Actual 16.1 km Distance (10 miles) |
|---|
| Allowable Range | 45-55 km/h (28-34 mph) | 93-108 km/h (58-67 mph) | 15.4-16.6 km (9.6-10.3 miles) |
Is conversion constant now set to the desired value?
| Yes | No |
|---|
| Procedure complete. | GO to F4. |
PINPOINT TEST G: SPEEDOMETER/ODOMETER INOPERATIVE
G1 CHECK REAR ANTI-LOCK LAMP ILLUMINATION
Does anti-lock lamp on instrument panel go out after self-test?
G2 CHECK ODOMETER DISPLAY
Is odometer display on, and do digits appear normal?
G3 CHECK FOR PRESENCE OF ERROR MESSAGE
Does the word ERROR appear on the odometer display?
| Yes | No |
|---|
| REPLACE instrument cluster. VERIFY proper operation. | GO to G4. |
G4 CHECK ODOMETER OPERATION
Does the odometer display mileage increase with vehicle in motion or rear wheels turning?
G5 CHECK SPEEDOMETER OPERATION
Does speedometer indication increase with increasing vehicle speed?
| Yes | No |
|---|
| REPLACE instrument cluster. VERIFY proper operation. | GO to G8. |
G6 CHECK SPEEDOMETER POWER FUSES
- Remove and inspect battery power fuse (No. 8) and ignition power fuse (No. 18). Replace as required.
NOTE: If fuses are blown, replace with a new, intact fuse. If new fuse blows, determine cause and service as necessary.
If fuses are OK, do speedometer and odometer now operate properly?
| Yes | No |
|---|
| REPLACE instrument cluster. VERIFY proper operation. | GO to G7. |
G7 CHECK SPEEDOMETER CONNECTOR
- Verify ground on instrument cluster connector C250 Pin 3 and Instrument Cluster Connector C251 Pin 1 with key in RUN.
- Inspect instrument cluster connectors C250 and C251 and ensure proper fit. Inspect for loose or corroded terminals. Verify locking tabs are in place.
Is resistance less than 1 ohm?
| Yes | No |
|---|
| REPLACE the instrument cluster. | SERVICE wiring harness and fuses as required. VERIFY proper operation. |
G8 CHECK SPEED INPUT SIGNAL
NOTE: Only wiring harness end of connector is to be probed. Vehicle speed control can be used as a good indicator. If it works normally, then the speedometer module is at least receiving a speed input signal and the wiring and sensor can be assumed to be good.
- Connect Rotunda 88 Digital Multimeter 105-00053 or equivalent to Pin 4 (speed in +) and Pin 5 (speed in -).
Does the voltage increase smoothly and continuously from 0 to approximately 3.5 volts as vehicle speed increases from 0 to 48 km/h (0 to 30 mph)?
| Yes | No |
|---|
| REPLACE the instrument cluster. | SERVICE wiring. CHECK for open or shorted wiring. If no problems are found, REFER to Section 06-09. |
G9 CHECK SPEEDOMETER
Does speedometer indication increase with increasing vehicle speed?
| Yes | No |
|---|
| Normal operation. ADVISE customer. | REPLACE the instrument cluster. |
PINPOINT TEST H: SPEEDOMETER/ODOMETER IMPROPER OPERATION
H1 CHECK SPEEDOMETER OPERATION
- Is speedometer free from hesitation or sticking when accelerating or decelerating smoothly? This can be confirmed by performing the following test:
- Press and hold the RESET button on the front of the speedometer while turning the key to RUN.
- Release the RESET button.
Does the pointer smoothly prove out, or sweep from 0 to maximum speed then back to 0?
| Yes | No |
|---|
| GO to H2. | After verifying good power and ground connections, GO to G6. REPLACE instrument cluster. VERIFY proper operation. |
H2 CHECK ODOMETER DISPLAY
- The trip odometer must be currently displayed for the RESET button to work.
- If unsure about missing or extra segments, perform the odometer display self test as follows:
- Press and hold the reset button on the front of the speedometer while turning the key to RUN.
- Release the RESET button.
- Press and release the select button. The odometer will begin with all zeroes and step through the display test each time the select button is pushed. Refer to PSOM Display Test Sequence below for exact display.
- The first digit on the left does not always match the other digits.
- Key off to exit this test.

Are all odometer digits formed correctly (no extra or missing segments)? Do the select and reset buttons work normally?
| Yes | No |
|---|
| GO to H3. | REPLACE instrument cluster. VERIFY proper operation. |
H3 CHECK SPEEDOMETER POINTER
Does pointer jump or waver at a constant speed?
H4 CHECK RABS SPEED SENSOR RING AND SENSOR
- Check for presence of the following conditions.
- Damaged, missing or bent teeth
- Metal chips on speed sensor
- Open or shorted sensor
- Improper gap between sensor and speed sensor ring
- Refer to Section 06-09 for additional information.
Are any of the above conditions present?
| Yes | No |
|---|
| SERVICE or REPLACE as necessary. VERIFY proper operation. | REPLACE the instrument cluster. VERIFY proper operation. |
H5 CHECK FOR STUCK POINTER
Is pointer stuck at upper pointer stop?
| Yes | No |
|---|
| GO to H6. | Speedometer normal. |
H6 SPEEDOMETER POINTER PROVEOUT
- Press and hold the RESET button on the front of the speedometer while turning the key to RUN.
- Release the RESET button. The pointer would normally prove out, or sweep from the lower to upper pointer stop and back again. In this case, the pointer will "jump back" to where it should be in the sweep and continue to sweep normally when the pointer gets to within 180 degrees of the upper pointer stop (about 56 km/h [35 mph]).
- Key off.
Does the pointer return to the normal position?
| Yes | No |
|---|
| Speedometer normal. | REPLACE the instrument cluster. VERIFY proper operation. |
PINPOINT TEST J: SPEED CONTROL, PCM OR ELECTRONIC TRANSMISSION DISPLAY INOPERATIVE OR ERRATIC
NOTE: Follow this procedure only after being referred here from Section 10-03, 1996 Powertrain Control/Emissions Diagnosis Manual, or electronic transmission shop manual diagnostics.
J1 CHECK ANTI-LOCK LAMP ILLUMINATION
Does anti-lock lamp on dash go out after self-test?
J2 CHECK SPEEDOMETER SPEED OUTPUT SIGNAL
CAUTION: Before checking the continuity of any circuit, make sure there is no voltage present in the circuit prior to switching the test equipment to the resistance function to avoid damage to equipment. Refer to the test equipment user's manual for additional information.
- To determine if there is a short between the PSOM and the speed control module, the vehicle speed control can be used as a good indicator. If it works normally above 56 km/h (35 mph), this means that the speedometer module is at least receiving a speed input signal and the wiring and sensor can be assumed to be good.
NOTE: Only wiring harness end of connector is to be probed.
- Use ohmmeter to check for opens in wiring between Pin 7 (speed out) and the affected module. Verify that the terminals in PSOM wiring connector are completely seated in the connector.
Is the circuit open?
| Yes | No |
|---|
| SERVICE wiring between speedometer and affected module as required. VERIFY proper operation. | GO to J3. |
J3 CHECK SPEED INPUT SIGNAL
CAUTION: Make sure multimeter is in the voltage function and not in the resistance function to avoid damage to multimeter.
NOTE: Only wiring harness end of connector is to be probed.
- Connect Rotunda 88 Digital Multimeter 105-00053 or equivalent to Pin 4 (speed +) and Pin 5 (speed -).
- If available, a frequency counter can be connected to Pin 4 (speed in +) and Pin 5 (speed in -).
Does the displayed frequency of the signal increase smoothly and continuously from 0 to approximately 667 Hz at approximately 48 km/h (30 mph)? OR does the voltage increase smoothly and continuously from 0 to approximately 3.5 volts as vehicle speed increases from 0 to approximately 48 km/h (30 mph)?
| Yes | No |
|---|
| REPLACE instrument cluster. | SERVICE wiring. CHECK for open wiring. If no problems are found, REFER to Section 06-09. |
PINPOINT TEST K: TACHOMETER INOPERATIVE, ERRATIC, WRONG INDICATION, DIESEL ENGINE
K1 CHECK FUSE
Is fuse blown?
| Yes | No |
|---|
| REPLACE fuse. If fuse blows again, CHECK for short in circuit. | GO to K2. |
K2 CHECK WIRING
- Check for loose wiring connections in engine compartment or at instrument cluster.
Are connections loose?
| Yes | No |
|---|
| SECURE loose connections. | GO to K3. |
K3 CHECK INSTRUMENT CLUSTER PRINTED CIRCUIT
- Inspect instrument cluster printed circuit for damage, poor connections or open circuits.
Is instrument cluster printed circuit open or damaged?
| Yes | No |
|---|
| REPLACE instrument cluster. | GO to K4. |
K4 MAKE RESISTANCE/VOLTAGE CHECKS
CAUTION: Before checking the continuity of any circuit, make sure there is no voltage present in the circuit prior to switching the test equipment to the resistance function to avoid damage to equipment. Refer to the test equipment user's manual for additional information.
- Remove instrument cluster and make resistance and voltage checks at instrument cluster connector C250 as follows:
- Check Pin No. 3 resistance to chassis ground Ś should read 1 ohm or less.
- Check Pin No. 9 resistance to corresponding terminal of diesel sensor mating connector or powertrain control module (PCM) pin Ś should be 1 ohm or less.
- On vehicles equipped with E4OD transmission, check sensor wires to powertrain control module (PCM) module for 1 ohm or less. Perform powertrain control module (PCM) test.
CAUTION: Make sure multimeter is in the voltage function and not in the resistance function to avoid damage to multimeter.
- Connect battery. Key to RUN. Check for +12 volts at Pin No. 13 (of Connector A). Key off. Disconnect battery.
Are resistances/voltages within specifications?
| Yes | No |
|---|
| Condition is not in tachometer. SERVICE wiring. | RETURN to K1 and RETEST. |
PINPOINT TEST L: TACHOMETER INOPERATIVE, ERRATIC, WRONG INDICATION, GASOLINE ENGINE
L1 CHECK FUSE
Is fuse blown?
| Yes | No |
|---|
| REPLACE fuse. If fuse blows again, CHECK for short in circuit. | GO to L2. |
L2 CHECK WIRING
- Check for loose wiring connections in engine compartment or at instrument cluster.
Are connections loose?
| Yes | No |
|---|
| SECURE loose connections. | GO to L3. |
L3 CHECK INSTRUMENT CLUSTER PRINTED CIRCUIT
- Inspect instrument cluster printed circuit for damage, poor connections, or open circuits.
Is instrument cluster printed circuit open or damaged?
| Yes | No |
|---|
| REPLACE instrument cluster. | GO to L4. |
L4 MAKE RESISTANCE/VOLTAGE CHECKS
CAUTION: Before checking the continuity of any circuit, make sure there is no voltage present in the circuit prior to switching the test equipment to the resistance function to avoid damage to equipment. Refer to the equipment user's manual for additional information.
- Remove instrument cluster and make resistance and voltage checks (using Rotunda 88 Digital Multimeter 105-00053 or equivalent) at instrument cluster connector C250 as follows:
- Check Pin No. 3 resistance to chassis ground Ś should read 1 ohm or less.
- Check Pin No. 10 resistance to chassis ground Ś should read 1 ohm or less, if vehicle has 8-cylinder engine. Open circuit if 6-cylinder engine.
- Check Pin No. 9 resistance to negative terminal of ignition coil should be 1 ohm or less.
CAUTION: Make sure multimeter is in the voltage function and not in the resistance function to avoid damage to multimeter.
- Connect battery. Key to RUN. Check for +12 volts at Pin No. 13. Turn ignition off. Disconnect battery.
Are resistances/voltages within specifications?
| Yes | No |
|---|
| Condition is not in tachometer. SERVICE wiring. | REPLACE tachometer. |
PINPOINT TEST M: ALL WARNING INDICATORS INOPERATIVE
M1 TEST FUSE
- Key off.
- Remove fuse and test for continuity using Rotunda 88 Digital Multimeter 105-00053 or equivalent.
Does fuse test OK?
| Yes | No |
|---|
| REINSTALL fuse. GO to M2. | REPLACE fuse. VERIFY indicators operation. |
M2 TEST FUSE PANEL VOLTAGE IN
- Key off.
- Place Rotunda 88 Digital Multimeter 105-00053 or equivalent in volts position.
- Connect meter to fuse panel feed Circuit 16 (R/LG) and perform voltage test.
Does circuit indicate a short or open?
| Yes | No |
|---|
| SERVICE or REPLACE circuit as necessary. VERIFY system operation. | GO to M3. |
M3 TEST INSTRUMENT CLUSTER FEED CIRCUIT
- Key off.
- Connect Rotunda 88 Digital Multimeter 105-00053 or equivalent to instrument cluster feed circuit at fuse panel output and instrument cluster input.
- Key to RUN and test feed circuit for voltage.
Does feed circuit test OK?
| Yes | No |
|---|
| REPLACE instrument cluster. | SERVICE or REPLACE feed circuit wiring or connectors as necessary. |
PINPOINT TEST N: BRAKE WARNING NEVER/ALWAYS ON
N1 CHECK BRAKE WARNING INDICATOR
- Key to RUN.
- Observe brake warning indicator for proveout.
Does brake warning indicator function properly?
| Yes | No |
|---|
| System OK. | If system light illuminates and stays on, GO to N2. If system light does not illuminate, GO to N6. |
N2 CHECK PARK BRAKE
- Release park brake.
- Check to be sure parking brake switch releases.
- Key to RUN.
Does brake warning indicator function correctly?
| Yes | No |
|---|
| System OK. | GO to N3. |
N3 CHECK BRAKE FLUID LEVEL
- Move vehicle to a level surface.
- Key off.
- Open hood and brake master cylinder reservoir.
- Check brake fluid level.
Is brake fluid level low?
| Yes | No |
|---|
| REFILL brake master cylinder reservoir with Ford High Performance DOT 3 Brake Fluid C6AZ-19542-AA or equivalent DOT 3 fluid meeting Ford specification ESA-M6C25-A. CHECK indicator operation. | GO to N4. |
N4 TEST PARK BRAKE SWITCH
- Key off.
- Connect Rotunda 88 Digital Multimeter 105-00053 or equivalent to park brake switch.
- Key to RUN and release park brake.
- Check for voltage through park brake switch.
Is there voltage through park brake switch?
| Yes | No |
|---|
| REPLACE park brake switch. CHECK for binding of park brake cable. SERVICE or REPLACE as necessary. | GO to N5. |
N5 CHECK FOR WIRE TO WIRE SHORTS
- Key off.
- Inspect wiring for frayed or exposed wiring.
- Check instrument cluster connector C251, park brake switch connector C276 and brake warning indicator connector C202 for damage.
Is any wiring or connector damage indicated?
| Yes | No |
|---|
| SERVICE or REPLACE damaged component as necessary. | REFER to Electrical and Vacuum Troubleshooting Manual for additional information on system wiring diagrams. |
N6 TEST FUSE
- Key off.
- Remove fuse and test for continuity using Rotunda 88 Digital Multimeter 105-00053 or equivalent.
Does fuse test as having continuity?
| Yes | No |
|---|
| REINSTALL fuse. GO to N7. | REPLACE fuse. CHECK system for proper operation. |
N7 CHECK INDICATOR LAMP
- Key off.
- Remove brake warning indicator lamp.
- Test brake warning indicator lamp for continuity using Rotunda 88 Digital Multimeter 105-00053 or equivalent.
Does indicator lamp show continuity?
| Yes | No |
|---|
| REINSTALL indicator lamp. GO to N8. | REPLACE indicator lamp. CHECK system operation. |
N8 TEST FOR FUSE PANEL FEED VOLTAGE
- Key off.
- Place volt-ohmmeter in the volts position.
- Connect meter to fuse panel voltage input side and a known good ground.
- Turn key to RUN position.
Does fuse panel show feed or input voltage?
| Yes | No |
|---|
| GO to N9. | LOCATE and SERVICE short or open in circuit. |
N9 TEST BRAKE WARNING FEED CIRCUITS FOR SHORTS OR OPENS
- Connect Rotunda 88 Digital Multimeter 105-00053 or equivalent to each feed circuit individually and test for short or open circuits. Refer to Electrical and Vacuum Troubleshooting Manual for wiring schematics.
Are any shorts or opens located?
| Yes | No |
|---|
| SERVICE or REPLACE damaged circuit as necessary. | GO to N10. |
N10 TEST RETURN CIRCUIT
- Key off.
- Place Rotunda 88 Digital Multimeter 105-00053 or equivalent in the ohms position.
- Test return Circuit 57 (BK) for continuity.
Does return circuit test as having continuity?
| Yes | No |
|---|
| GO to N11. | SERVICE or REPLACE as necessary. |
N11 TEST INSTRUMENT CLUSTER PRINTED CIRCUIT
- Key off.
- Test continuity of the instrument cluster printed circuit using Rotunda 88 Digital Multimeter 105-00053 or equivalent.
Does instrument cluster printed circuit test OK?
| Yes | No |
|---|
| REFER to Section 06-00 for additional brake system service and the Electrical and Vacuum Troubleshooting Manual for additional wiring information. | REPLACE instrument cluster. |
PINPOINT TEST P: CHARGE SYSTEM WARNING NEVER/ALWAYS ON
P1 TEST INDICATOR LAMP
- Key off.
- Remove indicator lamp and test for continuity using Rotunda 88 Digital Multimeter 105-00053 or equivalent.
Does indicator lamp test OK?
| Yes | No |
|---|
| REINSTALL lamp. GO to P2. | REPLACE lamp. VERIFY proper operation. |
P2 TEST FEED CIRCUITS
- Perform voltage test on Circuits 16 (R/LG), 904 (LG/R) and 38 (BK/O) using Rotunda 88 Digital Multimeter 105-00053 or equivalent. Refer to Electrical and Vacuum Troubleshooting Manual.
Are shorts or opens indicated?
| Yes | No |
|---|
| SERVICE or REPLACE circuits or connectors as necessary. | REFER to Electrical and Vacuum Troubleshooting Manual or Section 14-00 in this manual for additional information on charging system. |
PINPOINT TEST Q: HIGH BEAM WARNING NEVER/ALWAYS ON
Q1 TEST INDICATOR LAMP
- Remove indicator lamp from instrument cluster.
- Test continuity of indicator lamp using Rotunda 88 Digital Multimeter 105-00053 or equivalent.
Does indicator lamp have continuity?
| Yes | No |
|---|
| REINSTALL indicator lamp. GO to Q2. | REPLACE indicator lamp. CHECK indicator for proper operation. |
Q2 CHECK FEED CIRCUITS
- Connect Rotunda 88 Digital Multimeter 105-00053 or equivalent to feed Circuits 38 (BK/O), 15 (R/Y), 12 (LG/BK) and 932 (GY/W) and test each for shorts or opens.
Are short or open circuits found?
| Yes | No |
|---|
| SERVICE or REPLACE circuit(s) wiring as necessary. | GO to Q3. |
Q3 CHECK RETURN CIRCUIT
- Key off.
- Check return Circuit 57 (BK) for continuity using Rotunda 88 Digital Multimeter 105-00053 or equivalent.
Does return circuit test as having continuity?
| Yes | No |
|---|
| GO to Q4. | SERVICE or REPLACE return circuit as necessary. TEST system for correct operation. |
Q4 TEST INSTRUMENT CLUSTER PRINTED CIRCUIT
- Place Rotunda 88 Digital Multimeter 105-00053 in ohms position.
- Key off.
- Test printed circuit for continuity.
Does printed circuit have continuity?
| Yes | No |
|---|
| REFER to Electrical and Vacuum Troubleshooting Manual for testing procedures of multi-function switch. | REPLACE instrument cluster. |
PINPOINT TEST R: SAFETY BELT WARNING NEVER/ALWAYS ON
R1 TEST INDICATOR LAMP
- Remove indicator lamp from instrument cluster.
- Test lamp for continuity using Rotunda 88 Digital Multimeter 105-00053 or equivalent.
Does indicator lamp test as having continuity?
| Yes | No |
|---|
| REINSTALL indicator lamp. GO to R2. | REPLACE indicator lamp. CHECK system for proper operation. |
R2 TEST FUSE
- Remove fuse from panel.
- Test fuse for continuity using Rotunda 88 Digital Multimeter 105-00053 or equivalent.
Does fuse test as having continuity?
| Yes | No |
|---|
| REINSTALL fuse. GO to R3. | REPLACE fuse. CHECK system for proper operation. |
R3 TEST SAFETY BELT SWITCH FOR SHORT
- Place Rotunda 88 Digital Multimeter 105-00053 or equivalent in volts position.
- Connect meter to Circuits 85 (BR/LB) and 57 (BK) at switch.
- Fasten safety belt buckles.
- Key to RUN.
- Check for voltage through safety belt switch.
Does meter show voltage through switch?
| Yes | No |
|---|
| REPLACE safety belt switch. REFER to Electrical and Vacuum Troubleshooting Manual. | GO to R4. |
R4 TEST SAFETY BELT SWITCH FOR OPEN
- Place Rotunda 88 Digital Multimeter 105-00053 or equivalent in volts position.
- Connect meter to Circuits 85 (BR/LB) and 57 (BK) at switch.
- Unfasten safety belt buckles.
- Key to RUN.
- Check for voltage through safety belt switch.
Does meter show voltage through switch?
| Yes | No |
|---|
| GO to R5. | REPLACE safety belt switch. REFER to Electrical and Vacuum Troubleshooting Manual. |
R5 CHECK FOR VOLTAGE AT SAFETY BELT WARNING INDICATOR
- Place Rotunda 88 Digital Multimeter 105-00053 or equivalent in volts position.
- Connect volt-ohmmeter to feed Circuit 450 (DG/LG) and return Circuit 57 (BK) at safety belt warning indicator.
- Key to RUN.
Is at least 12 volts present?
| Yes | No |
|---|
| REFER to Section 13-09 for additional diagnostic information. | GO to R6. |
R6 TEST FEED CIRCUIT
- Place volt-ohmmeter in volts position.
- Perform voltage test on feed Circuit 640 (R/Y).
Does feed circuit indicate a short or open?
| Yes | No |
|---|
| SERVICE or REPLACE feed circuit wire as necessary. | GO to R7. |
R7 TEST WARNING CHIME MODULE
- Perform voltage test on warning chime module at Circuits 640 (RY) and 57 (BK). Refer to Electrical and Vacuum Troubleshooting Manual.
Does warning chime module test OK?
| Yes | No |
|---|
| GO to R8. | REPLACE warning chime module. CHECK system for proper operation. |
R8 TEST FEED CIRCUIT TO INDICATOR
- Place volt-ohmmeter in volts position.
- Perform voltage test on Circuit 450 (DG/LG).
Does circuit indicate a short or open?
| Yes | No |
|---|
| SERVICE or REPLACE feed circuit wire as necessary. | GO to R9. |
R9 TEST RETURN CIRCUIT
- Key off.
- Place volt-ohmmeter in ohms position.
- Test Circuit 57 (BK) for continuity.
Does meter indicate continuity through return circuit?
| Yes | No |
|---|
| REFER to Section 13-09 for additional diagnostic information. | SERVICE or REPLACE return circuit wire as necessary. |
Component Tests
CAUTION: During in-vehicle tests, do not let tester terminal studs designated by arrows come in contact with vehicle ground. The gauge will be shorted to the ground, preventing an accurate test and possibly damaging the gauge.
Disconnect connector from the appropriate sender and hook onto the matching terminals on the tester.
Turn the vehicle ignition switch lock cylinder (11582) to ON position.
Fuel Gauge, F-250, F-350
If only the fuel gauge is inoperative or appears to be out of calibration, a calibration test can be conducted on the vehicle fuel gauge system.
Fuel Tank Sending Unit
With the sending unit float arm in the empty stop position, resistance should be 15 ohms (below E). With the sending unit float arm in the full stop position, resistance should be 160 ohms (above F). The fuel gauge should read empty at 22.5 ohms and full at 145 ohms.
Fuel Tank Second Sending Unit Test, Dual Tanks
On aft/axle (standard) fuel tank, the fuel sender electrical connector can be disconnected and attached to a second test sender outside the fuel tank. The float can then be manually operated (up and down) while the fuel gauge operation is observed. Proper gauge function indicates a problem with the fuel tank sending unit located in the fuel tank. Improper operation indicates a problem with the fuel tank gauge or wiring. Refer to Pinpoint Test A in this section.
Fuel Tank Damage
If fuel indicating system components are functioning properly and inaccurate indications continue, check the fuel tank for distorted fuel tank sending unit mounting angle or damaged fuel tank sending unit. Make sure the fuel delivery module (FDM) is the correct model for the vehicle and that the FDM is not contacting the bottom of the fuel tank. Also inspect the vent hoses for kinks or obstructions.
Coolant Temperature Gauge
Check gauge calibration as follows:
- Using a Rotunda Instrument Gauge System Tester 014-R1063 or equivalent, with the key in the OFF position, disconnect wiring connector at the sender and connect tester to wiring connector.
- Set the tester to 74 ohms.
- Turn the key to RUN, and wait 60 seconds. The gauge should indicate on the COLD graduation.
- Set the tester to 9.7 ohms and wait 60 seconds. The gauge should indicate on the HOT graduation.

- If engine coolant temperature gauge tests within calibration, replace engine coolant temperature sender.
- If engine coolant temperature gauge still tests out of calibration, replace coolant temperature gauge.
Oil Pressure Sender
Check gauge operation as follows:
- With the key in RUN and the engine off, disconnect wiring connector at the switch. The gauge should indicate on the LOW graduation or below.
- Connect the wiring connector to the engine block ground. The gauge should indicate just slightly above mid-scale.
- If the oil pressure gauge tests within calibration, replace oil pressure switch.
- If the gauge still tests out of calibration, replace oil pressure gauge.
Battery Voltage Gauge
Test the battery voltage gauge as follows:
- Turn the key to RUN, turn the headlamps on, and set the heater blower/fan on high with the engine (6007) stopped. The gauge pointer should move toward the lower portion of the normal band (the white marked area).
- If no movement of needle is observed, check the fuse and the battery-to-circuit breaker and circuit breaker-to-cluster wire connections.
- If connections are tight and wire continuity is good, remove the instrument cluster from the vehicle.
- Check for flex circuit continuity and confirm flex circuit-to-clip and clip-to-gauge contact.
- If all connections are good, replace the instrument cluster.
Charge Indicator Lamp System
Normal Charge Indicator
With key off, charge indicator (battery symbol) lamp is off.
With key in RUN (engine not running), charge indicator (battery symbol) lamp is on.
With key in RUN (engine running), charge indicator (battery symbol) lamp is off.
If the charge indicator lamp does not light with the key in the RUN position (engine not running), check the I wiring circuit (ignition switch to regulator I terminal), for an open circuit or burned-out charge indicator lamp.
If the charge indicator lamp does not light, disconnect the wiring plug connector at the regulator and connect a jumper wire from the I terminal of the regulator wiring plug to the negative battery post cable clamp.
The charge indicator lamp should light when the key is turned to RUN (engine not running).
If the charge indicator bulb does not light, check the bulb for continuity and replace if necessary.
If the bulb is not burned out, an open circuit exists between the ignition switch (11572) and the voltage regulator.
Check the 500-ohm resistor across the charge indicator lamp.
For additional diagnosis and testing procedures, refer to Section 14-00.