Disconnect the fuel supply lines from the rear of both cylinder heads (6049).
| Item | Part Number | Description |
|---|---|---|
| 1 | 9350 | Fuel Pump |
| 2 | 9B254 | Fuel Line Fitting |
| 3 | 9A564 | Fuel Supply Line Assembly |
| 4 | 9R549 | Banjo Bolt |
| 5 | 9B253 | Fuel Line Fitting |
Section 03-01D: Engine, Diesel, 7.3L | 1996 F-Series Workshop Manual |
| Description | Tool Number |
|---|---|
| Injector Remover/Replacer Set | T94T-9000-AH |
| Injector Remover | T94T-9000-AH1 |
| Injector Replacer | T94T-9000-AH2 |
Removal
Disconnect battery ground cables (14301).
Remove the radiator (8005). Refer to Section 03-03.
Recover refrigerant. Refer to Section 12-00.
Remove the two crankcase breather screws and the crankcase breather.
Disconnect the air conditioning compressor electrical connectors.
Remove the four A/C compressor mounting bracket retaining bolts.
Disconnect the vacuum hose at the brake vacuum pump (2A451).
Disconnect the air conditioning manifold lines from the A/C compressor (19703).
Remove the power steering lines from the power steering pump (3A674).
Remove the A/C compressor mounting bracket (2882) and accessories as an assembly.
Remove the valve cover bolts and the valve cover (6582).
Disconnect the electrical connectors from the valve cover gasket (6584).
Disconnect the electrical connectors from the fuel injectors (9F593) and glow plugs.
Remove the valve cover gasket.
Drain fuel water separator.
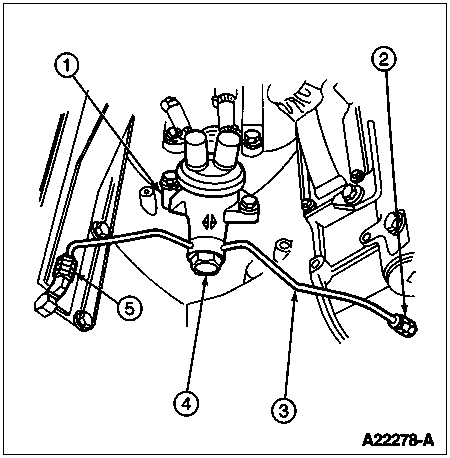
Disconnect the fuel supply lines from the rear of both cylinder heads (6049).
| Item | Part Number | Description |
|---|---|---|
| 1 | 9350 | Fuel Pump |
| 2 | 9B254 | Fuel Line Fitting |
| 3 | 9A564 | Fuel Supply Line Assembly |
| 4 | 9R549 | Banjo Bolt |
| 5 | 9B253 | Fuel Line Fitting |
Remove the banjo bolt from the fuel line at the fuel pump (9350).
Remove the fuel supply line assembly.
Remove the fuel line nut from the intake manifold stud.
Disconnect the fuel return line from the left cylinder head.
Remove the high pressure oil pump supply line from the left cylinder head.
Raise the vehicle.
Remove the left turbocharger exhaust inlet pipe bolts from the exhaust manifold (9430).
Lower the vehicle.
![]() CAUTION: Failure to remove the oil rail drain plugs prior to removing the fuel injectors will allow oil to enter the combustion chamber and could result in hydrostatic lock and severe engine damage.
CAUTION: Failure to remove the oil rail drain plugs prior to removing the fuel injectors will allow oil to enter the combustion chamber and could result in hydrostatic lock and severe engine damage.
Remove the oil rail drain plugs.
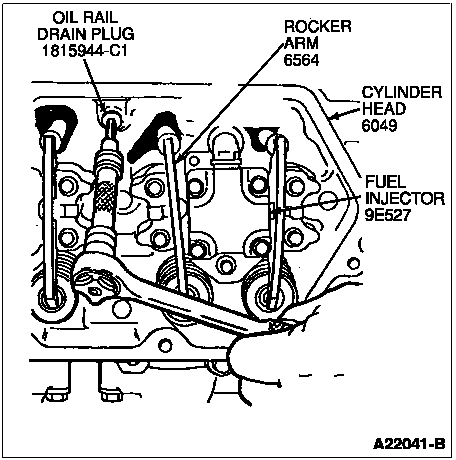
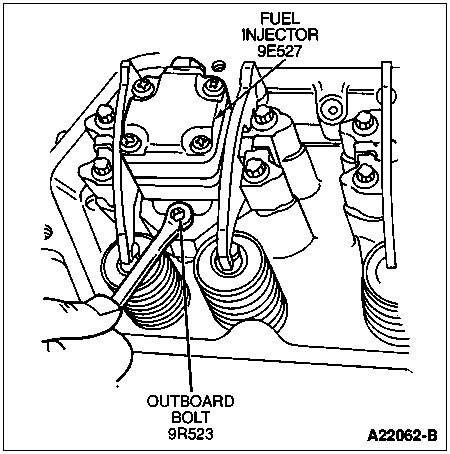
Remove the four outboard fuel injector hold-down bolts, oil deflector screws and oil deflectors.
![]() CAUTION: Make sure to retrieve the fuel injector copper washer, located at the tip of the fuel injector, during removal.
CAUTION: Make sure to retrieve the fuel injector copper washer, located at the tip of the fuel injector, during removal.
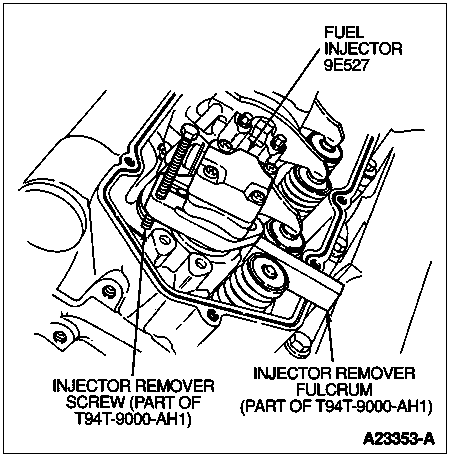
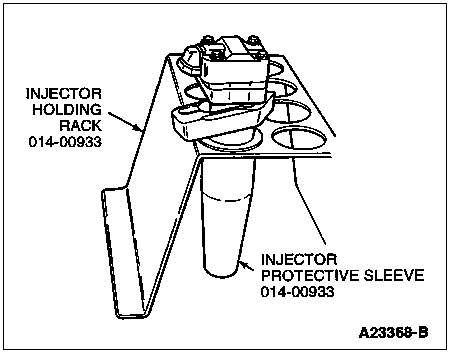
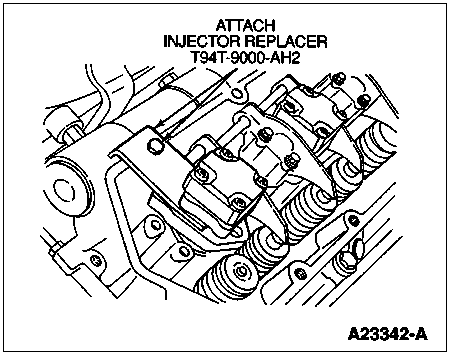
Remove the fuel injectors using Injector Remover T94T-9000-AH1. Position injector remover fulcrum beneath fuel injector hold-down plate and over edge of cylinder head. Install injector remover screw in threaded hole of fuel injector plate as shown. Tighten injector remover screw to lift fuel injector out of fuel injector bore. Discard copper washer. Place fuel injector in Rotunda Injector Protective Sleeve 014-00933 or equivalent and set fuel injector in Rotunda Injector Holding Rack 014-00933 or equivalent.
![]() CAUTION: Failure to remove oil and fuel from fuel injector bores could result in hydrostatic lock and severe engine damage.
CAUTION: Failure to remove oil and fuel from fuel injector bores could result in hydrostatic lock and severe engine damage.
With fuel injectors removed, vacuum oil and fuel from fuel injector bores using Rotunda Vacuum Pump 014-R1058 or equivalent.
Remove the rocker arm (6564) and push rods (6565).
Remove the four glow plugs.
Remove the left turbocharger exhaust inlet pipe retaining nuts and disconnect turbocharger exhaust inlet pipe from exhaust manifold.
Remove the upper air cleaner housing and zip tube.
Remove the main engine harness connectors in the left fender well and position harness assembly aside.
Remove the four inboard fuel injector shoulder bolts.
Remove the cylinder head bolts.
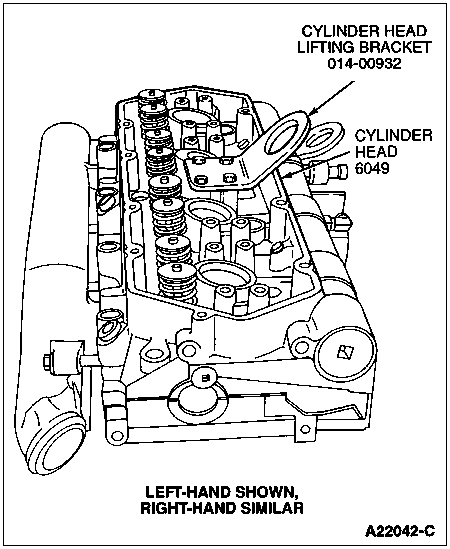
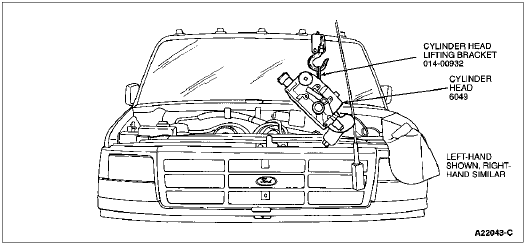
Install the Rotunda Cylinder Head Lifting Bracket 014-00932 or equivalent.
Remove the cylinder head and head gasket.
Cylinder Head Removal
Clean the cylinder block mating surface.
Clean the cylinder head mating surface.
Inspect the cylinder head and cylinder block deck. Refer to Cylinder Heads, Inspection and Cylinder Head Flatness in the Cleaning and Inspection portion of this section.
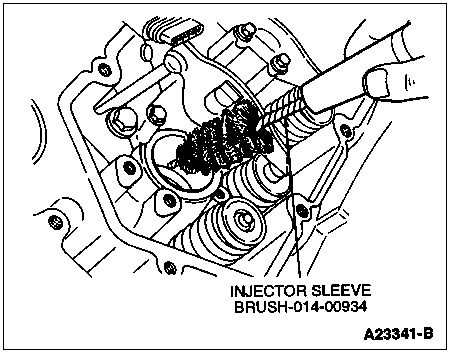
To ensure a good seat for the fuel injector O-rings, clean fuel injector bore using Rotunda Injector Sleeve Brush 014-00934 or equivalent. Clean any debris from fuel injector bore.
Installation
Install head gasket over dowel sleeves and onto the cylinder head surface.
Install the cylinder head. Take care to not damage the head gasket.
![]() CAUTION: Do not use too much engine oil on the threads or damage to the threads and poor sealing may result. Do not use anti-seize compound, grease or any other lubricants other than engine oil on the cylinder head bolt threads. They will affect the true torque value reading of the bolts.
CAUTION: Do not use too much engine oil on the threads or damage to the threads and poor sealing may result. Do not use anti-seize compound, grease or any other lubricants other than engine oil on the cylinder head bolt threads. They will affect the true torque value reading of the bolts.
Lightly lubricate the cylinder head retaining bolt threads and flanges with clean engine oil.
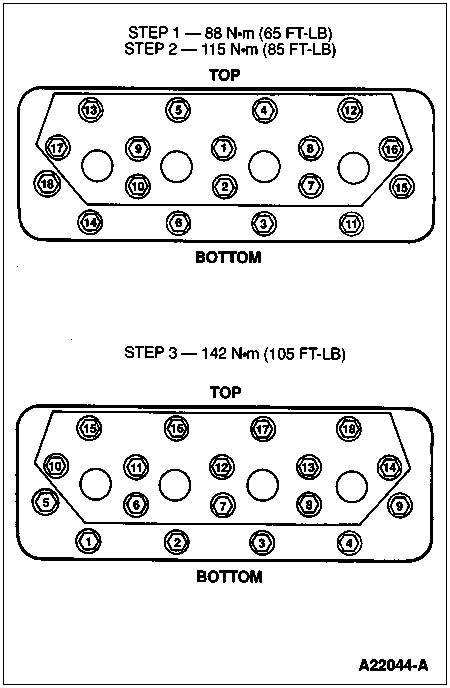
Install the cylinder head retaining bolts in sequence and tighten to the specified torque in three steps. Refer to the following illustration.
Remove the Rotunda Cylinder Head Lifting Bracket 014-00932 or equivalent.
Install the four inboard fuel injector hold-down bolts and tighten shoulder bolts to 12 Nm (120 lb-in).
![]() CAUTION: Failure to follow the next step of this procedure could result in bent valves, causing severe engine damage.
CAUTION: Failure to follow the next step of this procedure could result in bent valves, causing severe engine damage.
Rotate the engine until the mark on the crankshaft vibration damper (6316) is at 11 o'clock to prevent valve damage when installing the rocker arm.
Install the rocker arms and push rods (copper end up). Tighten the rocker arm bolts (6A527) to 27 Nm (20 lb-ft).
Install the fuel injectors. Lubricate the injector O-rings with clean engine oil. Carefully push injectors square into bore using hand pressure only to seat the injector O-rings. Position open end of Injector Replacer T94T-9000-AH2 between fuel injector body and fuel injector hold-down plate, while positioning opposite end of tool over edge of cylinder head. Align hole in tool with threaded hole in cylinder head and install bolt from tool kit. Tighten bolt to fully seat fuel injector in bore, then remove bolt and tool.
Install the four outboard fuel injector hold-down bolts. Tighten the bolts to 13.6 Nm (120 lb-in).
Install the four oil deflectors and deflector bolts. Tighten the bolts to 12 Nm (106 lb-in).
Install the oil drain plugs to the cylinder head. Tighten oil rail drain plugs to 6 Nm (53 lb-in).
Install the valve cover gasket. Connect the electrical connectors.
Install the left valve cover and bolts. Tighten the bolts to 11 Nm (97 lb-in).
Connect the engine wiring harness assembly connectors.
Install the upper air cleaner housing and zip tube.
Install the left turbocharger exhaust inlet pipe.
Raise vehicle.
Loosely install the left turbocharger exhaust inlet pipe-to-exhaust manifold bolts and nuts.
Lower vehicle.
Install the return fuel line block screws to the left cylinder head.
Connect the fuel return line to the front of the left cylinder head.
Install the high pressure oil pump supply line to the left cylinder head.
Install the fuel line nut to the intake manifold stud.
Install the fuel supply line.
Install the banjo bolt through the fuel supply line into fuel pump. Tighten banjo bolt to 55 Nm (40 lb-ft).
Connect the fuel supply lines at the rear of the cylinder heads.
Install the A/C compressor mounting bracket and accessories as an assembly.
Install the power steering lines to the power steering pump.
Connect the air conditioning manifold lines to the A/C compressor.
Connect the vacuum pump hose to the vacuum pump.
Install the four A/C compressor mounting bracket retaining bolts. Tighten bolts to 40-55 Nm (30-40 lb-ft).
Connect the air conditioning compressor electrical connectors.
Install the crankcase breather assembly and screws. Tighten screws to standard torque specifications listed in Torque Specifications at the end of this section.
Install the radiator. Refer to Section 03-03.
NOTE: When the battery has been disconnected and reconnected, some abnormal drive symptoms may occur while the powertrain control module (PCM) (12A650) relearns its adaptive strategy. The vehicle may need to be driven 16 km (10 miles) or more to relearn the strategy.
Connect battery ground cables.