Section 04-01B: Suspension, Front, 4-Wheel Drive
1996 F-150, F-250, F-350 4x4 and Bronco Workshop Manual
REMOVAL AND INSTALLATION

Axle Pivot Bracket, F-150 and Bronco

Refer to illustration under Spring, Coil, F-150 and Bronco, in the Removal and Installation portion of this section.

Removal

  1. Raise vehicle on a hoist. Place a tall jack under the axle arm near the front axle bearing bracket (3K090) and slowly raise the vehicle so axle is supported by the jack.

  1. Remove the axle-to-bracket retainer bolt and nut.

  1. If necessary, pry the axle out of the front axle bearing bracket. Raise the hoist slowly to disengage the axle from the front axle bearing bracket.

  1. If necessary, raise the engine to provide access to the vertical fasteners in the top of the front crossmember (5019). Refer to the appropriate engine section in Group 03.

  1. Remove and discard all bearing bracket-to-crossmember fasteners. Remove the front axle bearing bracket.

Installation

  1. NOTE: The two rearward vertical fasteners must be installed with bolt heads adjacent to the engine oil pan to maintain required clearance. The bolt and retainer assembly must be installed with bolt heads on the inside of the bearing bracket surface.

    Position the front axle bearing bracket to the front crossmember. Loosely assemble the bolts, retainer assembly and nuts. Do not tighten at this time.

  1. To ensure correct positioning of the front axle bearing bracket, tighten in two stages.

  1. Lower the hoist until the axle engages the front axle bearing bracket. Install the bolt and nut. Tighten to 213-288 Nm (157-211 lb-ft).

  1. Remove the jack and lower the vehicle.
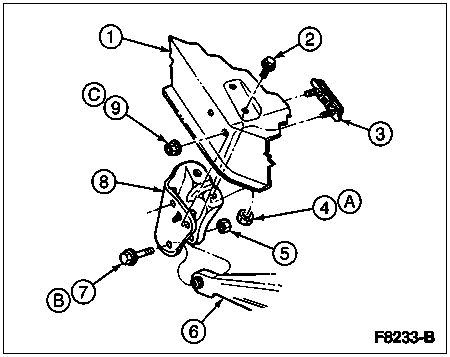


    ItemPart NumberDescription
    15019Crossmember
    2802114Bolt
    3802246Bolt
    4802073Nut
    5620604Nut
    63002Left Axle Arm
    7801079Bolt
    83K090Axle Pivot Bracket
    9802073Nut
    ATighten to 104-148 Nm
    (77-109 Lb-Ft)
    BTighten to 213-287 Nm
    (157-211 Lb-Ft)
    CTighten to 88-118 Nm
    (65-87 Lb-Ft)