![]() CAUTION: Keep the vent breather pointing up to prevent oil leakage onto parking brake shoes during storage and handling.
CAUTION: Keep the vent breather pointing up to prevent oil leakage onto parking brake shoes during storage and handling.
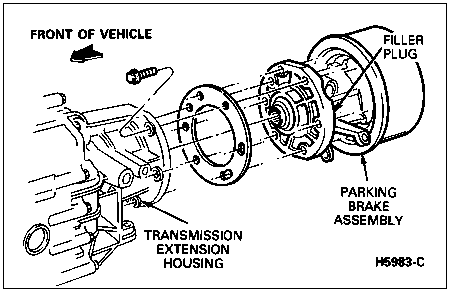
Remove the complete parking brake assembly from the transmission.
Section 06-05: Brake System, Parking | 1996 Bronco, F-150, F-250, F-350, F-Super Duty Chassis Cab and Motorhome Chassis Vehicles Workshop Manual |
Removal
Place the transmission (7003) in gear and release the parking brake control (2780). The front parking brake cable and conduit (2853) must be in the fully released position.
Raise and support the vehicle.
Disconnect and remove the speedometer cable from the left-hand side of the parking brake assembly.
Apply a penetrating oil such as Penetrating Lubricant E8AZ-195A501-B or equivalent to the adjusting clevis, jam nut and the threaded end of the front parking brake cable and conduit.
Loosen the jam nut and remove the locking pin from the clevis pin.
Remove clevis pin and clevis from the parking brake assembly.
Remove front parking brake cable and conduit from the bracket on the transmission case (7005).
Remove the bolts attaching the driveshaft (4602) to the parking brake assembly output flange.
Disconnect the driveshaft and position it out of the way. Wire driveshaft up to the frame (5005).
Remove the six hex-head bolts attaching the parking brake assembly to the transmission extension housing.
![]() CAUTION: Keep the vent breather pointing up to prevent oil leakage onto parking brake shoes during storage and handling.
CAUTION: Keep the vent breather pointing up to prevent oil leakage onto parking brake shoes during storage and handling.
Remove the complete parking brake assembly from the transmission.
Installation
If a new parking brake assembly is ordered through Ford Parts and Service Division, a container of Motorcraft MERCON® Multi-Purpose Automatic Transmission Fluid XT-2-QDX or MERCON® equivalent is also provided as part of the kit. This fluid is to be used to fill the parking brake assembly once the assembly is installed onto the transmission.
Using two guide bolts or drift pins, attach the parking brake assembly to the transmission splined output shaft (7060) and transmission extension housing.
![]() CAUTION: Do not reuse old bolts.
CAUTION: Do not reuse old bolts.
Install six new hex-head bolts (part number N605804-S100) to attach parking brake assembly to the transmission extension housing. Tighten the bolts to 34-57 Nm (25-42 lb-ft).
With the parking brake assembly installed, fill the parking brake assembly with Motorcraft MERCON® Multi-Purpose Automatic Transmission Fluid XT-2-QDX or -DDX or MERCON® equivalent to the bottom of the filler hole. Install and tighten the filler plug to 35-40 Nm (26-29 lb-ft).
Attach the driveshaft to the parking brake assembly output flange and tighten the bolts to 20-27 Nm (15-20 lb-ft).
Install the front parking brake cable and conduit into the mounting bracket, and snap into position.
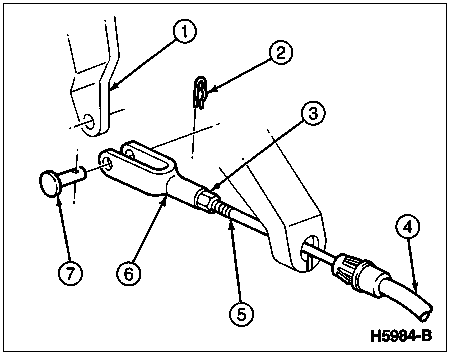
| Item | Part Number | Description |
|---|---|---|
| 1 | Ś | Actuating Arm (Part of 2598) |
| 2 | 352358-S2 | Self-Locking Pin |
| 3 | Ś | Jam Nut (Part of 2598) |
| 4 | 2853 | Front Parking Brake Cable and Conduit |
| 5 | Ś | Threaded End (Part of 2853) |
| 6 | Ś | Clevis (Part of 2853) |
| 7 | 76007-S8 | Clevis Pin |
Screw the jam nut and adjusting clevis onto the threaded end of the front parking brake cable and conduit.
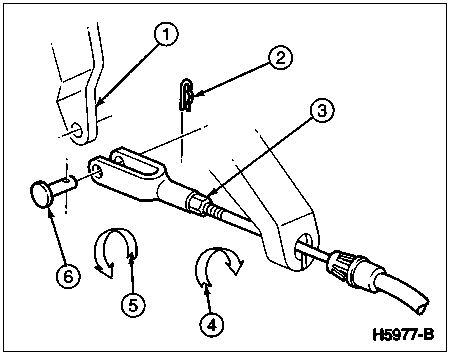
| Item | Part Number | Description |
|---|---|---|
| 1 | Ś | Actuating Arm (Part of 2598) in Applied Position |
| 2 | 352358-S2 | Self-Locking Pin |
| 3 | Ś | Jam Nut (Part of 2853) Loosened |
| 4 | Ś | Cable Lengthening Direction |
| 5 | Ś | Cable Shortening Direction |
| 6 | 76007-S8 | Clevis Pin |
Hold parking brake actuating lever in the applied position. Turn adjusting clevis onto cable in a clockwise direction.
Insert clevis pin through actuating lever and adjusting clevis, while holding cable tight.
Remove the clevis pin. Rotate the clevis 10 full turns in the counterclockwise (loosening) direction to lengthen the cable about 12mm (0.5 inch).
Install clevis pin and locking pin.