Section 07-03B: Transmission, Manual, Model S5-47 ZF | 1996 F-Series Vehicles Over 8500 lbs. GVW Workshop Manual |
Place the transmission (7003) on a transmission jack such as Rotunda Transmission Jack 164-R3506 or equivalent. Secure the transmission to the jack. Install guide studs in the engine (6007) and raise the transmission until the splines of input shaft (7017) are aligned with the splines of clutch disc (7550). The clutch release hub and bearing must be properly positioned in the clutch release lever (7515).
Slide the transmission forward on the guide studs until it is in position on the engine. Install the attaching bolts and tighten them to 53-72 Nm (39-53 lb-ft). Remove the guide studs and install the two remaining attaching bolts.
Install the transmission support crossmember (6A023) as described in Section 02-03. Position the insulator and retainer between the transmission and transmission support crossmember. Install bolts and tighten to 60-80 Nm (45-60 lb-ft).Install the nut retaining the insulator and retainer to transmission support crossmember. Tighten to 68-94 Nm (50-70 lb-ft). Remove the transmission jack.
Connect the clutch linkage. Refer to Section 08-02.
Connect the backup lamp switch (15520).
On F-Super Duty series vehicles, install the transmission parking brake. Refer to Section 06-05 in the Body, Chassis manual.
Install the driveshaft. Refer to Section 05-01.
Fill the transmission with Motorcraft MERCON® Multi-Purpose Automatic Transmission Fluid, XT-2-QDX or -DDX or MERCON® equivalent. Remove safety stands and lower the vehicle.
For vehicles equipped with 7.3L diesel engine, use Synthetic MERCON® E6AZ-19582-B, or equivalent Multi-Purpose Automatic Transmission Fluid meeting Ford specification ESR-M2C163-A2.
On diesel engines, install bolt retaining engine charge exhaust pipe to transmission housing. Tighten bolt to 54-68 Nm (40-50 lb-ft).
CAUTION: Do not use any sealant on gasket.
Place a new, dry gasket on the upper surface of the shift lever housing. Place the shift lever with the attached guide pieces into the guide piece grooves. The slotted ends of these guide pieces must face upward.

Tighten the four Allen-head capscrews that secure the shift lever boot retainer to the shift lever housing to approximately 10 Nm (7 lb-ft).
Install the upper shift lever to the lower shift lever and tighten the two retaining screws to 22-33 Nm (16-24 lb-ft).
Install the inner shift lever boot and the shift lever boot retainer to the opening cover of transmission.
Install the shift lever knob on the upper shift lever if removed.

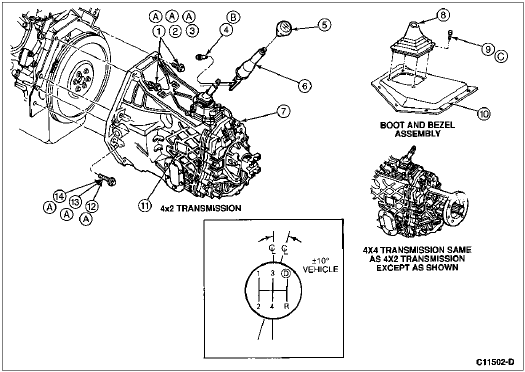
| Item | Part Number | Description |
|---|---|---|
| 1 | 385739 | Bolt, 7/16-14 x 1.62; 4.9L/5.8L |
| 2 | 57661 | Bolt, 7/16-14 x 1.5; 7.5L |
| 3 | N808234 | Bolt, M12-1.75 x 70; 7.3L |
| 4 | N605906 | Bolt |
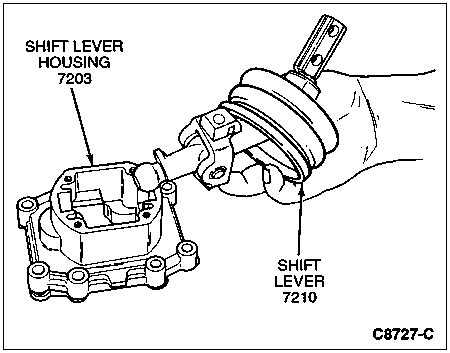
| 5 | 7213 | Shift Lever Knob |
| 6 | 7210 | Shift Lever |
| 7 | 7003 | Transmission |
| 8 | 7277 | Shift Lever Boot |
| 9 | N610959 | Bolt |
| 10 | 12110 | Transmission Floor Cover Plate |
| 11 | — | Transmission I.D. Plate (Part of 7003) |
| 12 | 57664 | Bolt, 7/16-14 x 2.25; 4.9L/5.8L |
| 13 | 57666 | Bolt, 7/16-14 x 2.75; 7.5L |
| 14 | N808235 | Bolt, M12-1.75 x 110; 7.3L |
| A | — | Tighten to 53-72 Nm (39-53 Lb-Ft) |
| B | — | Tighten to 22-23 Nm (16-24 Lb-Ft) |
| C | — | Tighten to 5-9 Nm (44-80 Lb-In) |