Section 10-01B: Fuel Tank, Filters, Tubes and Fuel Pump, Diesel Engine | 1996 F-Series and F-Super Duty Vehicles Equipped with Diesel Engines Workshop Manual |
REMOVAL AND INSTALLATION
Fuel Tank(s)
Steel Midship, F-250, F-350 and F-Super Duty Chassis Cab
NOTE: Since there are different midship fuel tanks (9002) which are removed and installed essentially the same way, follow steps and refer to appropriate illustration for details.
Removal
NOTE: When the battery (10655) is disconnected and reconnected, some abnormal drive symptoms may occur while the powertrain control module (PCM) (12A650) relearns its adaptive strategy. The vehicle may need to be driven 16 km (10 miles) or more to relearn the strategy.
Disconnect battery ground cable (14301).
Using Rotunda Fuel Storage Tanker 164-R3201 or equivalent, drain fuel tank.
If equipped with skid plate, remove fasteners and remove skid plate assembly.
Disconnect fuel tank sending unit electrical connector.
Loosen clamps and disconnect fuel filler hose and overflow hose at fuel tank.
Position suitable jack under fuel tank.
Remove nuts and bolts and lower straps. If necessary, turn strap approximately 30 degrees and remove.
Lower fuel tank enough to gain access to fuel connections.
Disconnect fuel vapor hose and fill vent hose from vapor valve.
Disconnect fuel supply and return tubes according to instructions for Steel Push Connectors in this section.
Remove fuel tank from vehicle.
Installation
Follow removal procedures in reverse order.
Tighten the fuel tank strap bolts and nuts to 30-40 Nm (22-30 lb-ft).
Tighten fuel tank bracket to frame nut to 21-29 Nm (16-21 lb-ft).
Tighten fuel tank skid plate bolts and nuts to 16-24 Nm (12-18 lb-ft).
NOTE: When the battery is disconnected and reconnected, some abnormal drive symptoms may occur while the powertrain control module relearns its adaptive strategy. The vehicle may need to be driven 16 km (10 miles) or more to relearn the strategy.
Connect battery ground cable.
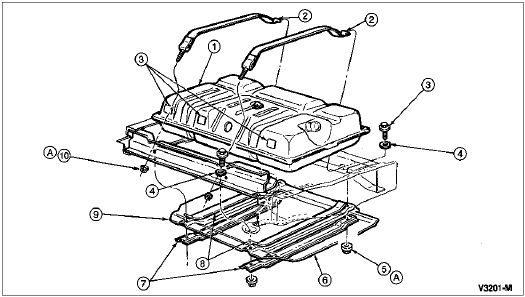
Steel Midship Fuel Tank Installation, F-250, F-350 and F-Super Duty Chassis Cab, 133-, 136.8-, 155- and 160.8-Inch Wheelbase
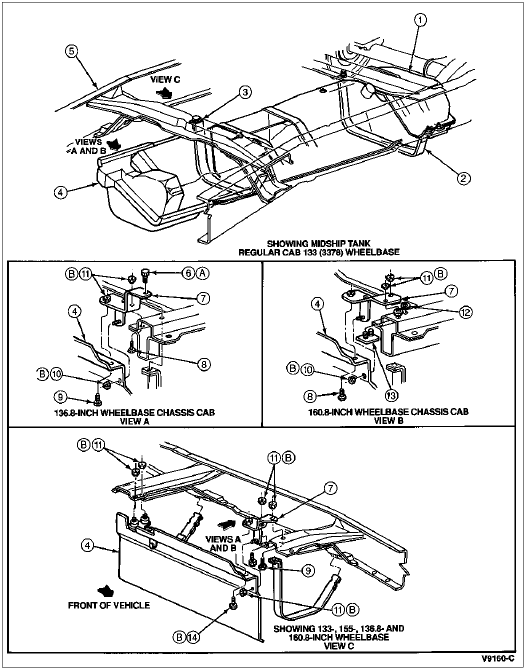
| Item | Part Number | Description |
| 1 | 9002 | Fuel Tank |
| 2 | 9092 | Fuel Tank Support Strap, Rear |
| 3 | 9092 | Fuel Tank Support Strap, Front |
| 4 | 9K014 | Shield |
| 5 | 5005 | Frame |
| 6 | N802253-S2 | Bolt |
| 7 | 9K037 | Bracket |
| 8 | N606689-S2 | Screw and Washer |
| 9 | N605906-S36 | Bolt |
| 10 | N803826-S56 | Nut and Washer |
| 11 | N620481-S2 | Nut |
| 12 | W623464-S2 | Nut, Push-On |
| 13 | 5R132 | Bolt |
| 14 | N605906-S36 | Bolt |
| A | — | Tighten to 30-40 Nm
(22-30 Lb-Ft) |
| B | — | Tighten to 16-24 Nm
(12-18 Lb-Ft) |
Steel Midship Fuel Tank Installation, F-250, F-350 4x4, 133-, 136.8-, 155- and 160.8-Inch Wheelbase
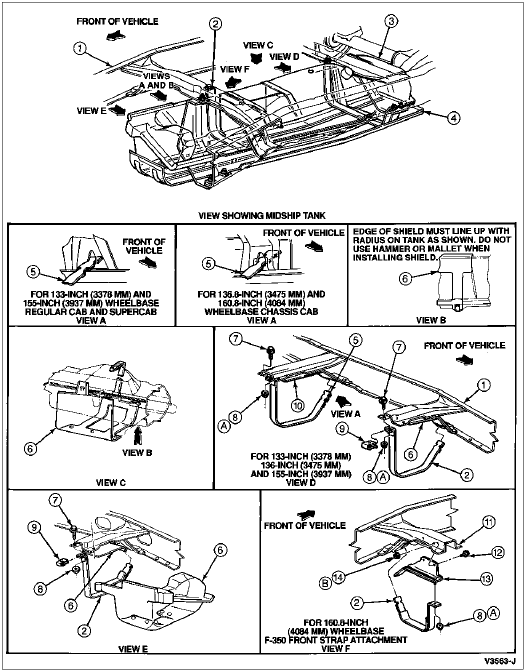
| Item | Part Number | Description |
| 1 | 5005 | Frame |
| 2 | 9092 | Fuel Tank Support Strap |
| 3 | 9002 | Fuel Tank |
| 4 | 9A148 | Skid Plate |
| 5 | 9092 | Fuel Tank Support Strap |
| 6 | 9K014 | Shield |
| 7 | N802253-S2 | Bolt |
| 8 | N620482-S2 | Nut |
| 9 | N801107-S100 | U-Nut |
| 10 | 9240 | Insulator, Upper |
| 11 | — | Crossmember, No. 3A
(Part of 5005) |
| 12 | N605906-S2 | Bolt |
| 13 | 9065 | Bracket |
| 14 | N620481-S2 | Nut |
| A | — | Tighten to 30-40 Nm
(22-30 Lb-Ft) |
| B | — | Tighten to 21-29 Nm
(16-21 Lb-Ft) |
Steel Midship Fuel Tank Skid Plate Installation, F-250, F-350 4x4, 133-, 155- and 161-Inch Wheelbase
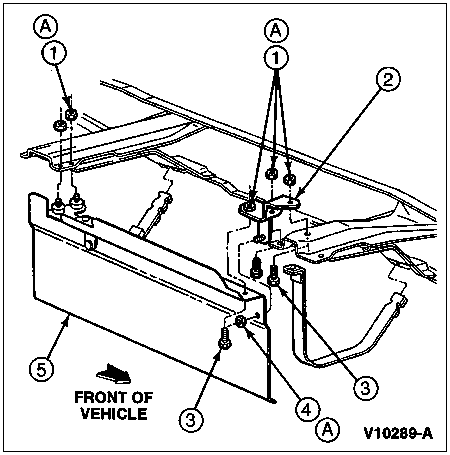
| Item | Part Number | Description |
| 1 | N620481-S2 | Nut, M8-1.25 |
| 2 | 9K037 | Bracket Assembly |
| 3 | N605906-S36 | Bolt, M8-1.25 |
| 4 | N803826-S60 | Nut and Washer, M8-1.25 |
| 5 | 9K014 | Shield Assembly |
| A | — | Tighten to 16-24 Nm
(12-18 Lb-Ft) |
Plastic Midship, 4x4
Removal
 WARNING: DISCONNECT THE BATTERY GROUND CABLES FROM BOTH BATTERIES PRIOR TO SERVICING THE FUEL SYSTEM, OR BODILY INJURY AND VEHICLE DAMAGE DUE TO POSSIBLE ELECTRICAL SPARKING AND POSSIBLE FIRE HAZARD MAY OCCUR.
Disconnect the battery ground cables on both batteries.
Using Rotunda Fuel Storage Tanker 164-R3201 or equivalent, drain fuel tank.
Remove skid plate and fuel tank heat shields (9A032).
Loosen fuel filler hose clamp at the fuel tank and disconnect the fuel filler hose.
Position suitable jack under fuel tank. Remove nuts from fuel tank support straps (9092) and lower fuel tank enough to gain access to hoses.
Disconnect the fuel tank sending unit wire at the fuel tank.
Disconnect the fuel tube push connect fittings at fuel tank sending unit.
Disconnect fuel vapor hose from fuel vapor valve.
Remove fuel tank from vehicle.
Installation
Install jack under fuel tank and raise fuel tank enough to start the tank neck into the filler hose.
Connect fuel vapor hose to fuel vapor valve.
Connect the fuel tube push connect fittings at the fuel tank sending unit.
Position and secure fuel filler hose on fuel tank filler neck. Make sure the inner hose is not twisted or kinked inside tank neck and filler pipe. Tighten hose clamp to 3-4 Nm (27-35 lb-in).
Connect the fuel tank sending unit wire.
Position fuel tank in vehicle and install front and rear fuel tank support straps. Tighten rear strap bolt to 30-40 Nm (22-30 lb-ft). Tighten front strap nut to 34-46 Nm (25-34 lb-ft).
Position fuel tank heat shield on fuel tank retaining strap studs and tighten attaching nuts to 16-24 Nm (12-18 lb-ft).
Position fuel tank support strap in vehicle and secure it to the frame (5005) with attaching bolts. Tighten to 16-24 Nm (12-18 lb-ft).
Position skid plate in vehicle and secure the skid plate and fuel tank support strap to frame with attaching bolts and nuts. Tighten to 16-24 Nm (12-18 lb-ft).
NOTE: When the battery is disconnected and reconnected, some abnormal drive symptoms may occur while the powertrain control module relearns its adaptive strategy. The vehicle may need to be driven 16 km (10 miles) or more to relearn the strategy.
Connect battery ground cables at both batteries.
Fill the fuel tank and check all connections for leaks.
Plastic Midship Fuel Tank Installation, F-Series 4x4 with E4OD, 133- and 155-Inch Wheelbase
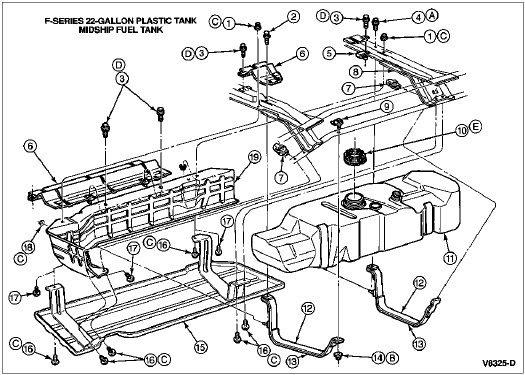
| Item | Part Number | Description |
| 1 | N620481-S2 | Nut |
| 2 | N802253-S2 | Bolt |
| 3 | N605892-S2 | Bolt |
| 4 | N802253-S2 | Bolt |
| 5 | N801595-S53 | U-Nut |
| 6 | 9B100 | Shield |
| 7 | N804340-S2 | U-Nut/td> |
| 8 | 9240 | Insulator, Upper |
| 9 | N805934-S2 | Bolt |
| 10 | 9A307 | Fuel Tank Sending Unit Locking Retainer Ring |
| 11 | 9002 | Fuel Tank |
| 12 | 9240 | Insulator |
| 13 | 9092 | Fuel Tank Support Strap, Rear |
| 14 | N620482-S2 | Nut |
| 15 | 9A148 | Skid Plate |
| 16 | N605906-S2 | Bolt |
| 17 | N605906-S2 | Bolt |
| 18 | N620480-S36 | Nut |
| 19 | 9A032 | Fuel Tank Heat Shield |
| A | — | Tighten to 30-40 Nm
(22-30 Lb-Ft) |
| B | — | Tighten to 34-46 Nm
(25-34 Lb-Ft) |
| C | — | Tighten to 16-24 Nm
(12-18 Lb-Ft) |
| D | — | Tighten to 11-15 Nm
(8-10 Lb-Ft) |
| E | — | Tighten to 54-75 Nm
(40-55 Lb-Ft) |
Aft-of-Axle, F-250, F-350, F-Super Duty Chassis Cab and Commercial Chassis
Fuel tank installations are shown in the illustrations.
Removal
Raise the rear of the vehicle.
To avoid electrical sparking at the tank, disconnect the battery ground cables on both batteries. Then disconnect the fuel tank sending unit wire at the fuel tank.
Disconnect the ground wire after both fuel tanks have been drained.
Using Rotunda Fuel Storage Tanker 164-R3201 or equivalent, drain fuel tank.
Loosen the clamp on the fuel tank filler pipe (9034) at the fuel tank and disconnect the filler pipe hose. Disconnect the fill vent hose at the vapor valve.
If removing the metal-type fuel tank, support the fuel tank and remove the bolts attaching the tank supports to the frame. Carefully lower the fuel tank. Finish removing the filler pipe and filler pipe vent hose if not possible in Step 5. Remove the fuel tank under the vehicle.
If removing the plastic-type fuel tank, support the fuel tank and remove the bolts attaching the combination skid plate and tank support to the frame. Carefully lower the fuel tank. Complete removing the filler pipe if not possible in Step 5. Remove the skid plate and fuel tank from under the vehicle. Disassemble the skid plate from the fuel tank.
Installation
Install new support strap insulation as required.
If installing the plastic-type fuel tank, preassemble the skid plate and fuel tank support straps to the fuel tank.
Raise the tank skid plate and fuel tank support (9053) and start the tank neck into the hose.
Connect the fuel tank sending unit wire to the sending unit.
Connect the fuel tube at the fuel tank sending unit and tighten the fuel filler hose clamps securely. Install the drain plug, if so equipped.
Position the fuel tank against the top fuel tank support straps or the frame and install the attaching bolts and nuts. Tighten the attaching bolts and nuts to 34-46 Nm (25-34 lb-ft).
Insert rubber inner tube inside filler neck and connect filler pipe hose. Tighten clamp to 3-4 Nm (27-35 lb-in).
NOTE: When the battery is disconnected and reconnected, some abnormal drive symptoms may occur while the powertrain control module relearns its adaptive strategy. The vehicle may need to be driven 16 km (10 miles) or more to relearn the strategy.
Connect both vehicle battery ground cables.
Fill the fuel tank and check all connections for leaks.
Lower the vehicle.
Steel Aft-of-Axle Fuel Tank Installation, F-250, F-350 and F-Super Duty Chassis Cab, Except F-350 with 136.8- and 160.8-Inch Wheelbase
| Item | Part Number | Description |
| 1 | 9002 | Fuel Tank |
| 2 | 9092 | Fuel Tank Support Strap, Upper |
| 3 | N801380-S100 | Bolt |
| 4 | 382873-S2 | Washer |
| 5 | N620482-S2 | Nut |
| 6 | 9C045 | Stone Shield, LH |
| 7 | — | Insulator (Part of 9002) Tank Assembly |
| 8 | 5035 | Rear Frame Crossmember, Lower |
| 9 | 9K015 | Stone Shield, RH |
| 10 | 34976-S36 | Nut |
| A | — | Tighten to 34-46 Nm
(25-34 Lb-Ft) |
Plastic Aft-of-Axle Fuel Tank Installation, F-350, 136.8- and 160.8-Inch Wheelbase

| Item | Part Number | Description |
| 1 | 9A307 | Fuel Tank Sending Unit Locking Retainer Ring |
| 2 | 9092 | Fuel Tank Support Strap |
| 3 | W623484-S2 | Spring Washer |
| 4 | 9B593 | Hose and Valve Assembly |
| 5 | 9B076 | Seal |
| 6 | 9002 | Fuel Tank |
| 7 | N620482 | Nut, M10-1.5 |
| 8 | 9A148 | Skid Plate |
| 9 | N605920-S2 | Bolt, M10-1.5 |
| 10 | 379930-S2 | Nut |
| 11 | 56741 | Bolt, M10-1.50 |
| 12 | 5037 | Crossmember |
| 13 | N605919-S2 | Bolt |
| 14 | 40949-S2 | Screw |
| 15 | 9A032 | Fuel Tank Heat Shield |
| 16 | 5005 | Frame |
| 17 | 9B100 | Shield |
| A | — | Tighten to 34-46 Nm
(25-34 Lb-Ft) |
| B | — | Tighten to 16-24 Nm
(12-18 Lb-Ft) (Exposed Thread Length) |
| C | — | Tighten to 11-15 Nm
(8-10 Lb-Ft) |
| D | — | Tighten to 54-75 Nm
(40-55 Lb-In) |