Remove bracket from the speed control servo (9C735); keep bracket and three screws for reuse.
Speed Control Servo Rotor
Section 10-03: Speed Control System, Electronic | 1996 F-150, F-250, F-350, F-Super Duty and Bronco Workshop Manual |
Removal
Remove speed control servo bracket attaching bolts and nuts.
Disconnect speed control 10-way connector.
Depress accelerator pedal and shaft (9725), then push locking arm on speed control actuator cap and rotate cap counterclockwise.
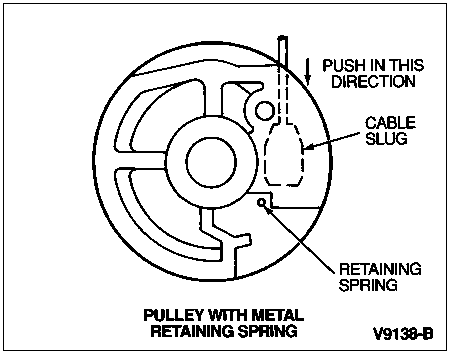
Remove speed control actuator cable slug from speed control servo pulley. Gently push actuator cable slug past retaining spring using a small screwdriver.
Remove bracket from the speed control servo (9C735); keep bracket and three screws for reuse.
Installation
Attach bracket to speed control servo with three screws. Tighten to 8-10 Nm (6-8 lb-ft).
Attach speed control 10-way connector to speed control servo.
Make sure the rubber seal is fully seated on actuator cable cap.
Depress accelerator pedal and shaft if accelerator cable (9A758) is attached to throttle and lock cable ball in slot located in servo pulley.
Release accelerator cable or pull accelerator cable at throttle end.
Insert cap locking tabs into speed control servo slots as shown.
Rotate cap clockwise until locking arm engages locking tab on servo.
Position speed control servo and install attaching bolts and nuts. Tighten nuts to 21-32 Nm (16-23 lb-ft).
On all models except F-Series 7.3L Diesel, adjust speed control actuator cable (9A825).