Section 00-04: Noise, Vibration and Harshness | 1996 F-150, F-250, F-350, Bronco and F-Super Duty Workshop Manual |
DIAGNOSIS AND TESTING
Pinpoint Tests
These pinpoint tests are designed to take the technician through a step-by-step diagnosis procedure to determine the cause of a condition. It may not always be necessary to follow a chart to its conclusion. Perform only the steps necessary to correct the condition. Then check the operation of the system to be sure the condition has been corrected.
It is sometimes necessary to remove various vehicle components to gain access to the component to be tested. Refer to the applicable section for removal and installation of components. After verifying that the condition has been corrected, make sure all components removed have been reinstalled.
When performing Pinpoint Test A, Shake/Vibration in Drive Under Acceleration/Deceleration diagnosis or Pinpoint TestD, Engine Accessory Vibration diagnosis, observe the following precautions:
 WARNING: IF ONLY ONE DRIVE WHEEL IS ALLOWED TO ROTATE, SPEED MUST BE LIMITED TO 55 KM/H (34 MPH) USING THE SPEEDOMETER READING SINCE ACTUAL WHEEL SPEED WILL BE TWICE THAT INDICATED ON THE SPEEDOMETER. EXCEEDING A SPEED OF 55 KM/H (34 MPH) OR ALLOWING THE DRIVE WHEEL TO HANG UNSUPPORTED COULD RESULT IN TIRE DISINTEGRATION AND/OR DIFFERENTIAL FAILURE, WHICH COULD CAUSE SERIOUS PERSONAL INJURY AND EXTENSIVE VEHICLE DAMAGE.
PINPOINT TEST A: SHAKE/VIBRATION IN DRIVE UNDER ACCESSORY/DECELERATION
A1 ROAD TEST FOR SHAKE/VIBRATION
- Accelerate vehicle to the speed at which the customer indicated the shake/vibration occurred.
- Record the critical vehicle speed and/or engine rpm.
- Place transmission in neutral and allow engine to return to idle.
Does shake/vibration disappear during neutral coast test?
A2 INSPECT TIRES/WHEELS
- Raise vehicle on a frame contact hoist. Inspect tires/wheels for extreme wear or damage, cupping or flat spots.

Is condition of tires OK?
| Yes | No |
|---|
| GO to A3. | CHECK suspension components for misalignment, abnormal wear or damage that may have contributed to the tire wear. CORRECT suspension concerns and REPLACE damaged tires. PERFORM Road Test. |
A3 INSPECT WHEEL BEARINGS
Is wheel bearing end play OK?
| Yes | No |
|---|
| GO to A4. | REPLACE wheel bearings as necessary. PERFORM Road Test. |
A4 TIRE/WHEEL BALANCE
- Check tire/wheel balance. Refer to Section 04-04. Correct as needed.
- Road test.
Are tires and wheels balanced?
| Yes | No |
|---|
| GO to A5. | BALANCE tires and wheels as necessary. PERFORM Road Test. |
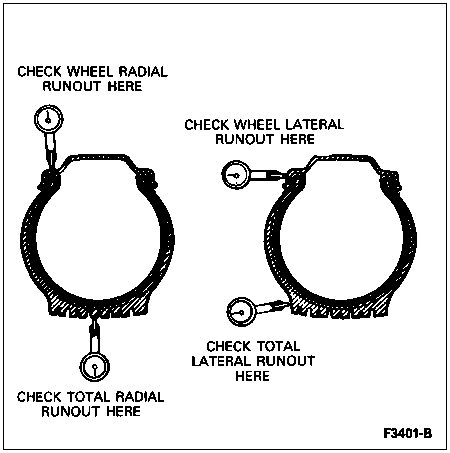
A5 MEASURE RUNOUTS
- For each wheel position measure, locate and mark the following:
- High point of tire/wheel assembly total radial runout.
- High point of wheel radial runout.
- High point of wheel lateral runout.
- Record all measurements in chart below
| Assembly Position | Tire/Wheel Assembly Total Radial Runout | Wheel Radial Runout | Wheel Lateral Runout |
|---|
| Left Front | | | |
| Right Front | | | |
| Left Rear | | | |
| Right Rear | | | |
| Example | 1.52mm
(0.060 Inch) | 0.50mm
(0.020 Inch) | 0.63mm
(0.025 Inch) |
Have all tire/wheel assemblies been measured?
| Yes | No |
|---|
| GO to A6. | COMPLETE Step A5. |
A6 ANALYSIS OF RUNOUT MEASUREMENT
- Measurements obtained in A5 must fall within guidelines below.
Do the measurements obtained in A5 fall within specifications listed in Condition 1 in the following chart?
| Condition | Assembly Total Radial Runout | Wheel Radial Runout | Wheel Lateral Runout |
|---|
| 1 | Less Than 1.02mm (0.040 Inch) | Less Than 1.14mm (0.045 Inch) | Less Than 1.14mm (0.045 Inch) |
| 2 | Less Than 1.02mm (0.040 Inch) | More Than 1.14mm (0.045 Inch) | Less Than 1.14mm (0.045 Inch) |
| 3 | Less Than 1.02mm (0.040 Inch) | Less Than 1.14mm (0.045 Inch) | More Than 1.14mm (0.045 Inch) |
| 4 | More Than 1.02mm (0.040 Inch) | Less Than 1.14mm (0.045 Inch) | Less Than 1.14mm (0.045 Inch) |
| Yes | No |
|---|
| Condition 1 � Good Assembly. GO to A14. | Condition 2 � GO to A7.
Condition 3 � GO to A7.
Condition 4 � GO to A7. |
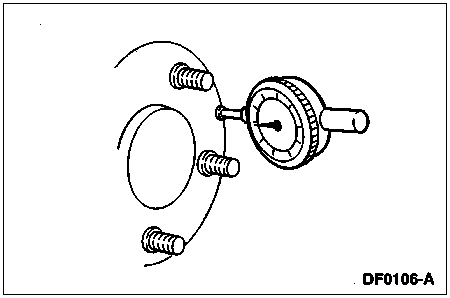
A7 WHEEL HUB BOLT RUNOUT
- Wheel hub bolt runout can affect wheel runout. Remove wheels and inspect wheel hub bolts.
- Measure wheel hub bolt runout. Refer to Section 04-04.

- Wheel hub bolt circle runout should not exceed 0.41mm (0.016 inch) TIR (total indicated runout).
Is wheel hub bolt runout within the limit?
| Yes | No |
|---|
| If Condition 2 or 3 from A6, GO to A10. If Condition 4, GO to A11. | CHECK for bent or damaged wheel hub bolts. REPLACE as necessary. CHECK wheel hub bolt runout again. If OK, REMEASURE runouts as in A5. If Condition 2 or 3 from A6 persists, GO to A10. If Condition 1, GO to A14. If Condition 4, GO to A11. |
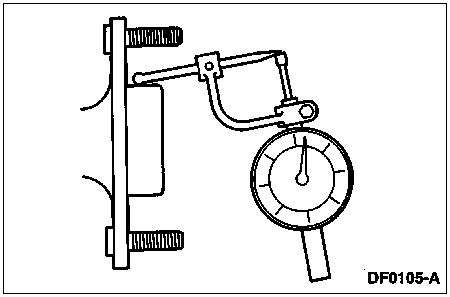
A8 WHEEL PILOT RADIAL RUNOUT
- Zero the indicator and slowly rotate axle shaft one complete revolution.
- Record total deflection.
- Wheel pilot radial runout should not exceed 0.254 mm (0.010 inch) TIR (total indicated runout).
Is wheel pilot radial runout within the accepted limit?
| Yes | No |
|---|
| REPAIR or REPLACE as necessary. | Go to A9. |
A9 FLANGE FACE LATERAL RUNOUT
- Zero the indicator and slowly rotate the axle shaft one complete revolution.
- Record total deflection.
- Flange face lateral runout should not exceed 0.152mm (0.006 inch) for disc brakes or 0.508mm (0.020 inch) for drum brakes TIR (total indicated runout).
Is flange face lateral runout within the accepted limit?
| Yes | No |
|---|
| REPAIR or REPLACE as necessary. | Go to A10. |
A10 REPLACING A WHEEL
- Measure the runouts on the new assembly.
Is assembly within specification from A6?
| Yes | No |
|---|
| GO to A13. | If Condition 2 or 3, REPLACE wheel and RECHECK. If Condition 4, GO to A11. |
A11 INDEX TIRE/WHEEL ASSEMBLY
- Align high point of total assembly radial runout 180 degrees away from high point of wheel radial runout.
- Measure total assembly radial runout.
Is total radial runout less than 1.02mm (0.040 inch)?
A12 REPLACE A TIRE
- Measure total assembly radial runout on new assembly.
Is total radial runout less than 1.02mm (0.040 inch)?
| Yes | No |
|---|
| GO to A13. | INDEX tire/wheel assembly as in A11. If new assembly is now within specifications, GO to A13. If new assembly is still not within specifications, GO to A14. |
A13 ROAD TEST
- Balance new tire/wheel assembly.
- After all assemblies have been checked and corrected, road test vehicle.
Is vehicle operating correctly?
| Yes | No |
|---|
| Vehicle OK. | GO to A14. |
A14 SUBSTITUTE WHEELS AND TIRES
- Substitute a known good set of wheels and tires.
- Road test.
- If the vehicle still exhibits a shake or vibration, note the vehicle speed and/or engine rpm at which it occurs.
Is vibration felt?
| Yes | No |
|---|
| GO to A15. | INSTALL original tire/wheel assemblies one by one, ROAD TESTING at each step until the damaged tire(s) is identified. REPLACE tire(s) as necessary and RETEST. |
A15 VIBRATION DIAGNOSIS OF ENGINE/TRANSMISSION VS. DRIVESHAFT/SUSPENSION COMPONENTS
- Spin all four wheels independently to identify position generating problem vibration.
- For front wheels, use on-vehicle balance machine.
- For rear wheels, accelerate to half critical speed observed in road test.
Was any vibration observed at the wheels?
| Yes | No |
|---|
| GO to A16. | Engine/transmission imbalance. REFER to Group 02, Group 03 and Group 07. |
A16 ROAD TEST FOR PROPER OPERATION
- After checking all wheel positions and correcting as needed, road test vehicle.
Is vehicle operating correctly?
PINPOINT TEST B: TIP-IN MOAN
B1 ENGINE AIR CLEANER
- Check engine air cleaner for proper installation of base gasket, lid element and engine air cleaner intake tube and duct assembly.
Are components properly installed?
| Yes | No |
|---|
| GO to B2. | CORRECT condition and PERFORM Road Test. If moan persists, GO to B2. |
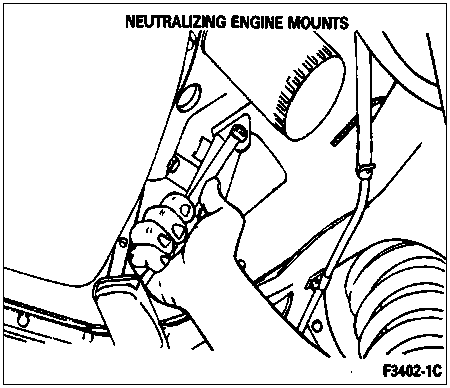
B2 ENGINE MOUNTS
- Neutralize engine mounts as follows:
- Loosen, but do not remove, engine mount fasteners.
- Start the engine and apply service brakes.
- Shift transmission into drive and back into neutral.
- Stop engine.
- Retighten engine mounts. Road test.
Is moan reduced or eliminated?
| Yes | No |
|---|
| Vehicle OK. | GO to B3. |
B3 EXHAUST SYSTEM
WARNING: PROPERLY VENT EXHAUST FUMES OUTSIDE OF WORKING AREA.
WARNING: EXHAUST SYSTEM COMPONENTS ARE HOT.
- Warm up system to normal operating temperature. Loosen all hanger attachments and reposition hangers until they hang free and straight. Then loosen all flange joints and, with engine running, shift transmission from neutral to drive and back to neutral (or load engine with clutch). Tighten all hanger clamps and flanges. Road test vehicle.

Is moan reduced or eliminated?
| Yes | No |
|---|
| REPLACE exhaust components as necessary. Vehicle OK. | REPEAT Pinpoint Test B. If moan is not eliminated, REFER to Symptom Charts in the Diagnosis and Testing portion of this section for other possible conditions. |
PINPOINT TEST C: IDLE BOOM/SHAKE/VIBRATION
C1 CABLE/HOSES
- Check engine compartment for any component that may be grounding between the engine and body or chassis. Example: control cables, A/C hoses, accelerator cable, etc.
Are components OK?
| Yes | No |
|---|
| GO to C2. | CORRECT condition and PERFORM Road Test. If boom, shake or vibration persists, GO to C2. |
C2 ENGINE MOUNTS
- Inspect engine mounts.
- Neutralize engine mounts. Refer to Pinpoint Test Step B2.
Are mounts OK?
| Yes | No |
|---|
| GO to C3. | REPLACE mounts. PERFORM Road Test. |
C3 EXHAUST SYSTEM
WARNING: PROPERLY VENT EXHAUST FUMES OUTSIDE OF WORK AREA.
WARNING: EXHAUST SYSTEM COMPONENTS ARE HOT.
- Warm up system to normal operating temperature. Loosen all hanger attachments and reposition hangers until they hang free and straight. Then loosen all flange joints and, with engine running, shift transmission from neutral to drive and back to neutral (or load engine with clutch). Tighten all hanger clamps and flanges. Road test vehicle.
Is system OK?
| Yes | No |
|---|
| REPLACE exhaust components as necessary. Vehicle OK. | GO to Pinpoint Test Step D2. |
PINPOINT TEST D: ENGINE ACCESSORY VIBRATION
D1 ENGINE RUN-UP
- Run up engine to problem rpm observed in road test, with vehicle stationary.
Does vibration occur?
| Yes | No |
|---|
| GO to D2. | Vehicle OK. |
D2 DRIVE BELT AND PULLEYS
- With engine stopped, inspect drive belt and pulleys for wear or damage, and check drive belt tension using Belt Tension Gauge T63L-8620-A or Rotunda Offset Belt Tension Gauge 014-R1056.
- Automatic tensioners have belt wear indicator marks. If the indicator mark is not between the min and max marks, the drive belt is worn or an incorrect drive belt is installed.

Are drive belts or pulleys worn or damaged?
| Yes | No |
|---|
| REPLACE worn or damaged drive belt or pulleys. CORRECT drive belt tension. | GO to D3. |
D3 MOUNTING HARDWARE
- Inspect mounting brackets and adjusting components for proper alignment and tightness.
Are mounting and adjusting components secure?
| Yes | No |
|---|
| GO to D4. | ALIGN and TIGHTEN mounting hardware to specifications. CORRECT drive belt tension. START UP engine and RUN UP to problem rpm. If vibration still exists, GO to D4. |
D4 DRIVE BELT NOISE
- Check for "chirps" or squeal in drive belt by spraying a small amount of water on the grooved side of the drive belt (use a spray bottle or equivalent).
Does the noise change?
| Yes | No |
|---|
| CHECK for misalignment. CHECK tensioner position. CHECK for worn drive belt. SERVICE/REPLACE as required. | CHECK accessory bearings. REPLACE as required. GO to D5. |
D5 DRIVE BELT AND PULLEYS � ENGINE IDLING
- With engine idling, visually check all drive belts and pulleys for misalignment, runout or irregular motion. Maximum runout is 3.175mm (0.125-inch).
- Increase engine rpm.
Was any misalignment or irregular motion detected?
| Yes | No |
|---|
| REPLACE pulley or drive belt as required. | GO to D6. |
D6 CHECK BELT(S)
- Key off. Remove one of the drive belts.
- Key to RUN, engine running.
- If vibration still exists, remove the next drive belt. Repeat step until no drive belts are left.
Has the vibration been reduced or eliminated?
| Yes | No |
|---|
| REPLACE the last drive belt removed. If the condition still occurs after replacement, REPAIR/REPLACE accessory. | RETURN to Symptom Charts in the Diagnosis and Testing portion of this section for additional possible causes. |
PINPOINT TEST E: DRIVESHAFT VIBRATION
E1 ROAD TEST FOR VIBRATION
- Accelerate vehicle to the speed at which the customer indicated the vibration occurred.
- Record the critical vehicle speed and/or engine rpm.
Is vibration present?
| Yes | No |
|---|
| GO to E2. | Vehicle OK. |
E2 ROAD SPEED HOIST TEST
NOTE: On 4x4 vehicles, unlock front hubs or remove hub covers before spinning wheels.
- Raise vehicle on a frame contact hoist. Engage drivetrain and run up to observed road test speed.
- Spin non-drive wheels using an on-vehicle balance machine. Rebalance as necessary and retest.
Is vibration present?
| Yes | No |
|---|
| GO to E3. | Vehicle OK. |
E3 ROAD SPEED HOIST TEST WITH DRIVE WHEELS REMOVED
- Mark relative position of drive wheels on axle or hub lug and remove wheels.
- If equipped, secure brake drums with lug nuts.
- Engage drivetrain and run up to observed road test speed.
Is vibration present?
E4 DRIVESHAFT INSPECTION
- Inspect driveshaft for undercoating, physical damage, missing balance weight, improperly seated, worn or binding universal joints.
Are driveshaft and universal joints OK?
| Yes | No |
|---|
| GO to E5. | REPAIR as required. PERFORM Road Test. If vibration is still present, GO to E5. |
E5 CHECKING DRIVESHAFT INDEX MARKS
- Check index marks (yellow paint daubs) on rear of driveshaft and rear axle universal joint flange.
Are marks more than 22.5 degrees apart?
| Yes | No |
|---|
| Models with one-piece driveshaft, GO to E6. All others, GO to E7. | REFER to driveshaft runout and balancing procedure in Section 05-00. |
E6 DRIVESHAFT RUNOUT (ONE-PIECE DRIVESHAFT)
- With vehicle on hoist and wheels off, measure runout at front, center and rear of driveshaft with indicator, while rotating driveshaft by turning the axle.
Does runout exceed 0.89mm (0.035 inch)?
| Yes | No |
|---|
| If runout exceeded specs at front and center, REPLACE driveshaft. If runout exceeded specs at rear only, MARK driveshaft at rear runout high point, then GO to E8. | REFER to driveshaft runout and balancing procedure in Section 05-00. |
E7 DRIVESHAFT RUNOUT (TWO-PIECE DRIVESHAFT)
- With vehicle on hoist and wheels off, measure runout at front, center and rear of driveshaft with indicator, while rotating driveshaft by turning the axle.
Does runout exceed 0.89mm (0.035 inch)?
| Yes | No |
|---|
| MARK driveshaft at rear runout high point, then GO to E8. | REFER to driveshaft runout and balancing procedure in Section 05-00. |
E8 INDEXING DRIVESHAFT AT AXLE
NOTE: With driveshaft disconnected from vehicle, manipulate universal joints in each direction of rotation. If universal joint feels stiff, lumpy or gritty in any direction, replace universal joint.
NOTE: Circular rear axle universal joint flange can be reindexed in 90-degree increments to fine tune the runout condition.
- Note or mark indexing of driveshaft to rear axle universal joint flange. Disconnect driveshaft at axle, turn 180 degrees, and reconnect.
- Recheck runout.
Does runout exceed 0.89mm (0.035 inch)?
| Yes | No |
|---|
| GO to E10. | PERFORM Road Test. If vibration is present, GO to E9. |
E9 INDEXING DRIVESHAFT AT TRANSMISSION
NOTE: WIth driveshaft removed from vehicle, manipulate universal joints in each direction of rotation. If universal joint feels stiff, lumpy or gritty in any direction, replace universal joint.
- Note or mark indexing of driveshaft at axle and transmission. Remove driveshaft, and turn 180 degrees at transmission only. Reinstall driveshaft.
Is vibration still present?
| Yes | No |
|---|
| REFER to driveshaft runout and balancing procedure in Section 05-00. | Vehicle OK. |
E10 CHECKING REAR AXLE UNIVERSAL JOINT FLANGE FOR EXCESSIVE RUNOUT
- Compare two high points of runout marked in Steps E6 or E7 with Step E8.
Are marks within 25mm (1 inch) of each other?
| Yes | No |
|---|
| REPLACE driveshaft. PERFORM Road Test. If vibration is present, REFER to driveshaft runout and balancing procedure in Section 05-00. | If marks are on opposite sides, REPLACE rear axle universal joint flange. PERFORM Road Test. If vibration is present, REFER to driveshaft runout and balancing procedure in Section 05-00. |
PINPOINT TEST F: BRAKE VIBRATION/SHUDDER
F1 ROAD TEST FOR VIBRATION/SHUDDER
- Determine if vibration/shudder is induced when making a light stop by applying service brakes.
Is vibration/shudder present?
| Yes | No |
|---|
| INSPECT brake system. REFER to the appropriate section in Group 06. REPAIR as required. | REFER to Symptom Charts in the Diagnosis and Testing portion of this section for other conditions. |
PINPOINT TEST G: AXLE NOISE
G1 CHECK DIFFERENTIAL LUBRICANT
- Check for low lubricant level.
- Check for wrong or poor grade axle lubricant.
Is lubricant level low or not to specification?
| Yes | No |
|---|
| ADD or REPLACE lubricant. REFER to appropriate section in Group 05. | GO to G2. |
G2 INSPECT AXLE HOUSING
- Check for exterior signs of damage.
Is axle housing damaged?
| Yes | No |
|---|
| REPAIR or REPLACE. REFER to appropriate section in Group 05. | GO to G3. |
G3 INSPECT CHATTER ON TURNS
- On turns, the rear axle has a chattering or groaning noise (limited slip or Traction-Lok® axles only). Slight chatter noise on slow turns after extended highway driving is considered acceptable and has no detrimental effect on the limited slip axle functions.
Is chatter noise while turning excessive?
| Yes | No |
|---|
| PERFORM Road Test. DRIVE vehicle in tight circles, five clockwise and five counterclockwise. If chatter is still evident, ADD specified amount of additive friction modifier meeting Ford specification to the rear axle lube and REPEAT tight circle road test. If still evident, REMOVE differential and SERVICE as necessary. REFER to appropriate section in Group 05. | GO to G4. |
G4 INSPECT AXLE SHAFTS/BEARINGS
- Check axle shaft end play. Refer to the appropriate section in Group 05.
- Remove axle shafts. Inspect bearings and axle shaft journals. Refer to appropriate section in Group 05.
- Inspect axle shaft splines.
- Inspect differential gears.
Are axle shafts (splines) OK?
| Yes | No |
|---|
| GO to G5. | REPLACE faulty axle shafts. INSPECT all differential gears. REPLACE parts as necessary. PERFORM Road Test. |
G5 INSPECT RING GEAR BOLTS
- Inspect ring gear for loose or broken bolts.
- Rotate rear axle universal joint flange to view all bolts.
Are ring gear bolts OK?
| Yes | No |
|---|
| GO to G6. | TIGHTEN or REPLACE rear gear bolts. INSPECT and REPLACE all damaged parts. REFER to appropriate section in Group 05.PERFORM Road Test. |
G6 BROKEN OR MUTILATED GEAR TEETH
- Inspect all differential gears for wear (check gear teeth for scoring abnormal wear, nicks or chips).
Are differential gears (ring and pinion) OK?
| Yes | No |
|---|
| GO to G7. | REPLACE faulty gears. REFER to appropriate section in Group 05. |
G7 CHECK DIFFERENTIAL BEARINGS
- Remove differential and inspect bearings for wear.
Are differential bearings OK?
| Yes | No |
|---|
| GO to G8. | REPLACE faulty bearings. REFER to appropriate section in Group 05. PERFORM Road Test. |
G8 INSPECT PINION GEAR/BEARINGS
- Remove pinion from axle.
- Inspect pinion and bearings for wear.
Are pinion bearings OK?
| Yes | No |
|---|
| Axle OK. REFER to Symptom Charts in the Diagnosis and Testing portion of this section. | REPLACE faulty bearings. REFER to appropriate section in Group 05. |
PINPOINT TEST H: NOISE AND VIBRATION � 4-WHEEL DRIVE VEHICLES
H1 INSPECT TIRES/WHEELS
- Check wheels for damage.
- Check tire pressure.
- Check tires for sawtooth wear pattern.
- Check tires for uneven inner or outer wear.
- Check tires for cupping or dishing.
- Check tire balance.
Are tires/wheels OK?
| Yes | No |
|---|
| GO to H2. | REPAIR or REPLACE faulty tires. ALIGN if necessary. |
H2 INSPECT WHEEL BEARINGS
- Spin front tires by hand to check for wheel bearing roughness. Check wheel bearing end play.
Are wheel bearings OK?
| Yes | No |
|---|
| GO to H3. | REPLACE wheel bearings. CHECK axle or spindle for wear. REFER to appropriate section in Group 05. |
H3 INSPECT LOCKING HUBS
- Inspect front hubs for wear and proper operation. Refer to Section 05-03C.
Are front locking hubs OK?
H4 CHECK TRANSFER CASE FLUID
- Remove transfer case fill plug.
- Check fluid level of transfer case.
- Check quality of transfer case fluid.
Is transfer case lubricant OK?
| Yes | No |
|---|
| GO to H5. | REPLACE or FILL fluid in transfer case. REFER to appropriate section in Group 07. |
H5 INSPECT TRANSFER CASE
Is transfer case OK?
| Yes | No |
|---|
| REFER to Symptom Charts in the Diagnosis and Testing portion of this section. | REPAIR or REPLACE parts as necessary. For service procedures, REFER to appropriate section in Group 07. |
PINPOINT TEST J: DRIVESHAFT JOINT NOISE AND VIBRATION
J1 INSPECT DRIVESHAFT U-JOINTS
- Raise vehicle on hoist. Refer to Section 00-02.
- Inspect universal joints (U-joint) for excessive play (wear) between U-joint and U-joint bearing cup.
Are U-joints OK?
| Yes | No |
|---|
| GO to J2. | REMOVE driveshaft and REPLACE faulty U-joints. REFER to Section05-01. |
J2 INSPECT DRIVESHAFT/U-JOINTS (DRIVESHAFT REMOVED)
- Remove driveshaft and place on a suitable workbench.
- Check U-joints for seized bearing cups.
- Check U-joints for smooth rotation operation.
Are U-joints (driveshaft removed) OK?
| Yes | No |
|---|
| INSPECT driveshaft slip yoke and center bearing support (if equipped). REPLACE if faulty. If OK, REFER to Symptom Charts in this section. REFER to Section 05-01. | REPLACE faulty U-joints. REFER to Section 05-01. |
PINPOINT TEST K: NON-AXLE NOISE
K1 INSPECT VEHICLE TRIM
- Inspect the following for cause of noise:
- grille whistle
- trim mouldings
- roof luggage rack (if equipped)
Are vehicle trim components causing noise?
| Yes | No |
|---|
| REPLACE or REPAIR as necessary. REPEAT road test. | GO to K2. |
K2 BELT SQUEAL OR CHIRP
- Check condition and tension of serpentine belt. Check other belts, if applicable.
Is belt or belts OK?
K3 INSPECT WHEELS/TIRES
Are wheel and tires OK?
K4 INSPECT A/C SYSTEM
- Inspect A/C system components for noise when the engine is running and A/C system is alternately engaged and disengaged.
Are A/C system components causing noise?
K5 EXHAUST SYSTEM
- Raise vehicle on hoist. Refer to Section 00-02.
- Check for broken or loose clamps or brackets.
Are exhaust clamps and brackets OK?
| Yes | No |
|---|
| GO to K6. | REPAIR or REPLACE if necessary. RESTART engine. If noise still exists, GO to K2. |
K6 CHECK NON-FACTORY ACCESSORIES
- Inspect running boards, grounding body to frame, antennas, visors, bug deflectors, etc. (if equipped).
Are accessories the cause of noise?
| Yes | No |
|---|
| ADJUST, REPAIR or REPLACE accessories and/or fasteners as required. | GO to Symptom Charts in the Diagnosis and Testing portion of this section. |