![]() CAUTION: Avoid damage to the crankshaft journal and cylinder wall when removing the piston and connecting rod.
CAUTION: Avoid damage to the crankshaft journal and cylinder wall when removing the piston and connecting rod.
Push the connecting rod and piston out through the top of the cylinder with the handle end of a hammer or a suitable piston hammer.
Section 03-01C: Engine, 7.5L MFI | 1996 F-250, F-350, F-Super Duty Chassis Cab and Motorhome Workshop Manual |
Removal
Drain the crankcase. Drain the cooling system. Refer to Section 03-03.
Remove the lower intake manifold (9424), cylinder heads (6049), oil pan (6675) and oil pump (6600). Refer to Intake Manifold, Lower, Cylinder Heads, and Oil Pan/Oil Pump Screen Cover and Tube in the In-Vehicle Service portion of this section.
Remove any ridge and/or deposits from upper end of cylinder bores as follows:
Make sure all connecting rod bearing caps are marked so they can be installed in their original positions.
Turn the crankshaft until the connecting rod (6200) being removed is down.
Remove the connecting rod nuts and connecting rod bearing cap.
![]() CAUTION: Avoid damage to the crankshaft journal and cylinder wall when removing the piston and connecting rod.
CAUTION: Avoid damage to the crankshaft journal and cylinder wall when removing the piston and connecting rod.
Push the connecting rod and piston out through the top of the cylinder with the handle end of a hammer or a suitable piston hammer.
Remove the connecting rod bearings (6211) from the connecting rod and connecting rod bearing cap.
Install the connecting rod bearing cap on the connecting rod from which it was removed.
Installation
If new partial piston ring sets (6148) are to be installed, remove the cylinder wall glaze. Refer to Section 03-00. Clean cylinder bores with soap and water after honing or deglazing. Dry and oil immediately after cleaning.
Oil the partial piston ring sets, pistons and cylinder walls with recommended quality engine oil. Be sure to install pistons into cylinders from which they were removed or to which they were fitted. Connecting rod and connecting rod bearing caps are numbered from 1 to 4 in the right bank, and 5 to 8 in the left bank, beginning at the front of engine (6007). Numbers on the connecting rod and connecting rod bearing cap must be on the same side when installed in the cylinder bore. If a connecting rod is ever transposed from one cylinder block (6010) or cylinder to another, new connecting rod bearings should be fitted and the connecting rod should be numbered to correspond with the new cylinder number.
NOTE: Refer to the following illustration.
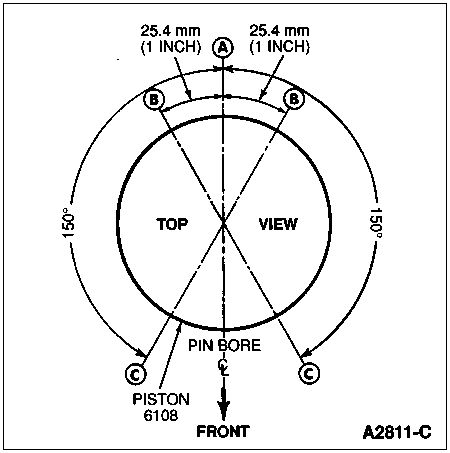
Make sure piston ring gaps (oil ring spacer A, oil ring segments B, and compression rings C) are properly spaced around circumference of piston.
Turn the crankshaft until the connecting rod journal reaches the bottom of its stroke.
Install Piston Ring Compressor D81L-6002-C or equivalent on piston and push in with hammer handle or a suitable piston hammer until it is slightly below top of cylinder. Be sure to guide connecting rods while tapping them into position to avoid damaging crankshaft journals. Install piston with indentation notch in piston head toward front of engine. Push the piston down into the cylinder until the connecting rod bearings seat on the crankshaft journal.

Check clearance of each connecting rod bearing using Plastigage® or equivalent. Refer to Section 03-00.
After the connecting rod bearings have been fitted, apply a light coat of recommended quality engine oil to the journals and connecting rod bearings.
Install the connecting rod bearing cap. Make sure connecting rod bolt heads are properly seated in the connecting rod. Tighten the nuts to 61-68 Nm (45-50 lb-ft).
After the piston and connecting rod assemblies have been installed, check the side clearance between the connecting rods on each crankshaft journal. Refer to Section 03-00.
Measure piston deck height as follows:

If the dial recorded a reading, this indicates that the piston is protruding above the cylinder block by the measurement noted on the dial. Compare the reading with the specification for the model year of the vehicle. If the dial did not record any protrusion in Step b above, then the piston is either flush with the cylinder block deck, or, is below the deck face. To determine the amount of piston recession below the cylinder block deck, perform the following:
Disassemble, clean and inspect oil pump. Refer to Section 03-00. Reassemble or replace oil pump as required. Clean the oil pump screen cover and tube (6622), oil pan, and the block gasket surfaces.
Prime the oil pump by filling the inlet port with engine oil and rotating the oil pump intermediate shaft (6A618) to distribute oil within the housing. Install the oil pump and the oil pan. Refer to Oil Pan/Oil Pump Screen Cover and Tube in the In-Vehicle Service portion of this section.
Install the cylinder heads. Refer to Cylinder Heads in the In-Vehicle Service portion of this section.
Install the lower intake manifold. Refer to Intake Manifold, Lower, in the In-Vehicle Service portion of this section.
Fill and bleed the cooling system. Refer to Section 03-03. Fill the crankcase to the correct level with the specified engine oil.
Start the engine and adjust the ignition timing to specifications listed on the engine decal.
Operate the engine at fast idle and check for oil and coolant leaks after the engine temperature has stabilized.
Install the engine air cleaner (ACL) (9600) and air cleaner outlet tube (9B659).