Section 06-09A: Brake System, Anti-Lock, Rear | 1996 F-150, F-250, F-350 Workshop Manual |
DIAGNOSIS AND TESTING
Pinpoint Tests
NOTE: Use Rotunda 88 Digital Multimeter 105-00053 or equivalent to perform electrical pinpoint tests.
PINPOINT TEST A: RED BRAKE WARNING LIGHT DOES NOT SELF-CHECK
Affected Circuit(s)/Electrical Component(s)

Description
If the red BRAKE warning light does not turn on when the key is in the START position, service the brake warning bulb system as required. The most likely cause of a nonfunctioning red BRAKE warning light is a burned-out bulb or an open fuse.
Possible Contributing Base Brake Component/Vehicle Wiring Concerns
- Open brake warning light bulb (RED)
- Open power fuse
- Open Circuit 640 (R/Y), 512 (T/LG), 531 (DG/Y)
- Unseated fluid level switch connector
- Worn or damaged ignition switch
A1 RED BRAKE WARNING LIGHT/FUSE
- Key to RUN.
- Apply parking brake.
- Observe BRAKE warning light.
Does the BRAKE warning light function?
| Yes | No |
|---|
| RELEASE parking brake. GO to A2. | REPAIR brake warning light circuit. CHECK for open fuse. CHECK for burned-out bulb or open Circuit 640 (R/Y). REPEAT System Pre-Check. |
A2 CHECK FOR CORRODED FLUID LEVEL SWITCH CONNECTOR PINS
- Remove fluid level switch connector located on brake master cylinder.
- Inspect both halves of fluid level switch connector for corrosion or connector pin backout.
Are the connections clean and secure?
| Yes | No |
|---|
| GO to A3. | REPAIR/REPLACE connector as needed. REPEAT System Pre-Check. |
A3 CHECK FOR UNSEATED CONNECTOR
- Firmly reconnect fluid level switch connector located on brake master cylinder.
- Turn key to START position.
- Observe BRAKE warning light.
Does the BRAKE warning light function?
| Yes | No |
|---|
| Condition is resolved. REPEAT System Pre-Check. | GO to A4. |
A4 MASTER CYLINDER FLUID LEVEL SWITCH
- Connect jumper wire from Circuit 531 (DG/Y) to Circuit 512 (T/LG).
- Turn key to START position.
- Observe BRAKE warning light.
Does the BRAKE warning light function?
| Yes | No |
|---|
| Fluid level switch is worn or damaged. REFER to Section 06-06. REPEAT System Pre-Check. | Open in Circuit 512 (T/LG) or worn or damaged ignition switch. REPAIR/REPLACE and REPEAT System Pre-Check. |
PINPOINT TEST B: RED BRAKE WARNING LIGHT STAYS ON WHEN KEY IS IN RUN POSITION
Affected Circuit(s)/Electrical Component(s)
Description
Red BRAKE light ON with ignition switch ON and parking brake released.
Possible Contributing Component/Vehicle Wiring Faults
- Ground short on Circuit 977 (P/W)
- Ground short on Circuit 162 (LG/R)
- Damaged parking brake switch
- Damaged low vacuum switch (Diesel only)
B1 CHECK IF BOTH WARNING LIGHTS ARE ON
- Disengage parking brake.
- Key to run.
Do both the red BRAKE warning light and yellow RABS light come on?
B2 CHECK PARKING BRAKE SWITCH
- Key off.
- Disconnect parking brake switch from harness connector.
- Key to run.
Does the red BRAKE warning light remain on?
| Yes | No |
|---|
| Diesel Engines: GO to B3. Gas Engines: REPAIR ground short in Circuits 977 or 162. REPEAT System Pre-Check. | REPLACE parking brake switch. REPEAT System Pre-Check. |
B3 CHECK LOW VACUUM SWITCH (DIESEL ONLY)
- Key off.
- Disconnect low vacuum switch from harness connector.
- Key to run.
Does the red BRAKE warning light remain on?
| Yes | No |
|---|
| REPAIR ground short in Circuits 977 or 162. REPEAT System Pre-Check. | REPLACE low vacuum switch. REPEAT System Pre-Check. |
PINPOINT TEST C: YELLOW REAR ABS WARNING LIGHT OFF AND DOES NOT SELF-CHECK
Affected Circuit(s)/Electrical Component(s)

Description
The anti-lock electronic control module (2C018) will turn on the yellow rear ABS warning light for 1-2 seconds after the key has been turned from the OFF to the RUN position. If REAR ABS warning light fails to flash, it may be caused by a burned-out bulb or an open fuse to Circuit 640 (R/Y). An open in Circuit 603 (DG) will also keep the light from flashing.
Possible Contributing Base Brake Component/Vehicle Wiring Concerns
- Open fuse Circuit 640 (R/Y)
- Missing power to REAR ABS warning light (open Circuit 640 [R/Y])
- Open Circuit 603 (DG)
- Burned-out yellow REAR ABS warning light bulb
- Terminal backout in the anti-lock electronic control module harness connector at Pin 7
- Harness connector not fully mated with anti-lock electronic control module
- Damaged anti-lock electronic control module
- Open REAR ABS ground (Circuit 530 [LG/Y])
C1 REAR ABS LIGHT 10 AMP FUSE
- Remove and inspect REAR ABS light 10-amp fuse.
Is the fuse blown?
| Yes | No |
|---|
| CHECK for short to ground between fuse panel and warning lights. REPAIR short and REPLACE 10-amp fuse. REPEAT System Pre-Check. If fuse fails again, GO to C2. | REINSTALL fuse and GO to C5. |
C2 ANTI-LOCK ELECTRONIC CONTROL MODULE HARNESS CONNECTOR
- Check to make sure harness connector is fully plugged into anti-lock electronic control module.
Are connections secure?
| Yes | No |
|---|
| GO to C3. | CONNECT harness to anti-lock electronic control module. REPEAT System Pre-Check. |
C3 ANTI-LOCK ELECTRONIC CONTROL MODULE GROUND
NOTE: When checking resistance in the RABS system, always disconnect the battery to starter relay cable. Improper resistance may occur with the vehicle battery connected.
- Check for good anti-lock electronic control module ground:
- Disconnect battery to starter relay cable.
- Remove harness connector from anti-lock electronic control module.
- Set ohmmeter on the 200 ohm scale.
- Check for resistance between anti-lock electronic control module harness connector Pin 4 and chassis ground.
Is resistance less than 1.0 ohm?
| Yes | No |
|---|
| RECONNECT battery ground cable. GO to C4. | CHECK for open in anti-lock electronic control module ground wire. CHECK for loose, dirty or broken connector pins. REPAIR as necessary. REPEAT System Pre-Check. |
C4 REAR ABS WARNING LIGHT POWER
- Check for voltage to REAR ABS warning light:
- Remove harness connector from anti-lock electronic control module.
- Set multimeter on 20 VDC scale position.
- Turn key to run.
- Check voltage between harness connector Pin 7 and a known good chassis ground.
Are 9 volts present?
| Yes | No |
|---|
| REPLACE anti-lock electronic control module. REPEAT System Pre-Check. | GO to C5. |
C5 POWER TO REAR ABS WARNING LIGHT FUSE
- Check for voltage to fuse.
- Set multimeter to 20 VDC scale.
- Key to run.
- Check voltage between panel fuse connector and known good chassis ground.
Are 9 volts present?
| Yes | No |
|---|
| GO to C6. | REPAIR fuse panel or vehicle electrical system. REPEAT System Pre-Check. |
C6 REAR ABS WARNING LIGHT BULB
- Check REAR ABS warning light bulb.
Is bulb OK?
| Yes | No |
|---|
| REPAIR open between rear ABS warning light fuse and Pin 7 of the harness connector. REPEAT System Pre-Check. | REPLACE bulb. REPEAT System Pre-Check. |
PINPOINT TEST D: YELLOW REAR ABS WARNING LIGHT SELF-CHECK OK, BUT LIGHT AUTOMATICALLY BEGINS FLASHING
Affected Circuit(s)/Electrical Component(s)

Description
The yellow rear ABS warning light will automatically begin a flash-out sequence if the diagnostic line Circuit 571 (BK/O) or 483 (R) is shorted to ground. This will result in a blown fuse for the Keep-Alive Memory Power for the anti-lock electronic control module. An open Keep-Alive Memory (KAM) fuse is most likely caused by a grounded diagnostic connector.
Possible Contributing Base Brake Component/Vehicle Wiring Concerns
- Intermittent anti-lock electronic control module power circuit
- Intermittent anti-lock electronic control module ground circuit
- Intermittent rear ABS warning light circuit
- Blown Keep-Alive Memory fuse
D1 OBSERVE REAR ABS WARNING LIGHT FOR FLASH SEQUENCE
- Observe REAR ABS warning light and determine if the flashing is a diagnostic trouble code (one or more short pulses followed by one long pulse).
Is the flash sequence a diagnostic trouble code?
| Yes | No |
|---|
| INSPECT Circuits 571 (BK/O) and 483 (R) for short to ground. REPAIR circuit and REPLACE RABS KAM fuse. (SEE owner's manual.) REPEAT System Pre-Check. | GO to D2. |
D2 INTERMITTENT POWER TO ANTI-LOCK ELECTRONIC CONTROL MODULE
- Remove the harness connector from the anti-lock electronic control module.
- Set multimeter to 20VDC scale.
- Key to run.
- Shake the instrument panel harness while measuring battery voltage between Pin 1, Pin 9 and chassis ground.
Is voltage steady and greater than 9 volts?
| Yes | No |
|---|
| GO to D3. | REPAIR Circuit 601 (LB/PK). REPEAT System Pre-Check. |
D3 DAMAGED ANTI-LOCK ELECTRONIC CONTROL MODULE GROUND
- Disconnect the battery ground cable.
- Set the multimeter on the 200 ohm scale.
- Shake the anti-lock electronic control module harness while reading the resistance between Pin 4 and chassis ground.
Is resistance less than 1 ohm and steady?
| Yes | No |
|---|
| REPLACE anti-lock electronic control module. RECONNECT the battery ground cable. REPEAT System Pre-Check. | REPAIR poor ground in Circuit 530 (LG/Y) or Circuit 570 (BK/W). RECONNECT the battery ground cable. REPEAT System Pre-Check. |
PINPOINT TEST E: YELLOW REAR ABS WARNING LIGHT SELF-CHECK OK, BUT NO DIAGNOSTIC TROUBLE CODE WHEN DIAGNOSTICS ARE STARTED
Affected Circuit(s)/Electrical Component(s)

Description
The yellow RABS warning light should automatically begin a flash-out sequence if the diagnostic connector is shorted to ground for at least one second. This flashout sequence can be observed by watching the yellow REAR ABS warning light. There are a few conditions that will prevent the flashout from occurring. These must be resolved before continuing the repair process.
Possible Contributing Base Brake Component/Vehicle Wiring Concerns
- Burned-out brake taillights
- Missing anti-lock electronic control module power (Circuit 601 [LB/PK] and associated fuse)
- Shorted yellow rear ABS warning light circuit (Circuit 603 [DG])
- Incorrect anti-lock electronic control module (RABS I vs. RABS II)
 CAUTION: RABS I vehicles which have been upgraded with RABS II anti-lock electronic control module will NOT have Keep-Alive Memory and therefore will not be able to store codes when the vehicle is turned off.
NOTE: A RABS I system which has previously been serviced may have its anti-lock electronic control module upgraded to a RABS II. In the event that you are uncertain whether you have a RABS I or RABS II anti-lock electronic control module, check the anti-lock electronic control module part number to be certain of the type of system you have.
Part number F3TF-2C018- RABS II anti-lock electronic control modulePart number F3UF-2C018- RABS II anti-lock electronic control moduleAll other part numbers are RABS I anti-lock electronic control module
E1 DETERMINE IF SYSTEM IS RABS I OR RABS II
- Determine if the ABS system is a RABS I or a RABS II system.
Is anti-lock electronic control module RABS II?
| Yes | No |
|---|
| GO to E2. | Anti-lock electronic control module is a RABS I. REFER to appropriate year service manual (1987-1992). This manual does not cover RABS I anti-lock brake system. |
E2 CHECK FOR BURNED-OUT REAR BRAKE LIGHTS
- Press on brake pedal while observing rear brake lights.
Do the brake lights function properly?
| Yes | No |
|---|
| GO to E3. | REPAIR brake light system: Burned-out bulbs or open Circuit 511 (LG). REPEAT System Pre-Check. |
E3 CHECK FOR LOSS OF BRAKE INPUT TO ANTI-LOCK ELECTRONIC CONTROL MODULE
- Remove the harness connector from the anti-lock electronic control module. Check for terminal backout.
- Set multimeter to 20 VDC range.
- Press on brake pedal hard enough to turn on rear brake lights.
- Measure voltage from harness connector Pin 11 to chassis ground while brake pedal is pressed.
Is voltage greater than 9 volts?
| Yes | No |
|---|
| LEAVE anti-lock electronic control module disconnected. GO to E4. | REPAIR open in Circuit 511 (LG). RECONNECT anti-lock electronic control module. REPEAT System Pre-Check. |
E4 CHECK POWER TO THE ANTI-LOCK ELECTRONIC CONTROL MODULE
- Key to run.
- Measure the voltage between RABS harness connector Pin 1 (or Pin 9) and chassis ground.
Is voltage greater than 9 volts?
| Yes | No |
|---|
| LEAVE anti-lock electronic control module disconnected. GO to E5. | REPAIR Circuit 601 (LB/PK) or associated fuse. RECONNECT anti-lock electronic control module. REPEAT System Pre-Check. |
E5 CHECK FOR SHORTS IN ANTI-LOCK ELECTRONIC CONTROL MODULE HARNESS CONNECTOR
- With same setup as in Step E4, observe REAR ABS warning light.
Is the REAR ABS warning light on?
| Yes | No |
|---|
| CHECK for short to ground in Circuit 603 (DG). RECONNECT the anti-lock electronic control module. REPEAT System Pre-Check. | LEAVE anti-lock electronic control module disconnected. GO to E6. |
E6 CHECK CIRCUIT 571 (BK/O) CONTINUITY
- Set the multimeter to the 200 ohm scale.
- Disconnect the RABS diagnostic connector from its mating half (Circuits 571 [BK/O] and 483 [R]).
- Measure resistance of Circuit 571 (BK/O) from diagnostic connector to anti-lock electronic control module harness connector Pin 12.
Is the resistance less than 20 ohms?
| Yes | No |
|---|
| REPLACE anti-lock electronic control module. | REPAIR Circuit 571 (BK/O). RECONNECT anti-lock electronic control module. REPEAT System Pre-Check. |
PINPOINT TEST F: YELLOW REAR ABS WARNING LIGHT FLASHES TWO TIMES WHEN RETRIEVING DIAGNOSTIC TROUBLE CODES (CODE 2)
Affected Circuit(s)/Electrical Component(s)

Description
Code 2 is generated when the anti-lock electronic control module detects an open circuit in Circuit 599 (PK/LG). The code may also be generated by a failed isolation solenoid (open coil) internal to the RABS valve or a failed internal anti-lock electronic control module circuit.
Possible Contributing Base Brake Component/Vehicle Wiring Concerns
- Terminal backout in the anti-lock electronic control module harness connector at Pin 13
- Terminal backout in the RABS valve harness connector at Pin 1
- Bulkhead connector (between engine compartment and instrument panel) terminal backout or loose connection
- Anti-lock electronic control module or RABS valve connectors not fully mated with component
- Intermittent open circuit in Circuit 599 (PK/LG)
F1 CHECK YELLOW RABS WARNING LAMP
- Key off.
- Locate and disconnect the diagnostic connector from its mating half (Circuits 571 [BK/O] and 483 [R]).
- Reconnect diagnostic connector.
- Key on.
Does the yellow RABS warning lamp come ON?
| Yes | No |
|---|
| Hard fault. GO to F2. | Intermittent fault. GO to Pinpoint Test T and PROCEED with intermittent diagnosis for all affected circuits. REFER to mini-schematic for this test. |
F2 VERIFY INTEGRITY OF ANTI-LOCK ELECTRONIC CONTROL MODULE HARNESS CONNECTION
- Key off.
- Disconnect battery ground cable.
- Remove the anti-lock electronic control module harness connector.
- Pull gently on Pin 13 (PK/LG) just behind the harness connector.
Is connector clean and secure?
| Yes | No |
|---|
| LEAVE anti-lock electronic control module connector disconnected. GO to F3. | SERVICE terminal or harness connector as needed. If terminals are not serviceable, REPLACE anti-lock electronic control module. GO to F6. |
F3 VERIFY INTEGRITY OF RABS VALVE CONNECTION
- Remove RABS valve connector.
- Inspect RABS valve component connector for contamination or loose terminals.
- Pull gently on Pin 1 (PK/LG) just behind the harness connector.
Is terminal clean and secure?
| Yes | No |
|---|
| LEAVE RABS valve harness connector disconnected. GO to F4. | SERVICE terminal or connector as needed. If component side is not serviceable, REPLACE RABS valve. GO to F6. |
F4 CHECK FOR CONTINUITY ALONG HARNESS CIRCUIT 599 (PK/LG)
- Verify multimeter is on 200 ohm scale.
- Measure resistance between anti-lock electronic control module harness connector Pin 13 (PK/LG) and RABS valve component side connector harness connector Pin 1.
Is resistance greater than 10 ohms?
| Yes | No |
|---|
| FIND and REPAIR open circuit along Circuit 599 (PK/LG). GO to F6. | Circuit is not open. GO to F5. |
F5 CHECK FOR OPEN RABS VALVE ISOLATION SOLENOID
- Verify multimeter is on 200 ohm scale.
- Measure resistance between RABS valve component side connector Pins 1 (PK/LG) and 3 (BK/W).
Is resistance greater than 6 ohms?
| Yes | No |
|---|
| Open circuit in RABS valve is indicated. REPLACE RABS valve. GO to F6. | REPLACE the anti-lock electronic control module. GO to F6. |
F6 CLEAR CODE/PULL CODE
- Key off.
- Reconnect battery ground cable.
- Verify all connectors are installed.
- Locate and disconnect the diagnostic connector from its mating half (Circuits 571 [BK/O] and 483 [R]).
- Key to run.
- Begin diagnostic trouble code flashout by connecting Circuit 571 (BK/O) to a chassis ground for at least 1 second.
Is original code obtained?
| Yes | No |
|---|
| If all steps are complete, GO to Pinpoint Test T. If all steps are not complete, RETURN to last step completed and CONTINUE. | GO to pinpoint test for corresponding code. If DTC 16 is obtained, GO to Pinpoint Test S. |
PINPOINT TEST G: YELLOW REAR ABS WARNING LIGHT FLASHES THREE TIMES WHEN RETRIEVING DIAGNOSTIC TROUBLE CODES (CODE 3)
Affected Circuit(s)/Electrical Component(s)

Description
Code 3 is generated when the anti-lock electronic control module detects an open circuit in line 664 (Y/LG) or 274 (BK/W). The code may also be generated by a failed dump solenoid (open coil) internal to the RABS valve or a failed internal anti-lock electronic control module circuit.
Possible Contributing Base Brake Component/Vehicle Wiring Concerns
- Terminal backout in the anti-lock electronic control module harness connector at Pin 8 or 14
- Terminal backout in the RABS valve harness connector at Pin 2
- Bulkhead connector (between engine compartment and instrument panel) terminal backout or loose connection
- Anti-lock electronic control module or RABS valve connectors not fully mated with component
- Intermittent open circuit in line 664 (Y/LG)
G1 CHECK YELLOW RABS WARNING LAMP
- Key off.
- Locate and disconnect the diagnostic connector from its mating half (Circuits 571 [BK/O] and 483 [R]).
- Reconnect diagnostic connector.
- Key on.
Does the yellow RABS warning lamp come ON?
| Yes | No |
|---|
| Hard fault. GO to G2. | Intermittent fault. GO to Pinpoint Test T and PROCEED with intermittent diagnosis for all affected circuits. REFER to mini-schematic for this test. |
G2 VERIFY INTEGRITY OF ANTI-LOCK ELECTRONIC CONTROL MODULE CONNECTION
- Key off.
- Disconnect battery ground cable.
- Remove the anti-lock electronic control module connector.
- Inspect anti-lock electronic control module Pins 8 and 14.
- Pull gently on each wire just behind Pins 8 and 14 on harness connector.
Are connections clean and secure?
| Yes | No |
|---|
| LEAVE anti-lock electronic control module connector disconnected. GO to G3. | SERVICE terminal or connector as needed. If component side is not serviceable, REPLACE anti-lock electronic control module. GO to G6. |
G3 VERIFY INTEGRITY OF RABS VALVE CONNECTION
- Remove RABS valve connector.
- Inspect RABS valve connector Pin 2.
- Gently pull on Pin 2 wire just behind RABS harness connector.
Are connections clean and secure?
| Yes | No |
|---|
| LEAVE RABS valve connector disconnected. GO to G4. | SERVICE terminal or connector as needed. If not serviceable, REPLACE RABS valve. GO to G6. |
G4 CHECK FOR CONTINUITY ALONG HARNESS CIRCUIT 664 (Y/LG) FROM ANTI-LOCK ELECTRONIC CONTROL MODULE CONNECTOR PINS 8 AND 14
- Set multimeter on 200 ohm scale.
- Measure resistance between anti-lock electronic control module harness connector Pin 8 and RABS valve harness connector Pin 2.
- Measure resistance between anti-lock electronic control module harness connector Pin 14 and RABS valve harness connector Pin 2.
Is resistance greater than 10 ohms for either measurement?
| Yes | No |
|---|
| FIND and REPAIR open circuit along 664 (Y/LG). GO to G6. | Circuit is not open. GO to G5. |
G5 CHECK FOR OPEN RABS DUMP VALVE SOLENOID
- Verify multimeter is on 200 ohm scale.
- Measure resistance between RABS valve Pins 2 and 3.
Is resistance greater than 3 ohms?
| Yes | No |
|---|
| Open circuit in RABS valve is indicated. REPLACE RABS valve. GO to G6. | REPLACE the anti-lock electronic control module. GO to G6. |
G6 CLEAR CODE/PULL CODE
- Turn key to off.
- Reconnect battery ground cable.
- Verify all connectors are installed.
- Locate and disconnect the diagnostic connector from its mating half (Circuits 571 [BK/O] and 483 [R]).
- Turn key to ON position.
- Begin diagnostic trouble code flashout by connecting Circuit 571 (BK/O) to a chassis ground for at least 1 second.
Is original code obtained?
| Yes | No |
|---|
| If all steps are complete, GO to Pinpoint Test T. If all steps are not complete, RETURN to the last step completed and CONTINUE. | GO to Pinpoint Test for corresponding code. If DTC 16 is obtained, GO to Pinpoint Test S. |
PINPOINT TEST H: YELLOW REAR ABS WARNING LIGHT FLASHES FOUR TIMES WHEN RETRIEVING DIAGNOSTIC TROUBLE CODES (CODE 4)
Affected Circuit(s)/Electrical Component(s)

Description
Code 4 is generated when the anti-lock electronic control module detects a short circuit (less than 10k ohms) in Circuit 535 (LB/R). This can indicate a short in the valve reset switch circuit, or a hydraulic leak into dump section of the RABS valve.
Possible Contributing Base Brake Component/Vehicle Wiring Concerns
- Terminal backout in the anti-lock electronic control module harness connector at Pin 6
- Terminal backout in the RABS valve harness connector at Pins 4 or 3
- Bulkhead connector (between engine compartment and instrument panel) terminal backout or loose connection
- Anti-lock electronic control module or RABS valve connectors not fully mated with component
- Intermittent open or open circuit in Circuits 535 (LB/R), or 274 (BK/W)
- Intermittent short or short circuit in Circuit 535 (LB/R)
- Defective RABS valve
- Worn or damaged anti-lock electronic control module
H1 CHECK WARNING LIGHTS
- Key off.
- Locate and disconnect the diagnostic connector from its mating half (Circuits 571 [BK/O] and 483 [R]).
- Reconnect diagnostic connector.
- Key on.
Do BOTH the red BRAKE and yellow RABS lamps come on?
| Yes | No |
|---|
| Hard fault. GO to H2. | Intermittent fault. GO to Pinpoint Test T and PROCEED with intermittent diagnosis for all affected circuits. REFER to mini-schematic for this test. |
H2 VERIFY INTEGRITY OF ANTI-LOCK ELECTRONIC CONTROL MODULE CONNECTION
- Key to off.
- Disconnect battery ground cable.
- Inspect anti-lock electronic control module component connector Pin 6.
- Inspect anti-lock electronic control module harness connector Pin 6.
- Pull gently on Pin 6 wire just behind the anti-lock electronic control module harness connector.
Are connections clean and secure?
| Yes | No |
|---|
| LEAVE anti-lock electronic control module connector disconnected. GO to H3. | SERVICE terminal or connector as needed. If component side is not serviceable, REPLACE anti-lock electronic control module. GO to H9. |
H3 VERIFY INTEGRITY OF RABS VALVE CONNECTION
- Remove RABS valve connector.
- Inspect RABS valve component connector Pins 4 and 3.
- Inspect RABS valve harness connector Pins 4 and 3.
- Pull gently on Pin 4 wire just behind the RABS valve harness connector.
- Pull gently on Pin 3 just behind the RABS valve harness connector.
Are connections clean and secure?
| Yes | No |
|---|
| LEAVE RABS valve connector disconnected. GO to H4. | SERVICE terminal or connector as needed. If component side is not serviceable, REPLACE RABS valve. GO to H9. |
H4 CHECK FOR CONTINUITY ALONG ANTI-LOCK ELECTRONIC CONTROL MODULE HARNESS CIRCUIT 535 (LB/R)
- Set multimeter on 200 ohm scale.
- Measure resistance between anti-lock electronic control module harness connector Pin 6 and RABS valve harness connector Pin 4.
Is resistance greater than 10 ohms?
| Yes | No |
|---|
| FIND and REPAIR open circuit along Circuit 535 (LB/R). GO to H9. | Circuit is not open. GO to H5. |
H5 CHECK FOR CONTINUITY ALONG GROUND CIRCUIT 274 (BK/W)
- Set multimeter on 200 ohm scale.
- Measure resistance between RABS valve harness connector Pin 3 and negative battery post.
Is resistance 3 ohms or less?
| Yes | No |
|---|
| GO to H6. | FIND and REPAIR open circuit along Circuit 274 (BK/W). GO to H9. |
H6 CHECK FOR SHORT ALONG ANTI-LOCK ELECTRONIC CONTROL MODULE HARNESS CIRCUIT 535 (LB/R)
- Set multimeter on 200 ohm scale.
- Measure resistance between anti-lock electronic control module harness connector Pin 6 and chassis ground.
Is resistance greater than 12 ohms?
| Yes | No |
|---|
| Circuit is not shorted. GO to H7. | FIND and REPAIR ground short along Circuit 535 (LB/R). GO to H9. |
H7 CHECK FOR CLOSED RABS VALVE RESET SWITCH
- Verify multimeter is on 200k ohm scale.
- Measure resistance between RABS valve connector Pin 4 and RABS valve body.
Is resistance greater than 10k ohms?
| Yes | No |
|---|
| Reset switch is not closed. GO to H8. | Shorted circuit in RABS valve is indicated. REPLACE RABS valve. GO to H9. |
H8 CHECK RESISTANCE BETWEEN VALVE SWITCH AND VALVE COMMON
- Verify multimeter is on 200k ohm scale.
- Measure resistance between RABS valve Pins 4 and 3.
Is resistance greater than 10k Ohms?
| Yes | No |
|---|
| REPLACE anti-lock electronic control module. GO to H9. | Shorted or open circuit in RABS valve is indicated. REPLACE RABS valve. GO to H9. |
H9 CLEAR CODE/PULL CODE
- Key off.
- Reconnect battery ground cable.
- Verify all connectors are installed.
- Locate and disconnect the diagnostic connector from its mating half (Circuits 571 [BK/O] and 483 [R]).
- Key to run. Begin diagnostic trouble code flashout by connector Circuit 571 (BK/O) to a chassis ground for at least 1 second.
Was original code obtained?
| Yes | No |
|---|
| GO to H10. | GO to the pinpoint test for the corresponding code. If DTC 16 is obtained, GO to Pinpoint Test S. |
H10 VERIFY PROPER WARNING LIGHT PROVEOUT
- Start the vehicle and observe the REAR ABS warning light for proper warning light proveout.
Does the REAR ABS warning light prove out properly?
H11 VALVE RESET SWITCH CHECK
Does the RABS warning light come on?
| Yes | No |
|---|
| Key off. GO to H13. | Key off. GO to H12. |
H12 RABS HYDRAULIC VALVE LEAK TEST
NOTE: The condition is similar to the master cylinder bypass condition. It is important that the brake pedal be quickly and forcefully applied to rule out master cylinder bypass as the cause if a hydraulic leak is detected. Typically, master cylinder bypass only occurs at low line pressures.
- Press hard on the brake pedal and keep pressure on the brake pedal for 30 seconds.
- While keeping pressure on the brake, monitor the height of the brake pedal.
Does the brake pedal drop slowly toward the floor?
H13 OBTAIN DIAGNOSTIC TROUBLE CODE
- Obtain diagnostic trouble code.
Is Code 4 obtained?
| Yes | No |
|---|
| REPLACE RABS valve. GO to Pinpoint Test S to verify concern is resolved. | DTC 16 is obtained. Inconsistent result. If RABS warning light did come on in H11, then a diagnostic trouble code other than Code 16 should be stored. REPEAT H13 and verify Code 16 is obtained. DTC obtained is NOT Code 4. GO to the pinpoint test for the code obtained. No code is obtained. GO to Pinpoint Test E. |
H14 BLOCKED ISOLATION ORIFICE
- Disconnect anti-lock electronic control module harness connector.
- Raise the vehicle on a hoist far enough to allow all wheels to spin freely.
- Verify that the vehicle is in 4x2 mode and the hubs are unlocked (4x4 only).
- Start the vehicle and allow rear wheels to spin at idle for at least 30 seconds.
- Apply the brake pedal with the force of a normal traffic stop.
Do the rear wheels react uncharacteristically slowly or continue to spin?
| Yes | No |
|---|
| RECONNECT anti-lock electronic control module. REPLACE RABS valve. GO to Pinpoint Test S to verify concern is resolved. | RABS valve is OK. RECONNECT anti-lock electronic control module. GO to Pinpoint Test T. |
PINPOINT TEST J: YELLOW REAR ABS WARNING LIGHT FLASHES FIVE TIMES WHEN RETRIEVING DIAGNOSTIC TROUBLE CODES (CODE 5)
Affected Circuit(s)/Electrical Component(s)

Description
Code 5 is generated when the maximum number of allowable dump pulses has been exceeded. The system will only recognize this condition during an anti-lock stop in 2WD mode. The code may be caused by a blocked RABS dump valve orifice, a stuck dump valve, an open circuit in Circuit 210 (LB), a worn or damaged 4x4 transfer case that causes the vehicle to remain in 4x4 after 4x2 has been selected, or mechanical problems in the rear brake system. (Rear brakes may lock.)
Possible Contributing Base Brake Component/Vehicle Wiring Concerns
- Parking brake drag
- Worn or damaged 4x4 switch
- Rear brake assembly grabby or hanging up
- Connector corrosion or contamination
- Intermittent open circuit in Circuit 210 (LB)
- Pierced wire insulation to battery power (4x4 only)
J1 CHECK YELLOW RABS WARNING LAMP
- Key off.
- Locate and disconnect the diagnostic connector from its mating half (Circuits 571 [BK/O] and 483 [R]).
- Reconnect diagnostic connector.
- Key on.
Does the yellow RABS warning lamp come ON?
| Yes | No |
|---|
| Hard fault. GO to J2. | Intermittent fault. GO to Pinpoint Test T and PROCEED with intermittent diagnosis for all affected circuits. REFER to mini-schematic for this test. |
J2 DRIVE STATUS
Was vehicle in 4-wheel drive when code occurred?
J3 CHECK FOR INCORRECT 4WD SWITCH SIGNAL, OR SHORT TO POWER TO ANTI-LOCK ELECTRONIC CONTROL MODULE
- Disconnect anti-lock electronic control module harness connector to deactivate RABS.
- Key to run.
- Shift into 4x4 mode.
- Set multimeter to 20V DC scale.
- Measure voltage between Pin 5 of the anti-lock electronic control module harness and chassis ground.
Is the measured voltage less than 1 volt?
| Yes | No |
|---|
| GO to J4. | REPAIR 4x4 indicator switch or REPAIR battery short in Circuit 210 (LB). GO to J5. |
J4 CHECK FOR LOW OR ERRATIC RABS SENSOR SIGNAL
- Disconnect anti-lock electronic control module harness connector.
- Position vehicle on hoist and raise both front and rear wheels just enough to clear the floor.
- Start the engine and turn the wheels at 8 km/h (5 mph).
- Place multimeter on 2000mV AC scale.
- Measure the voltage across anti-lock electronic control module harness connector Pins 3 and 10.
Is the voltage less than 650mV RMS or is RABS sensor signal erratic?
| Yes | No |
|---|
| COMPLETE Pinpoint Test K for Code 6, steps K3 through K8, then RETURN. GO to J5 to verify. | REINSTALL anti-lock electronic control module connector. GO to J6. |
J5 CLEAR CODE/PULL CODE
- Key off.
- Reconnect battery ground cable.
- Verify all connectors are installed.
- Locate and disconnect the diagnostic connector from its mating half (Circuits 571 [BK/O] and 483 [R]).
- Turn key on.
- Begin diagnostic trouble code flashout by connecting Circuit 571 (BK/O) to a chassis ground for at least 1 second.
Was original code obtained?
| Yes | No |
|---|
| If all steps are complete, GO to Pinpoint Test T. If all steps are not complete, RETURN to the last step completed and CONTINUE. | GO to pinpoint test for corresponding code. If DTC 16 is obtained, GO to Pinpoint Test S. |
J6 VERIFY PROPER WARNING LIGHT PROVEOUT
- Start the vehicle and observe the REAR ABS warning light for proper warning light proveout.
Does the REAR ABS warning light prove out properly?
J7 BASE BRAKE STOPPING TEST
- Remove the harness connector from the anti-lock electronic control module.
- Drive the vehicle at approximately 32 km/h (20 mph).
- Perform a light to medium (normal traffic) stop.
Do the rear wheels lock up?
| Yes | No |
|---|
| RECONNECT anti-lock electronic control module. GO to Symptom Chart. | RECONNECT anti-lock electronic control module. GO to J8. |
J8 DRY ROAD STOP TEST
Do the rear wheels lock up? (Momentary lockup followed by spinup is permissible.)
| Yes | No |
|---|
| REPLACE RABS valve. GO to Pinpoint Test S to verify concern is resolved. | GO to J9. |
J9 VERIFY PROPER RABS II OPERATION IN 4X2
WARNING: PERFORM THIS TEST ON AN AXLE HOIST ONLY.
NOTE: Because vehicle is not on the ground, wheels will spin for a significant time. This is not indicative of vehicle braking performance.
- Place vehicle on the hoist and raise high enough to clear all wheels off the ground.
- Verify vehicle is in 4x2 mode. (4x4 vehicles only.)
- Place vehicle transmission in Drive Low (automatic) or First gear (manual).
- Accelerate engine so that speedometer indicates 16 km (10 mph).
- Press hard on the brake pedal until wheels stop.
Do the rear wheels first lock up and then spin?
| Yes | No |
|---|
| LEAVE key on. GO to J10. | REPLACE anti-lock brake control module. GO to Pinpoint Test S to verify concern is resolved. |
J10 OBTAIN DIAGNOSTIC TROUBLE CODE
- Obtain diagnostic trouble code.
Is Code 5 obtained?
| Yes | No |
|---|
| Inconsistent result. Previous step indicates anti-lock brake control module is functioning correctly. CLEAR code REPEAT J9. If result repeats, GO to J1. | DTC 16 is obtained. RETURN to pinpoint tests. DTC obtained is NOT Code 5. GO to the pinpoint test for the code obtained. No code is obtained. GO to Pinpoint Test E. |
PINPOINT TEST K: YELLOW REAR ABS WARNING LIGHT FLASHES SIX TIMES WHEN RETRIEVING DIAGNOSTIC TROUBLE CODES (CODE 6)
Affected Circuit(s)/Electrical Component(s)

Description
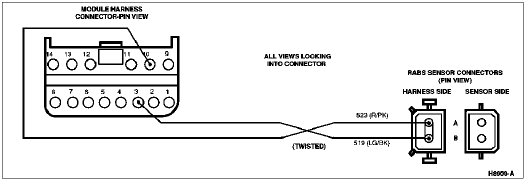
Code 6 is generated when the anti-lock electronic control module detects an interruption in the continuous signal from the RABS sensor while rolling, caused by an intermittent open internal to the RABS sensor, Circuit 519 (LG/BK) or Circuit 523 (R/PK), or a damaged RABS sensor ring. This condition can be detected anytime the brake pedal is not applied and 20 seconds has elapsed since the ignition self-test.
Possible Contributing Base Brake Component/Vehicle Wiring Concerns
- Terminal backout in the anti-lock electronic control module harness connector at Pins 3 and 10
- Terminal backout in the RABS sensor harness connector at Pins A and B
- Bulkhead connector (between engine compartment and instrument panel) terminal backout or loose connection
- Anti-lock electronic control module or RABS sensor connectors are not fully mated with component
- Intermittent open/short circuit in Circuits 519 (LG/BK) or 523 (R/PK)
- Damaged RABS sensor (possibly metal shavings on pole piece)
- Damaged RABS sensor ring (possibly teeth missing)
K1 CHECK YELLOW RABS WARNING LAMP
- Key off.
- Locate and disconnect the diagnostic connector from its mating half (Circuits 571 [BK/O] and 483 [R]).
- Reconnect diagnostic connector.
- Key to run.
Does the yellow RABS warning lamp come ON?
| Yes | No |
|---|
| Hard fault. GO to K2. | Intermittent fault. GO to Pinpoint Test T and PROCEED with intermittent diagnosis for all affected circuits. REFER to mini-schematic for this test. |
K2 VERIFY INTEGRITY OF ANTI-LOCK ELECTRONIC CONTROL MODULE HARNESS CONNECTION
- Key off.
- Disconnect battery ground cable.
- Remove the anti-lock electronic control module connector.
- Inspect anti-lock electronic control module connector for contamination and loose or bent terminals.
- Pull gently on Circuit 519 (LG/BK) just behind Pin 3 on the harness connector.
- Pull gently on Circuit 523 (R/PK) just behind Pin 10 on the harness connector.
Are all connections clean and secure?
| Yes | No |
|---|
| LEAVE anti-lock electronic control module connector disconnected. GO to K3. | SERVICE terminals or connector as needed. If component side is not serviceable, REPLACE anti-lock electronic control module. GO to K8. |
K3 VERIFY INTEGRITY OF RABS SENSOR CONNECTION
- Verify key is off.
- Remove RABS sensor harness connector.
- Inspect RABS connector for contamination and bent or loose terminals.
- Gently pull on Circuit 519 (LG/BK) behind Pin B of harness connector.
- Gently pull on Circuit 523 (R/PK) behind Pin A of harness connector.
Are all connections clean and secure?
| Yes | No |
|---|
| REINSTALL RABS sensor connector. GO to K4. | SERVICE terminal or connector as needed. If component side is not serviceable, REPLACE RABS sensor. GO to K8. |
K4 VERIFY PROPER RABS SENSOR WIRE ROUTING
Are wires secure and properly routed?
| Yes | No |
|---|
| GO to K5. | FIND and REPAIR as necessary. GO to K8. |
K5 VERIFY RABS SENSOR INTEGRITY
- Set multimeter on the 20k ohm scale.
- Check resistance between Pins A and B of the RABS sensor component connector.
Is resistance between 900 and 2500 ohms?
| Yes | No |
|---|
| GO to K6. | REPLACE RABS sensor. GO to K8. |
K6 CHECK FOR ERRATIC RABS SENSOR SIGNAL AND LOOSE WIRE CONNECTORS
- Set multimeter on the 20k ohm scale.
- Check resistance between Pin 10 and Pin 3 of the harness connector while shaking the harness from RABS sensor to anti-lock electronic control module.
Is reading steady and between 900 and 2500 ohms?
| Yes | No |
|---|
| Signal is not erratic. GO to K7. | FIND and REPAIR open/short circuit along Circuits 519 (LG/BK) and 523 (R/PK). GO to K8. |
K7 CHECK FOR METAL CHIPS ON RABS SENSOR MAGNET POLE PIECE
- Verify key is off.
- Remove the RABS sensor from the rear axle housing and inspect for a buildup of metal chips on RABS sensor magnetic pole.
Are metal chips present?
| Yes | No |
|---|
| DRAIN and CLEAN rear axle housing. GO to K8. | REPLACE anti-lock electronic control module. GO to K8. |
K8 CLEAR CODE/PULL CODE
- Turn key off.
- Reconnect battery ground cable.
- Verify all connectors are installed.
- Locate and disconnect the diagnostic connector from its mating half (Circuits 571 [BK/O] and 483 [R]).
- Turn key to on.
- Begin diagnostic trouble code flashout by connecting Circuit 571 (BK/O) to a chassis ground for at least 1 second.
Was original code obtained?
| Yes | No |
|---|
| GO to K9. | GO to Pinpoint Test for corresponding code. If DTC 16 is obtained, GO to Pinpoint Test S. |
K9 VERIFY PROPER WARNING LIGHT PROVEOUT
- Key on and observe the REAR ABS warning light for proper bulb proveout.
Does the REAR ABS warning light prove out properly?
K10 MEASURE RABS SENSOR OUTPUT
- Put vehicle on hoist and raise so that the rear wheels can rotate freely.
- Verify the vehicle is in 4x2 mode and hubs are unlocked.
- Set an AC voltmeter on the 2000mV scale.
- Remove the cap from the RABS sensor test connector and connect the AC voltmeter across the connector leads.
- Start the engine and turn the rear wheels at 8 km/h (5 mph).
- Measure the voltage output of the RABS sensor.
Is 650mV or more registered?
| Yes | No |
|---|
| REINSTALL the RABS sensor test connector cap. GO to K11. | REINSTALL the RABS sensor test connector cap. REPLACE RABS sensor. GO to Pinpoint Test S to verify concern is resolved. |
K11 MEASURE RABS SENSOR AIR GAP
- Remove rear axle differential cover.
- Measure the shortest distance from the RABS sensor pole piece to the teeth on the RABS sensor ring.
- Rotate the axle 60-90 degrees.
- Repeat the two previous steps five times for a total of five measurements.
Are all measurements between 0.127mm (0.005 inch) and 1.14mm (0.045 inch) and within 0.254mm (0.010 inch) of each other?
| Yes | No |
|---|
| GO to K13. | Measurements are not between 0.127mm (0.005 inch) and 1.14mm (0.045 inch). CHECK for foreign material under RABS sensor mounting flange and on carrier housing. REPLACE RABS sensor. GO to K12. Not all measurements are within 0.254mm (0.010 inch) of each other. REPLACE RABS sensor ring. GO to Pinpoint Test S to verify concern is resolved. |
K12 IMPROPER RABS SENSOR GAP RESOLUTION
- Verify that the installed RABS sensor is seated fully in the bore and the hold-down bolt is tightened to specification.
- Repeat measurements from Step K11.
Are all measurements between 0.127mm (0.005 inch) and 1.14mm (0.045 inch) and within 0.254mm (0.010 inch) of each other?
K13 CHECK CONDITION OF RABS SENSOR RING TEETH
- Carefully inspect each tooth on the RABS sensor ring. (Rear axle differential cover should still be off.)
Are any teeth missing, malformed, or damaged?
PINPOINT TEST L: YELLOW REAR ABS WARNING LIGHT FLASHES SEVEN TIMES WHEN RETRIEVING DIAGNOSTIC TROUBLE CODES (CODE 7)
Affected Circuit(s)/Electrical Component(s)
Description
Code 7 is generated when the anti-lock electronic control module detects a missing isolation solenoid output. This can only be detected during an ignition self-check or during RABS stop.
Possible Contributing Base Brake Component/Vehicle Wiring Concerns
- Anti-lock electronic control module internal fuse blown or internal open circuit
- Shorted isolation solenoid internal to the RABS valve
- Intermittent short or shorted circuit in Circuit 599 (PK/LG)
- Contamination or bent Pins 1 and 3 of RABS valve connector shorting together
L1 CHECK YELLOW RABS WARNING LAMP
- Key off.
- Locate and disconnect the diagnostic connector from its mating half (Circuits 571 [BK/O] and 483 [R]).
- Reconnect diagnostic connector.
- Key to run.
Does the yellow RABS warning lamp come ON?
| Yes | No |
|---|
| Hard fault. GO to L2. | Intermittent fault. GO to Pinpoint Test T and PROCEED with intermittent diagnosis for all affected circuits. REFER to mini-schematic for this test. |
L2 CHECK FOR RABS VALVE ISOLATION SOLENOID OR WIRING SHORTED TO GROUND
- Key off.
- Disconnect battery ground cable.
- Remove the anti-lock electronic control module harness connector.
- Set the multimeter on the 200 ohm scale.
- Measure the resistance between anti-lock electronic control module harness connector Pin 13 and chassis ground.
Is resistance 3-6 ohms?
| Yes | No |
|---|
| Circuit is not shorted. REPLACE anti-lock electronic control module. GO to L6. | Resistance less than 3 ohms. Circuit is shorted. LEAVE anti-lock electronic control module harness connector disconnected. GO to L3. |
L3 CHECK INTEGRITY OF RABS VALVE CONNECTION
- Remove RABS valve connector.
- Inspect RABS valve connector and Pins 1 and 3.
Are connections clean and secure?
| Yes | No |
|---|
| Leave RABS valve harness connector disconnected. GO to L4. | SERVICE terminals or connector as needed. If component side is not serviceable, REPLACE RABS valve. GO to L6. |
L4 CHECK FOR SHORTED RABS VALVE ISOLATION SOLENOID
- Verify RABS valve harness connector removed.
- Set the multimeter on the 200 ohm scale.
- Measure the resistance between Pins 1 and 3 of RABS valve connector.
Is resistance greater than 3 ohms?
| Yes | No |
|---|
| LEAVE RABS valve harness connector disconnected. GO to L5. | REPLACE RABS valve. GO to L6. |
L5 CHECK FOR SHORT TO GROUND ALONG HARNESS CIRCUIT 599 (PK/LG)
- Set multimeter on 20k ohm scale.
- Measure resistance between anti-lock electronic control module harness connector Pin 13 (PK/LG) and chassis ground.
Is resistance less than 20k ohms?
| Yes | No |
|---|
| REPAIR ground short in Circuit 599 (PK/LG) between anti-lock electronic control module and RABS valve. GO to L6. | Conflict of information. REPEAT L3. |
L6 CLEAR CODE/PULL CODE
- Key off.
- Reconnect battery ground cable.
- Verify all connectors are installed.
- Locate and disconnect the diagnostic connector from its mating half (Circuits 571 [BK/O] and 483 [R]).
- Key to run.
- Begin diagnostic trouble code flashout by connecting Circuit 571 (BK/O) to a chassis ground for at least 1 second.
Is original code obtained?
| Yes | No |
|---|
| If all steps are complete, GO to Pinpoint Test T. If all steps are not complete, RETURN to the last step completed and CONTINUE. | GO to pinpoint test for corresponding code. If DTC 16 is obtained, GO to Pinpoint Test S. |
PINPOINT TEST M: YELLOW REAR ABS WARNING LIGHT FLASHES EIGHT TIMES WHEN RETRIEVING DIAGNOSTIC TROUBLE CODES (CODE 8)
Affected Circuit(s)/Electrical Component(s)
Description
Code 8 is generated when the anti-lock electronic control module detects a missing dump solenoid output. This concern can only be detected during an ignition self-test or during a REAR ABS stop.
Possible Contributing Base Brake Component/Vehicle Wiring Concerns
- Anti-lock electronic control unit internal fuse blown or internal open circuit
- Shorted dump solenoid internal to RABS valve
- Intermittent short or shorted circuit in Circuit 664 (Y/LG)
- Bulkhead connector between engine compartment and instrument panel terminals shorted
M1 CHECK YELLOW RABS WARNING LAMP
- Key off.
- Locate and disconnect the diagnostic connector from its mating half (Circuits 571 [BK/O] and 483 [R]).
- Reconnect diagnostic connector.
- Key to run.
Does the yellow RABS warning light come ON?
| Yes | No |
|---|
| Hard fault. GO to M2. | Intermittent fault. GO to Pinpoint Test T and PROCEED with intermittent diagnosis for all affected circuits. REFER to mini-schematic for this test. |
M2 CHECK FOR RABS VALVE DUMP SOLENOID OR WIRING SHORTED TO GROUND
- Key off.
- Disconnect battery ground cable.
- Remove the anti-lock electronic control module harness connector.
- Set the multimeter on the 200 ohm scale.
- Measure the resistance between anti-lock electronic control module harness connector Pin 8 and chassis ground.
- Measure the resistance between anti-lock electronic control module harness connector Pin 14 and chassis ground.
Is resistance 1-3 ohms between anti-lock electronic control module harness Pin 8 and ground AND between anti-lock electronic control module harness Pin 14 and ground?
| Yes | No |
|---|
| REPLACE anti-lock electronic control module. GO to M4. | Resistance less than 1 ohm between anti-lock electronic control module harness Pin 8 and ground OR
no resistance less than 1 ohm between anti-lock electronic control module harness Pin 14 and ground. LEAVE anti-lock electronic control module harness connector disconnected. GO to M3. |
M3 CHECK FOR SHORTED RABS VALVE DUMP SOLENOID
- Remove RABS valve harness connector.
- Set the multimeter on the 200 ohm scale.
- Measure the resistance between Pins 3 and 2 of RABS valve component connector.
Is resistance greater than 1 ohm?
| Yes | No |
|---|
| Leave RABS valve harness connector disconnected. GO to M4. | REPLACE RABS valve. GO to M5. |
M4 CHECK FOR SHORT TO GROUND ALONG HARNESS CIRCUIT 664 (Y/LG)
- Set multimeter on 20 ohm scale.
- Measure resistance between anti-lock electronic control module harness connector Pin 8 and RABS valve harness connector Pin 2.
- Measure resistance between anti-lock electronic control module harness connector Pin 14 and valve harness connector Pin 2.
Is resistance greater than 10 ohms between anti-lock electronic control module harness Pin 8 and RABS valve Pin 2 AND between anti-lock electronic control module harness Pin 14 and RABS valve Pin 2?
| Yes | No |
|---|
| Conflict of information. REPEAT M2. | Resistance less than 10 ohms between anti-lock electronic control module connector Pin 8 and RABS valve Pin 4 OR resistance less than 10 ohms between anti-lock electronic control module Pin 14 and RABS valve Pin 2. REPAIR short in Circuit 664 (Y/LG) between anti-lock electronic control module and RABS valve. GO to M5. |
M5 CLEAR CODE/PULL CODE
- Key off.
- Reconnect battery ground cable.
- Verify all connectors are installed.
- Locate and disconnect the diagnostic connector from its mating half (Circuits 571 [BK/O] and 483 [R]).
- Key to run.
- Begin diagnostic trouble code flashout by connecting Circuit 571 (BK/O) to a chassis ground for at least 1 second.
Is original code obtained?
| Yes | No |
|---|
| If all steps are complete, GO to Pinpoint Test T. If all steps are not complete, RETURN to the last step completed and CONTINUE. | GO to pinpoint test for corresponding code. If DTC 16 is obtained, GO to Pinpoint Test S. |
PINPOINT TEST N: YELLOW REAR ABS WARNING LIGHT FLASHES NINE TIMES WHEN RETRIEVING DIAGNOSTIC TROUBLE CODES (CODE 9)
Affected Circuit(s)/Electrical Component(s)
Description
Code 9 is generated when the anti-lock electronic control module detects high RABS sensor resistance. The anti-lock electronic control module will consider the RABS sensor circuit to have a high resistance when it exceeds approximately 3k ohms. The code may also be generated by a failed internal anti-lock electronic control module circuit.
Possible Contributing Base Brake Component/Vehicle Wiring Concerns
- Terminal backout in the anti-lock electronic control module harness connector at Pin 3 or Pin 10
- Terminal backout in the RABS sensor harness connector at Pins A or B
- Anti-lock electronic control module or RABS sensor connectors not fully mated with component
- Open or intermittent open circuit in Circuits 519 (LG/BK) or 523 (R/PK)
N1 CHECK YELLOW RABS WARNING LAMP
- Key off.
- Locate and disconnect the diagnostic connector from its mating half (Circuits 571 [BK/O] and 483 [R]).
- Reconnect diagnostic connector.
- Key on.
Does the yellow RABS warning lamp come ON?
| Yes | No |
|---|
| Hard fault. GO to N2. | Intermittent fault. GO to Pinpoint Test T and PROCEED with intermittent diagnosis for all affected circuits. REFER to mini-schematic for this test. |
N2 VERIFY INTEGRITY OF ANTI-LOCK ELECTRONIC CONTROL MODULE CONNECTION
- Key off.
- Disconnect battery ground cable.
- Remove the anti-lock electronic control module harness connector.
- Pull gently on Circuit 519 (LG/BK) just behind Pin 3 on the anti-lock electronic control module harness connector.
- Pull gently on Circuit 523 (R/PK) just behind Pin 10 on the anti-lock electronic control module harness connector.
Is terminal fully engaged?
| Yes | No |
|---|
| LEAVE anti-lock electronic control module connector disconnected. GO to N3. | Terminal moves back or comes free of connector. SERVICE terminal or connector as needed. GO to N6. |
N3 VERIFY INTEGRITY OF RABS SENSOR CONNECTION
- Remove RABS sensor harness connector.
- Inspect RABS sensor component connector for contamination or loose terminals.
- Gently pull on Circuit 519 (LG/BK) behind Pin B of harness connector.
- Gently pull on Circuit 523 (R/PK) behind Pin A of harness connector.
Are all connections clean and secure?
| Yes | No |
|---|
| LEAVE sensor connector disconnected. GO to N4. | SERVICE terminals or connector as needed, if component side is not serviceable, REPLACE RABS sensor. GO to N6. |
N4 CHECK FOR CONTINUITY ALONG HARNESS CIRCUITS 519 (LG/BK) and 523 (R/PK)
- Set multimeter on 200 ohm scale.
- Measure resistance between anti-lock electronic control module harness connector Pin 3 and RABS sensor harness connector Pin B.
- Measure resistance between anti-lock electronic control module harness connector Pin 10 and RABS sensor harness connector Pin A.
Are both resistances less than 10 ohms?
| Yes | No |
|---|
| Circuit is not open. GO to N5. | FIND and REPAIR open circuit along Circuit 519 (LG/BK) and 523 (R/PK). GO to N6. |
N5 CHECK FOR OPEN RABS SENSOR
- Verify multimeter is on 20k ohm scale.
- Measure resistance between RABS sensor component connector Pins A and B.
Is resistance less than 2500 ohms?
| Yes | No |
|---|
| REPLACE anti-lock electronic control module. GO to N6. | REPLACE RABS sensor. GO to N6. |
N6 CLEAR CODE/PULL CODE
- Key off.
- Reconnect battery ground cable.
- Verify all connectors are installed.
- Locate and disconnect the diagnostic connector from its mating half (Circuits 571 [BK/O] and 483 [R]).
- Key to run.
- Begin diagnostic trouble code flashout by connecting Circuit 571 (BK/O) to a chassis ground for at least 1 second.
Is original code obtained?
| Yes | No |
|---|
| If all steps are complete, GO to Pinpoint Test T. If all steps are not complete, RETURN to the last step completed and CONTINUE. | GO to pinpoint test for corresponding code. If Code 16 is obtained, GO to Pinpoint Test S. |
PINPOINT TEST P: YELLOW REAR ABS WARNING LIGHT FLASHES 10 TIMES WHEN RETRIEVING DIAGNOSTIC TROUBLE CODES (CODE 10)
Affected Circuit(s)/Electrical Component(s)
Description
Code 10 is generated when the anti-lock electronic control module detects low RABS sensor resistance. The code may also be generated by a short circuit in the Circuits 519 (LG/BK) or 523 (R/PK), or a failed internal anti-lock electronic control module circuit.
Possible Contributing Base Brake Component/Vehicle Wiring Concerns
- Short between anti-lock electronic control module harness connector Pin 3 and Pin 10
- Short between RABS sensor connector Pins A and B
- Bulkhead connector (between engine compartment and instrument panel (04320)) sensor terminals shorted together
- Intermittent short circuit in Circuits 519 (LG/BK) or 523 (R/PK)
P1 CHECK YELLOW RABS WARNING LAMP
- Key off.
- Locate and disconnect the diagnostic connector from its mating half (Circuits 571 [BK/O] and 483 [R]).
- Reconnect diagnostic connector.
- Key on.
Does the yellow RABS warning lamp come ON?
| Yes | No |
|---|
| Hard fault. GO to P2. | Intermittent fault. GO to Pinpoint Test T and PROCEED with intermittent diagnosis for all affected circuits. REFER to mini-schematic for this test. |
P2 VERIFY INTEGRITY OF ANTI-LOCK ELECTRONIC CONTROL MODULE CONNECTION
- Key off.
- Disconnect battery ground cable.
- Remove the anti-lock electronic control module harness connector.
- Pull gently on wire just behind Pin 3 on the harness connector.
- Pull gently on wire just behind Pin 10 on the harness connector.
Is terminal fully engaged?
| Yes | No |
|---|
| LEAVE anti-lock electronic control module connector disconnected. GO to P3. | SERVICE terminal or connector as needed. GO to P7. |
P3 VERIFY INTEGRITY OF RABS SENSOR CONNECTION
- Remove RABS sensor harness connector.
- Inspect RABS sensor component connector.
- Gently pull on wire behind Pins A and B of harness connector.
- Gently pull on wire behind Pins A and B of component connector.
Are all connections clean and secure?
| Yes | No |
|---|
| LEAVE RABS sensor connector disconnected. GO to P4. | SERVICE terminals or connector as needed, if component side is not serviceable, REPLACE RABS sensor. GO to P7. |
P4 CHECK FOR SHORT ALONG HARNESS CIRCUIT 519 (LG/BK) WITH CIRCUIT 523 (R/PK)
- Set multimeter on 20k ohm scale.
- Verify RABS sensor connector is disconnected.
- Measure resistance between anti-lock electronic control module harness connector Pin 3 and Pin 10.
Is resistance greater than 20k ohms?
| Yes | No |
|---|
| Circuits are not shorted. GO to P5. | FIND and REPAIR short along Circuits 519 (LG/BK) and 523 (R/PK). GO to P7. |
P5 CHECK FOR SHORT TO CHASSIS GROUND ALONG CIRCUIT 523 (R/PK)
- Verify multimeter is on 20k ohm scale.
- Measure resistance between anti-lock electronic control module harness connector Pin 10 and chassis ground.
Is resistance greater than 20k ohms?
| Yes | No |
|---|
| Circuit is not shorted. GO to P6. | FIND and REPAIR short circuit along Circuit 523 (R/PK). GO to P7. |
P6 CHECK FOR SHORTED RABS SENSOR
- Verify multimeter is on 20k ohm scale.
- Measure resistance between RABS sensor Pins A and B.
Is resistance 900-2500 ohms?
| Yes | No |
|---|
| REPLACE anti-lock electronic control module. GO to P7. | REPLACE RABS sensor. GO to P7. |
P7 CLEAR CODE/PULL CODE
- Key off.
- Reconnect battery ground cable.
- Verify all connectors are installed.
- Locate and disconnect the diagnostic connector from its mating half (Circuits 571 [BK/O] and 483 [R]).
- Key to run.
- Begin diagnostic trouble code flashout by connecting Circuit 571 (BK/O) to a chassis ground for at least 1 second.
Is original code obtained?
| Yes | No |
|---|
| If all steps are complete, GO to Pinpoint Test T. If all steps are not complete, RETURN to the last step completed and CONTINUE. | GO to pinpoint test for corresponding code. If DTC 16 is obtained, GO to Pinpoint Test S. |
PINPOINT TEST Q: YELLOW REAR ABS WARNING LIGHT FLASHES 11 TIMES WHEN RETRIEVING DIAGNOSTIC TROUBLE CODES (CODE 11)
Affected Circuit(s)/Electrical Component(s)

Description
Code 11 is caused by the stoplight switch (13480) always being closed prior to the vehicle moving. If the stoplight switch remains closed when the vehicle begins to move, the REAR ABS warning light will turn on at approximately 26 km/h (16 mph). Code 11 will not be latched in the control anti-lock electronic control module's memory until the speed of the vehicle exceeds 60 km/h (37 mph) for at least 10 seconds. If the vehicle does not exceed 60 km/h (37 mph) for at least 10 seconds, then the REAR ABS warning light will turn on but the anti-lock electronic control module will not latch a code. Code 11 can be caused by a driver resting his foot on the brake pedal with just enough pressure to close the stoplight switch, while driving at least 60 km/h (37 mph) for a minimum of ten seconds. When this occurs, a Code 11 will be latched by the anti-lock electronic control module.
Possible Contributing Base Brake Component/Vehicle Wiring Concerns
- Terminal backout in the anti-lock electronic control module harness connector at Pin 11
- Missing (burned-out) stoplamps. All stoplamps must be missing or burned out to cause a Code 11
- An intermittent/continuous open in Circuit 511 (LG). This open would be between anti-lock electronic control module connector Pin 11 and the stoplight switch
- Worn or damaged stoplight switch
Q1 CHECK YELLOW RABS WARNING LAMP
- Key off.
- Locate and disconnect the diagnostic connector from its mating half (Circuits 571 [BK/O] and 483 [R]).
- Reconnect diagnostic connector.
- Key to on.
Does the yellow RABS warning lamp come ON?
| Yes | No |
|---|
| Hard fault. GO to Q2. | Intermittent fault. GO to Pinpoint Test T and PROCEED with intermittent diagnosis for all affected circuits. REFER to mini-schematic for this test. |
Q2 CHECK VEHICLE STOPLAMP OPERATION
- Turn key to the off position.
- Apply pressure to the brake pedal and then release pressure while observing the stoplamps.
Do stoplamps function properly?
| Yes | No |
|---|
| GO to Q5. | Lamps do not illuminate. GO to Q3. Lamps always illuminated. REPAIR or REPLACE vehicle stoplight switch. GO to Q6. |
Q3 CHECK VEHICLE STOPLAMPS
Are the bulbs burned out?
| Yes | No |
|---|
| REPLACE stoplamp bulbs and GO to Q6. | GO to Q4. |
Q4 CHECK FOR BLOWN STOPLAMP FUSE
- Remove and visually inspect stoplamp fuse located in the fuse panel.
Is the fuse blown?
| Yes | No |
|---|
| REPLACE fuse and INVESTIGATE reason for blown fuse. GO to Q6. | CHECK Circuit 511 (LG) for open condition. If none found, then REPAIR or REPLACE vehicle stoplight switch. GO to Q6. |
Q5 CHECK FOR CONTINUITY BETWEEN ANTI-LOCK ELECTRONIC CONTROL MODULE CONNECTOR PIN 11 AND THE STOPLAMP SWITCH
- Set multimeter on 20 volt scale.
- Step on brake pedal.
- Measure voltage between anti-lock electronic control module harness connector Pin 11 and chassis ground.
Is the voltage greater than 9 volts?
| Yes | No |
|---|
| REPLACE anti-lock electronic control module. GO to Q6. | FIND and REPAIR high resistance or open wire. REINSTALL all connectors. GO to Q6. |
Q6 CLEAR CODE/PULL CODE
- Key off.
- Reconnect battery ground cable.
- Verify all connectors are installed.
- Locate and disconnect the diagnostic connector from its mating half (Circuits 571 [BK/O] and 483 [R]).
- Key to run.
- Begin diagnostic trouble code flashout by connecting Circuit 571 (BK/O) to a chassis ground for at least 1 second.
Is original code obtained?
| Yes | No |
|---|
| If all steps are complete, GO to Pinpoint Test T. If all steps are not complete, RETURN to the last step completed and CONTINUE. | GO to pinpoint test for corresponding code. If DTC 16 is obtained, GO to Pinpoint Test S. |
PINPOINT TEST R: YELLOW REAR ABS WARNING LIGHT FLASHES 12 TIMES WHEN RETRIEVING DIAGNOSIS TROUBLE CODES (CODE 12)
Affected Circuit(s)/Electrical Component(s)
Description
Code 12 is generated when the anti-lock electronic control module detects that the brake fluid level in the brake master cylinder reservoir is low for one or more seconds during an anti-lock stop. It can also be generated by a short in the stoplamp circuit.
Possible Contributing Base Brake Component/Vehicle Wiring Concerns
- Low brake master cylinder reservoir fill level
- Fluid leaks in vehicle brake system
- Worn or damaged fluid level switch, or fluid level switch circuit shorted to ground
- Brake master cylinder reservoir float that sticks in the bottom of brake master cylinder reservoir or does not float
- Damaged diode/resistor element in red brake warning lamp circuit
- Damaged ignition switch
- Ground short in Circuits 512 (T/LG) or 531 (DG/Y)
- Damaged anti-lock electronic control module
R1 CHECK WARNING LIGHTS
- Key off.
- Locate and disconnect the diagnostic connector from its mating half (Circuits 571 [BK/O] and 483 [R]).
- Reconnect diagnostic connector.
- Key on.
Do BOTH the red BRAKE and yellow RABS lamps come on?
| Yes | No |
|---|
| Hard fault. GO to R2. | If the brakes have been serviced recently, or if brake fluid has been added to the system recently, MOST likely, the Code 12 was falsely set at that time and the RABS is OK. If this is NOT the case, GO to Pinpoint Test T for intermittent diagnosis procedures for the affected circuits. REFER to the mini-schematic for this pinpoint test. |
R2 CHECK BRAKE FLUID LEVEL IN MASTER CYLINDER
- Key off.
- Check the brake fluid level in the brake master cylinder reservoir.
Is the fluid level within specification?
| Yes | No |
|---|
| GO to R3. | CHECK for leaks in the brake system. REPAIR as required. FILL brake master cylinder reservoir to the required level. GO to R9. |
R3 VERIFY FLOAT BUOYANCY
- Remove the brake master cylinder reservoir filler cap.
- Attempt to push down the float with a clean, blunt steel implement, then let it float back up.
Does the float go down then float back up?
| Yes | No |
|---|
| GO to R4. | REPLACE the brake master cylinder reservoir. BLEED the brake system. GO to R9. |
R4 CHECK CIRCUIT 531 (DG/Y) FOR GROUND SHORT
- Key off.
- Disconnect brake fluid level switch harness connector.
- Disengage parking brake.
- Check for ground short on Circuit 531 (DG/Y) at brake fluid level switch harness connector.
Is there a ground short?
| Yes | No |
|---|
| REPAIR ground short in Circuit 531 (DG/Y). RECONNECT all components. GO to R9. | GO to R5. |
R5 CHECK DIODE/RESISTOR ELEMENT
- Engage parking brake.
- Check for ground short on Circuit 531 (DG/Y) at brake fluid level switch harness connector.
Is there a ground short?
| Yes | No |
|---|
| REPLACE resistor/diode element. RECONNECT all components. GO to R9. | GO to R6. |
R6 CHECK CIRCUIT 512 FOR GROUND SHORT
- Key off.
- Disconnect battery negative cable.
- Disconnect fluid level switch.
- Disconnect ignition switch.
- Disconnect anti-lock electronic control module.
- Check for short to ground on Pin 2 of anti-lock electronic control module harness connector (Circuit 512 [T/LG]).
Is there a ground short?
| Yes | No |
|---|
| REPAIR ground short in Circuit 512 (T/LG). RECONNECT all components. GO to R9. | GO to R7. |
R7 CHECK IGNITION SWITCH
- Reconnect ignition switch.
- Check for short to ground on Pin 2 of anti-lock electronic control module harness connector (Circuit 512 [T/LG]).
Is there a ground short?
| Yes | No |
|---|
| REPLACE ignition switch. RECONNECT all components. GO to R9. | GO to R8. |
R8 CHECK BRAKE FLUID LEVEL SWITCH
- Reconnect brake fluid level switch.
- Check for short to ground on Pin 2 of anti-lock electronic control module harness connector (Circuit 512).
Is there a ground short?
| Yes | No |
|---|
| REPLACE brake master cylinder reservoir. RECONNECT all components. GO to R9. | REPLACE anti-lock electronic control module. GO to R9. |
R9 CLEAR CODE/PULL CODE
- Key off.
- Reconnect battery negative cable.
- Verify all connectors are installed.
- Locate and disconnect the diagnostic connector from its mating half (Circuits 571 [BK/O] and 483 [R]).
- Key to run.
- Begin diagnostic trouble code flashout by grounding Circuit 571 (BK/O) for 1 second.
Is original code obtained?
| Yes | No |
|---|
| If all steps are complete, GO to Pinpoint Test T. If all steps are not complete, RETURN to the last step completed and CONTINUE. | GO to pinpoint test for corresponding DTC. If DTC 16 is obtained, GO to Pinpoint Test S. |
PINPOINT TEST S: VERIFICATION DRIVE TEST
Purpose
This drive test will be used when either of the two conditions listed below exists.
- Required Repair Verification
- This drive procedure will be used after all vehicle repairs. Once a vehicle has been repaired, it is necessary to verify the repair by driving the vehicle. This is because the anti-lock electronic control module is unable to detect some system concerns until the vehicle is being driven a certain way. Therefore the drive verification test is a very important step.
- Symptom Evaluation Drive
- When a vehicle is brought to the dealer, the customer may only have a general concern about the way their vehicle is braking. In these situations there may not be a clear system concern to troubleshoot. In this type of situation, this drive test is designed to produce common system concern symptoms. Use this drive test to determine a symptom. Once a symptom is found, a symptom troubleshooting procedure can be followed to repair the vehicle.
Drive Description
This drive test is designed to be a generic drive test that is used for three purposes listed below.
- To verify a repair of the RABS II system on a vehicle.
- To attempt to recreate an intermittent concern.
- To attempt to detect a symptom when a diagnostic trouble code or a concern symptom is not known.
S1 KEEP-ALIVE MEMORY (KAM) FUSE CHECK
- Key to run. Observe REAR ABS warning light proveout.
- Turn on headlamps and press on the brake pedal.
- With the headlamps ON and while pushing on the brake pedal, monitor the yellow REAR ABS warning light in the dash for 10 seconds.
Does the REAR ABS warning light prove out normally?
| Yes | No |
|---|
| GO to S2. | The REAR ABS warning light flashes. REPLACE KAM fuse (SEE owner's manual for fuse location). REPEAT S1. |
S2 LOW SPEED REAR ABS STOP
NOTE: Wetting down the area where stop is to be performed will aid this test.
NOTE: An assistant to observe rear wheels would be helpful.
- Drive vehicle at approximately 16 km/h (10 mph).
- Press on brake pedal hard enough to lock all four wheels, and observe the left rear wheel in the driver's mirror.
- Repeat the second step, except observe right rear wheel in passenger mirror.
Do both rear wheels lock or does one wheel lock consistently? (Momentary lockup is permissible.)
| Yes | No |
|---|
| Also, REAR ABS warning light is not on. GO to Symptom Chart for one or both rear wheels lock up. | Other symptoms are detected. GO to S6. Also, REAR ABS warning light is not on. GO to S3. REAR ABS warning light comes on and stays on. GO to S7. |
S3 CHECK FOR UNWARRANTED RABS II ACTIVITY
Is there any pulsation in the brake pedal any time during the stop or within 10 seconds after the vehicle has stopped?
| Yes | No |
|---|
| Also, REAR ABS warning light is not on. GO to Symptom Chart for unwarranted RABS II Activity. | Other symptoms are detected. GO to S6. Also, REAR ABS warning light is not on. GO to S4. REAR ABS warning light comes on and stays on. GO to S7. |
S4 BRAKE STOPLAMP/SWITCH CHECK
- Key to run.
- Press on the brake pedal.
- Release brake pedal.
Do the stoplamps come on and then turn off properly?
S5 DETERMINE DRIVE TEST IS COMPLETE
Has customer concern been addressed and corrected by previous actions?
| Yes | No |
|---|
| STOP. Vehicle RABS II function has been verified. | REFER to Symptom Chart. |
S6 DETERMINE NEXT DIAGNOSTIC STEP BASED ON BRAKE SYMPTOM
- Hard or soft brake pedal.
- Lack of sufficient vehicle deceleration upon brake application
Are any of the above symptoms present?
S7 OBTAIN DIAGNOSTIC TROUBLE CODE
- Obtain diagnostic trouble code.
Is the diagnostic trouble code the same as before and has the entire pinpoint test for the code been completed?
| Yes | No |
|---|
| REPEAT steps once more. | Pinpoint test is not complete. RETURN to the last step completed in the pinpoint test. Code obtained is different. GO to the pinpoint test for the code obtained. No code is obtained. GO to Pinpoint Test E. |
PINPOINT TEST T: INTERMITTENT DIAGNOSIS
As previously mentioned, intermittent concerns are the most difficult to diagnose.
An understanding of code storage and automatic code erasure is important.
First, codes can only be stored if the anti-lock electronic control module has power. The anti-lock electronic control module gets primary power from the ignition feed into Pins 1 and 9. If this voltage is missing or less than 11V, the anti-lock electronic control module will not initialize and therefore, a code cannot be stored. However, any code already in memory will be retained as long as the Keep-Alive Memory power is available. Code 16 (system OK) is present whenever the anti-lock electronic control module sees the required voltage (assuming no other diagnostic trouble codes are present).
Therefore, some codes read out in the System Pre-Check may not result in any trouble found in the pinpoint test performed. More likely, this is an indication of an intermittent electrical concern.
At times, running completely through a pinpoint test will not lead to a concern resolution. Often, the concern is due to an intermittent connection, termination, or a damaged circuit. An attempt has been made to point out obvious sources for potential intermittents within the pinpoint tests. However, it should be noted that several circuits pass through one or more connections between components. These are also areas of potential concern and should be considered.
T1 CLEAR CODES, RECONNECT COMPONENTS
- Reinstall any components removed and reconnect all connections.
- Clear all codes.
- Key to run.
Does the REAR ABS warning light prove out?
| Yes | No |
|---|
| GO to T3. | Light stays on. GO to T2. |
T2 SERVICE CONNECTOR/TERMINAL FAULT
- Most likely problem is at one of the affected component connectors such that terminals unseat or back out upon installation. At each affected connection, look for:
- bent terminals.
- damaged connector terminal locks.
- damaged connector wedge.
NOTE: If one of the above conditions is found, check the length of the affected circuit once the connection is remade. If the wire is too tight (short), damage is likely to recur once vehicle is given back to the customer. Service the wire as necessary to correct tight wire conditions.
Are any of the above conditions noted?
| Yes | No |
|---|
| SERVICE connector and terminal as necessary. GO to T7. | GO to T6. |
T3 WIGGLE TEST
- Leave key on.
NOTE: Start at one component and wiggle connector by connector until the whole circuit has been tested.
- Wiggle an affected circuit in one location only.
- Observe REAR ABS warning light.
Is the REAR ABS warning light on?
| Yes | No |
|---|
| SERVICE the wire terminal or connector as identified in the wiggle test. GO to T5. | GO to T4. |
T4 VERIFY ALL CIRCUITS HAVE BEEN TESTED
Have all affected circuits for the code being serviced been tested?
| Yes | No |
|---|
| Key off. GO to T6. | GO to T3 and CHECK next circuit. |
T5 RETRIEVE CODE
Is this code different than the code being serviced?
| Yes | No |
|---|
| GO to the appropriate pinpoint test. | SERVICE the wire, terminal, or connector as necessary. GO to T7. |
T6 VERIFY ALL APPROPRIATE DIAGNOSTIC PROCEDURES HAVE BEEN RUN
NOTE: All steps of the pinpoint test for the code being serviced must be completed. (If some tests were performed, then go the pinpoint step last completed and continue.)
Has the System Pre-Check been run and a code been retrieved?
| Yes | No |
|---|
| All diagnostic procedures have been run. RETURN to the pinpoint test and PROCEED. | RETURN to procedure(s) not yet performed and PROCEED. |
T7 VERIFY CONDITION RESOLVED
- Clear all codes.
- Key off.
- Retrieve code.
Is Code 16 set?
| Yes | No |
|---|
| STOP. Concern has been corrected. | Code being serviced still exists. GO to T4. Different code is set. GO to appropriate pinpoint test. |
PINPOINT TEST U: REAR ABS AND SPEEDOMETER ARE NOT FUNCTIONING CORRECTLY
This procedure is intended to determine whether the cause for loss of or erratic Programmable Speedometer/Odometer Module (PSOM) function is due to the lack of a signal from the RABS Sensor.
There are two basic reasons that PSOM would not receive a signal from the RABS Sensor:
- The RABS sensor or the signal from the RABS sensor is faulty and either not being generated or is not reaching the anti-lock electronic control module and/or PSOM. In cases where the concern is not intermittent and not reaching the anti-lock electronic control module, the rear ABS warning light will be on upon vehicle start up and a diagnostic trouble code should be obtained upon RABS II diagnostic trouble code retrieval. Where the concern is intermittent and the rear ABS warning light does NOT come on during vehicle start up, a diagnostic trouble code may still be stored in the anti-lock electronic control module (see the Symptom Chart).
- The wiring or interconnections in the vehicle harness between the anti-lock electronic control module and the PSOM is faulty. This may lead to erratic PSOM function and is difficult to diagnose.
- This procedure will only determine whether the RABS sensor is functioning based upon whether a signal is received at the PSOM. If it is determined that the RABS sensor is sending out a proper signal, refer to Section 13-01.
U1 DETERMINE STATE OF ABS WARNING LIGHT
- Observe rear ABS warning light.
- Turn key to START.
- Allow key to return to the RUN position.
Does the rear ABS warning light turn on?
| Yes | No |
|---|
| GO to U2. | GO to Pinpoint Test C. RETURN when rear ABS warning light fault is repaired. |
U2 OBTAIN REAR ABS CODE
- Obtain rear ABS code (refer System Pre-Check).
NOTE: Any other code obtained represents a rear ABS system concern and does NOT have an effect on the ability of the RABS sensor to send the speed signal to PSOM. Resolve the rear ABS system concern indicated by the diagnostic trouble code first. When the rear ABS system concern is corrected, repeat this step to continue PSOM concern diagnosis.
Are any of the following codes obtained: 6, 9, or 10?
| Yes | No |
|---|
| GO to the pinpoint test for the code obtained. | DTC 16 is obtained. GO to U3. A code other than 6, 9, 10, 16 is obtained. GO to appropriate pinpoint test. No code is obtained. GO to Pinpoint Test E. |
U3 VERIFY RABS SENSOR SPEED SIGNAL AT ANTI-LOCK ELECTRONIC CONTROL MODULE
- Key off.
- Remove the harness connector from the anti-lock electronic control module.
- Raise the vehicle so that all the wheels are clear of the ground. If the vehicle is a 4x4, verify the transfer case is in the 4x2 mode.
- Connect Rotunda 88 Digital Multimeter 105-00053 or equivalent between harness connector Pin 10 (Circuit 523-R/PK) and Pin 3 (Circuit 519 — LG/BK).
- Set the meter to the frequency counter (Hz) setting.
- Gradually spin the rear wheels.
Does the frequency increase as the rear wheel speed increases?
| Yes | No |
|---|
| Anti-lock electronic control module is receiving a proper signal. REFER to Section 13-01. | GO to Pinpoint Test K, step K11. |