Loosen wheel bearing retainer (nut) using Hub Nut Wrench T95T-1197-B. While rotating rotor and hub, retighten wheel bearing retainer (nut) to 68 Nm (50 lb-ft) to seat wheel bearings.

Section 05-03C: Wheel Hubs and Bearings, Front Wheels, 4-Wheel Drive | 1997 F-250 Heavy Duty and F-350 Workshop Manual |
Automatic Locking Hubs
| Description | Tool Number |
|---|---|
| Hub Nut Wrench | T95T-1197-B |
Raise the vehicle and install safety stands.
Remove the hublock assembly. Refer to Locking Hubs, Automatic in the Removal and Installation portion of this section.
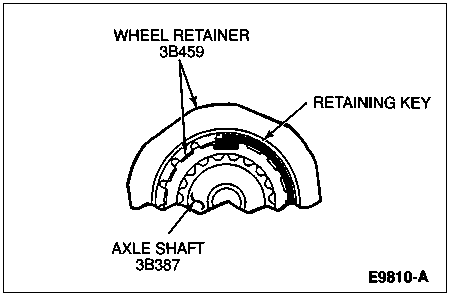
Remove retaining lock ring or C-ring and three-piece thrust washers. Remove cam assembly and wheel nut retaining key (if not already removed).
Loosen wheel bearing retainer (nut) using Hub Nut Wrench T95T-1197-B. While rotating rotor and hub, retighten wheel bearing retainer (nut) to 68 Nm (50 lb-ft) to seat wheel bearings.
Back off nut 90 degrees (1/4 turn). Tighten wheel retainer nut to 1.8 Nm (16 lb-in). If necessary, tighten nut to next slot to allow installation of retainer key.
Install retaining key into the spindle keyway by inserting the short leg into the aligned slot in nut. Press all the way into position until curved portion of retaining key is seated into counterbore of wheel retainer (nut).
Install cam assembly.
![]() CAUTION: Improper sequence of three-piece thrust washers will result in excessive wear of assembly.
CAUTION: Improper sequence of three-piece thrust washers will result in excessive wear of assembly.
Install three washers in order: metal washer first, plastic washer second and splined washer last.
Install C-ring or lock ring. Align legs of cam assembly for installation of hub body.
Check that the final end play of the front disc brake hub and rotor on the front wheel spindle is 0.00-0.50 mm (0.000-0.002 inch).
![]() CAUTION: Excessive end play or torque greater than 2.3 Nm (20 lb-in) to rotate hub and rotor will result in excessive wear of wheel bearings.
CAUTION: Excessive end play or torque greater than 2.3 Nm (20 lb-in) to rotate hub and rotor will result in excessive wear of wheel bearings.
Torque required to rotate the front disc brake hub and rotor is not to exceed 2.3 Nm (20 lb-in).
Install hublock. Tighten screws to 4-6 Nm (35-53 lb-in).
Remove safety stands. Lower vehicle.
Manual Locking Hubs
Raise the vehicle and install safety stands. Remove caliper and brake pads. Refer to Section 06-03 in the Body, Chassis Manual.
Remove the hublock assembly.
Remove C-ring and three-piece thrust washers (if not already removed).
Remove the outer lock nut with Spanner Locknut Wrench D85T-1197-A or equivalent. Remove the lockwasher and loosen inner lock nut.
Using spanner lock nut wrench while rotating the front disc brake hub and rotor (1102) back and forth, tighten the inner lock nut to 68 Nm (50 lb-ft) to seat the bearing.
Back off the lock nut 90 degrees.
NOTE: Hole pattern of lockwasher is offset with keyway to provide half-position settings by flipping washer over to obtain closest hole.
Install the lockwasher so the key is positioned in the groove of the front wheel spindle (3105). Tighten the inner lock nut, aligning the pin into the nearest lockwasher hole.
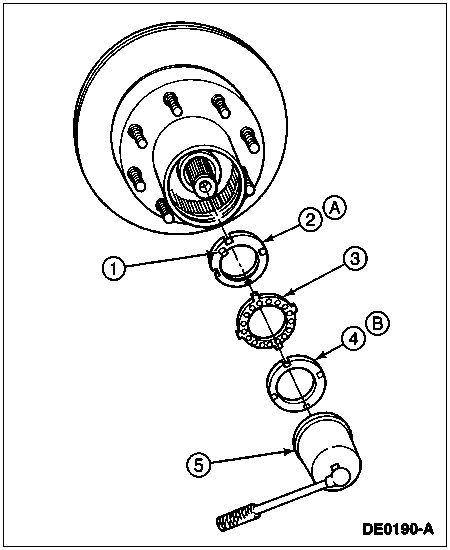
| Item | Part Number | Description |
|---|---|---|
| 1 | — | Pin (Part of 1195) |
| 2 | 1195 | Inner Lock Nut |
| 3 | 1198 | Lockwasher |
| 4 | 1197 | Outer Lock Nut |
| 5 | D85T-1197-A (Models 50 and 60) | Spanner Locknut Wrench |
| A | — | Tighten to 68 Nm (50 Lb-Ft). Back Off 90 Degrees. |
| B | — | Tighten to 217-278 Nm (160-205 Lb-Ft). |
Install the outer lock nut and tighten to 217-278 Nm (160-205 lb-ft) using Spanner Locknut Wrench D85T-1197-A or equivalent.
Check the final end play of the front wheel spindle. It should be 0.00-0.05 mm (0.000-0.002 inch).
Torque required to rotate the front disc brake hub and rotor is not to exceed 2.3 Nm (20 lb-in).
![]() CAUTION: Improper sequence of three-piece thrust washers will result in excessive wear of assembly.
CAUTION: Improper sequence of three-piece thrust washers will result in excessive wear of assembly.
Install three washers in order: metal washer first, plastic washer second and splined metal washer third. Install C-ring.
Install the hublocks.
Install calipers and pads. Refer to Section 06-03.
Remove the safety stands. Lower the vehicle.