Section 07-01A: Transmission, Automatic, E4OD | 1996 All F-Series and Bronco with E4OD Automatic Transmission Workshop Manual |
The following items must be checked before proceeding:
Know and Understand the Concern
In order to diagnose a concern properly, you must first understand the customer complaint or condition. Customer contact may be required in order for the technician to begin to verify the concern. You must understand the conditions as to when the concern occurs. For example:
After understanding when and how the concern occurs, then proceed to verifying the concern.
Verification of Condition
This section provides information that must be used in both determining the actual cause of customer concerns and performing the appropriate service procedures.
NOTE: Some transmission conditions may cause engine concerns. An EPC short circuit may cause alternate firing. The torque converter clutch not disengaging will stall the engine.
The following procedures must be used when verifying customer concerns for transmission:
Required Equipment
Determine Customer Concern
NOTE: Some E4OD transmission conditions may cause engine concerns. An electronic pressure control short circuit may cause alternate firing. The torque converter clutch not disengaging will stall the engine.
Determine customer concerns relative to vehicle usage and dependent driving conditions, paying attention to the following items:
NOTE: If noise/vibration, check for dependencies, either rpm dependent, vehicle speed dependent, shift dependent, gear dependent, range dependent, or temperature dependent.
Check Fluid Level and Condition
Fluid Level Check
![]() CAUTION: Vehicles equipped with 4x4 applications must have the 4x4 gearshift selector lever in any position other than neutral.
CAUTION: Vehicles equipped with 4x4 applications must have the 4x4 gearshift selector lever in any position other than neutral.
NOTE: If the vehicle has been operating for an extended period at high speeds or in city traffic during hot weather, or pulling a trailer, the vehicle should be turned off for about 30 minutes to allow the fluid to cool before checking.
Under normal circumstances, you do not need to check the fluid level of the transmission, since the vehicle does not use up transmission fluid. However, if the transmission is not working properly, for instance, the transmission may slip or shift slowly, or if you notice some sign of fluid leakage, the fluid level should be checked.
It is preferable to check the transmission fluid level at normal operating temperature after approximately 32 km (20 miles) of driving. However, if necessary, you can check the fluid level without having to drive 32 km (20 miles) to obtain a normal operating temperature if outside temperature is above 10°C (50°F).
With the vehicle on a level surface, start the engine and move the transmission gearshift selector lever through all of the gear ranges allowing sufficient time for each position to engage. Securely engage the transmission gearshift selector lever in the park position, fully set the parking brake control (2780) and leave the engine running.
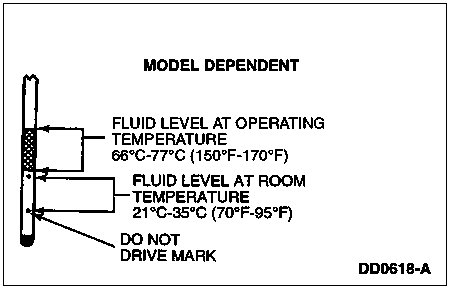
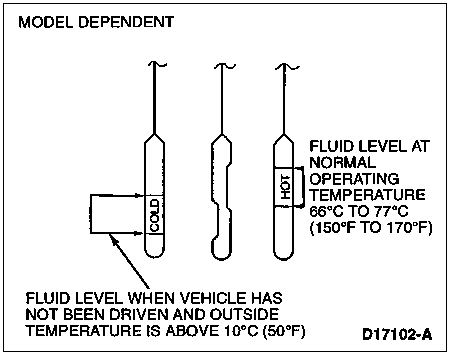
Wipe off the fluid level indicator cap, pull thefluid level indicator (7A020) out and wipe the indicator end clean. Put the fluid level indicator back into the fluid filler tube and make sure it is fully seated. Pull the fluid level indicator out and read the fluid level.
![]() CAUTION: The vehicle should not be driven if the fluid level is below the bottom hole on the fluid level indicator and outside temperature is above 10°C (50°F).
CAUTION: The vehicle should not be driven if the fluid level is below the bottom hole on the fluid level indicator and outside temperature is above 10°C (50°F).
When checking fluid at normal operating temperature, the fluid level should be within the crosshatched area or HOT marked area on the fluid level indicator. When the vehicle has not been driven, and outside temperature is above 10°C (50°F), the fluid level should be between the holes or COLD marked area on the fluid level indicator.


High or Low Fluid Level
A fluid level that is too high may cause the fluid to become aerated due to the churning action of the rotating parts of the transmission. Aerated fluid will cause erratic control pressure, that may result in harsh/soft shifts or engagements, damage to the clutch materials, improper torque converter operation, and the aerated fluid may be forced from the vent (7034). If fluid level is high, excess fluid MUST be removed. Refer to Fluid Change — Drain/Refill under Verification of Condition in the Diagnosis and Testing portion of this section.
A fluid level that is too low will affect transmission operation, such as: slipping, slow engagements, damage to internal hardware. Low level may indicate fluid leaks that may cause transmission damage. If fluid level is low, refer to the following procedure.


Adding Fluid
Only Motorcraft MERCON® Multi-Purpose Automatic Transmission Fluid XT-2-QDX or MERCON® equivalent should be used in all Ford automatic transmissions. Before adding any fluid, be sure that the correct type will be used.
Add fluid in 0.24L (0.5 pint) increments through the fluid filler tube to bring the level to the correct area on the fluid level indicator. If an overfill occurs, excess fluid must be removed.
Fluid Change — Drain/Refill
Normal maintenance and lubrication requirements do not necessitate periodic automatic transmission fluid changes. If a major service, such as a clutch, band, bearing, etc., is required in the transmission, it will have to be removed for service. At this time, the converter, transmission cooler and cooler lines must be thoroughly flushed to remove any contamination.
![]() CAUTION: Use only MERCON® service fluid as the use of any other fluids may result in a transmission malfunction or failure.
CAUTION: Use only MERCON® service fluid as the use of any other fluids may result in a transmission malfunction or failure.
There is no scheduled automatic transmission fluid change requirement for E4OD transmissions, except for conditions listed below. Transmission fluid level should be checked when performing other maintenance service and adjusted to specified levels.
The automatic transmission fluid, filter and seal assembly should be changed every 33795 km (21,000 miles) under any of the following conditions:
Loosen, then remove the transmission fluid pan attaching bolts to drain fluid.
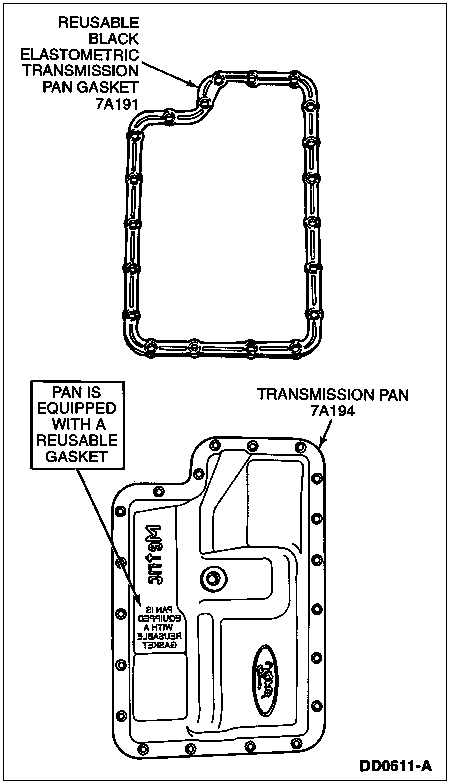
![]() CAUTION: Cork gaskets and elastomeric gaskets are not interchangeable. If you remove a cork gasket, replace it with a cork gasket. If you remove an elastomeric gasket, clean, inspect and reuse unless gasket is damaged. Be careful not to cut or bend elastomeric gasket.
CAUTION: Cork gaskets and elastomeric gaskets are not interchangeable. If you remove a cork gasket, replace it with a cork gasket. If you remove an elastomeric gasket, clean, inspect and reuse unless gasket is damaged. Be careful not to cut or bend elastomeric gasket.
Remove transmission pan gasket. If transmission is equipped with a cork gasket, discard it. If transmission is equipped with the new elastomeric reusable gasket, clean, inspect and reuse unless damaged.
Old Style Transmission Pan and Cork Transmission Pan Gasket

New Style Transmission Pan and Elastomeric Pan Gasket

Perform required internal repair and cleaning.
Drain the torque converter by removing drain plug.
Thoroughly flush torque converter (7902), cooler lines and transmission in-tank radiator cooler and auxiliary cooler (if equipped).
After torque converter has been drained, install new torque converter drain plug and tighten to 24-27 Nm (18-20 lb-ft).
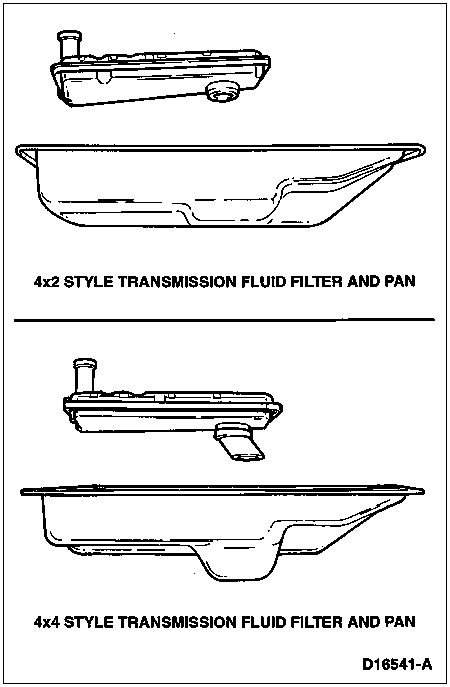
![]() CAUTION: Mixing 4x4 and 4x2 transmission fluid filters and transmission pan assembly components could cause transmission damage.
CAUTION: Mixing 4x4 and 4x2 transmission fluid filters and transmission pan assembly components could cause transmission damage.
Select the appropriate style filter assembly and transmission pan for either 4x2 or 4x4 models.

Replace fluid filter and seal assembly.
![]() CAUTION: Cork gaskets and elastomeric gaskets are not interchangeable. If you remove a cork gasket, replace it with a cork gasket. If you remove an elastomeric gasket, clean, inspect and reuse unless gasket is damaged. Be careful not to cut or bend elastomeric gasket.
CAUTION: Cork gaskets and elastomeric gaskets are not interchangeable. If you remove a cork gasket, replace it with a cork gasket. If you remove an elastomeric gasket, clean, inspect and reuse unless gasket is damaged. Be careful not to cut or bend elastomeric gasket.
NOTE: A unique transmission pan and pan retaining bolts are required to use the new elastomeric gasket for past model service. The cork style gasket will be retained for past model service where a new transmission pan is not required. If the transmission pan is damaged and requires replacement, a kit will be available. This kit will contain a transmission pan, elastomeric gasket and 20 pan bolts having an increased thread length to accommodate current and past model usage.
If transmission is equipped with a cork gasket, discard it and install a new gasket. If transmission is equipped with the new elastomeric reusable gasket, clean, inspect and reuse unless damaged.
Old Style Transmission Pan and Cork Transmission Pan Gasket

New Style Transmission Pan and Elastomeric Pan Gasket

![]() CAUTION: Use only MERCON® service fluid as the use of any other fluids may result in a transmission malfunction or failure.
CAUTION: Use only MERCON® service fluid as the use of any other fluids may result in a transmission malfunction or failure.
Add 6.2 liters (6.5 quarts) of MERCON® service fluid to the transmission through the fluid filler tube.
Start engine. Move the transmission range selector lever through all gear ranges, checking for engagements.
Check and adjust the transmission fluid level in 0.24 liter (0.5 pint) increments to the proper level (crosshatched area of the fluid level indicator at normal operating temperatures).
Fluid Condition Check
Make the normal fluid level check. Refer to Fluid Level Check under Verification of Condition in the Diagnosis and Testing portion of this section.
Observe color and odor of the fluid. It should be red, not brown or black. Odor may indicate overheating condition, clutch disc or band failure.
Use an absorbent white facial tissue and wipe the fluid level indicator. Examine the stain for evidence of solid particles and for engine coolant signs (gum or varnish on fluid level indicator).
Road Testing Vehicle
The following Shift Point Road Test and Torque Converter Operation Test provide diagnostic information on transmission shift controls and torque converter operation.
Shift Point Road Test
This test verifies that the shift control system is operating properly.
Bring engine and transmission up to normal operating temperature.
Operate the vehicle with the gearshift selector lever in (D) range.
Apply minimum throttle and observe the speeds at which the upshift occurs and the torque converter engages. (Refer to Automatic Transmission Special Specification Bulletin FPS-12180-96 for actual speed.)
| Throttle Opening | Range | Shift | Vehicle Speed (1) |
|---|---|---|---|
| Light Throttle | (D), D (D), D (D) (D) (D), D (D), D | 1-2 2-3 3-4 4-3 3-2 2-1 | 8-15 16-24 32-49 28-45 12-20 5-15 |
| Wide-Open Throttle | (D), D (D), D (D) (D) (D), D (D), D | 1-2 2-3 3-4 4-3 3-2 2-1 | 20-43 37-74 54-110 51-103 31-71 17-38 |
*(1) Nominal shift speed at sea level is shown. Actual shift speed will depend on tire brand, size and axle ratio. Refer to Automatic Transmission Special Specification Bulletin FPS-12180-96 for actual speeds.
D is the same as (D) with the transmission control switch actuated (light on).
With the vehicle in OVERDRIVE (fourth gear), depress the transmission control switch. The transmission should downshift to third gear. Remove foot from accelerator pedal; engine braking should occur.
Press accelerator pedal to floor (wide-open throttle). Transmission should shift from 3rd to 2nd gear, or 3rd to 1st depending on vehicle speed. Torque converter clutch should disengage and then reapply.
With vehicle (D) range above 80 km/h (50 mph) and less than half throttle, move the transmission gearshift selector lever from (D) range to manual 2 range and remove foot from accelerator pedal. The transmission should immediately downshift into second gear. With the vehicle remaining in manual 2 range, move transmission gearshift selector lever into manual 1 range, and release accelerator pedal. Transmission should downshift into 1st gear at speeds BELOW 48-56 km/h (30-35 mph).
If transmission fails to upshift/downshift or torque converter clutch does not apply and release, refer to Diagnosis by Symptom Index under Diagnosis by Symptom in the Diagnosis and Testing portion of this section for concern diagnosis.
Torque Converter Operation Test
This test verifies the torque converter clutch control system and the torque converter are operating properly.
Perform Quick Test as stated in the Powertrain Control/Emissions Diagnosis Manual OBDI or OBDII. Check for a code 628, 629, 652, P0741, P0743, P1742, P1744, P1743. Refer to Pinpoint Tests in the Diagnosis and Testing portion of this section for diagnosis.
Connect a tachometer to the engine.
Bring engine to normal operating temperature by driving the vehicle at highway speeds for approximately 15 minutes in (D) range.
After normal operating temperatures are reached, maintain a constant vehicle speed of about 80 km/h (50 mph), and tap the brake pedal (2455) with the left foot.
Engine rpm should increase when the brake pedal is tapped, and decrease about five seconds after the brake pedal is released. If this does not occur, refer to Torque Converter Operation Concerns in the Diagnosis by Symptom Index under Diagnosis by Symptom in the Diagnosis and Testing portion of this section.
If the vehicle stalls in (D) at idle with the vehicle at a stop, move the gearshift selector lever to the manual 1 position. If the vehicle stalls, the cause may be the converter control valve in the pump. Service as required. If the vehicle doesn't stall in manual 1, refer to the Electrical Diagnosis in the Powertrain Control/Emissions Diagnosis Manual OBDI or OBDII for powertrain control module (PCM) (12A650) and Vehicle Harness Diagnosis.
Visual Inspection
This inspection will identify modifications or additions to the vehicle operating system that may affect diagnosis.
Inspect vehicle for non-Ford approved add-on devices such as:
Check TSBs and OASIS
Refer to all Technical Service Bulletins and OASIS messages that pertain to the transmission concern and follow the procedure outlined.
Perform On-Board Diagnostics
After a road test, with the vehicle warm and before disturbing any connectors, perform the Quick Test using Rotunda New Generation Star (NGS) Tester 007-00500 or equivalent.
Refer to Diagnostics in the Diagnosis and Testing portion of this section.